
Web Customer Support
Find answers to common questions and get help with your web experience.
1. Purpose
- To define the process for creating a new customer account in the TwinBP system.
2. Scope
- This procedure applies to all customers registering through the mobile or web application.
3. Procedure
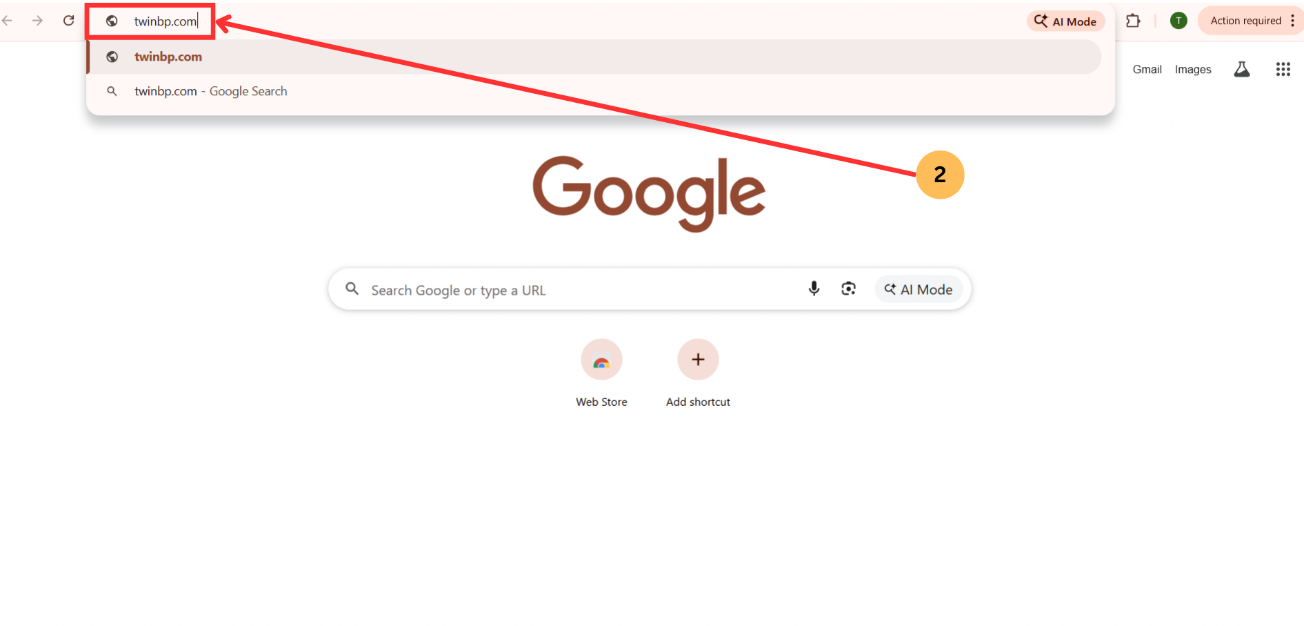
3.1 Access Website
- Open a web browser.
- Enter TwinBP.com in the address bar.
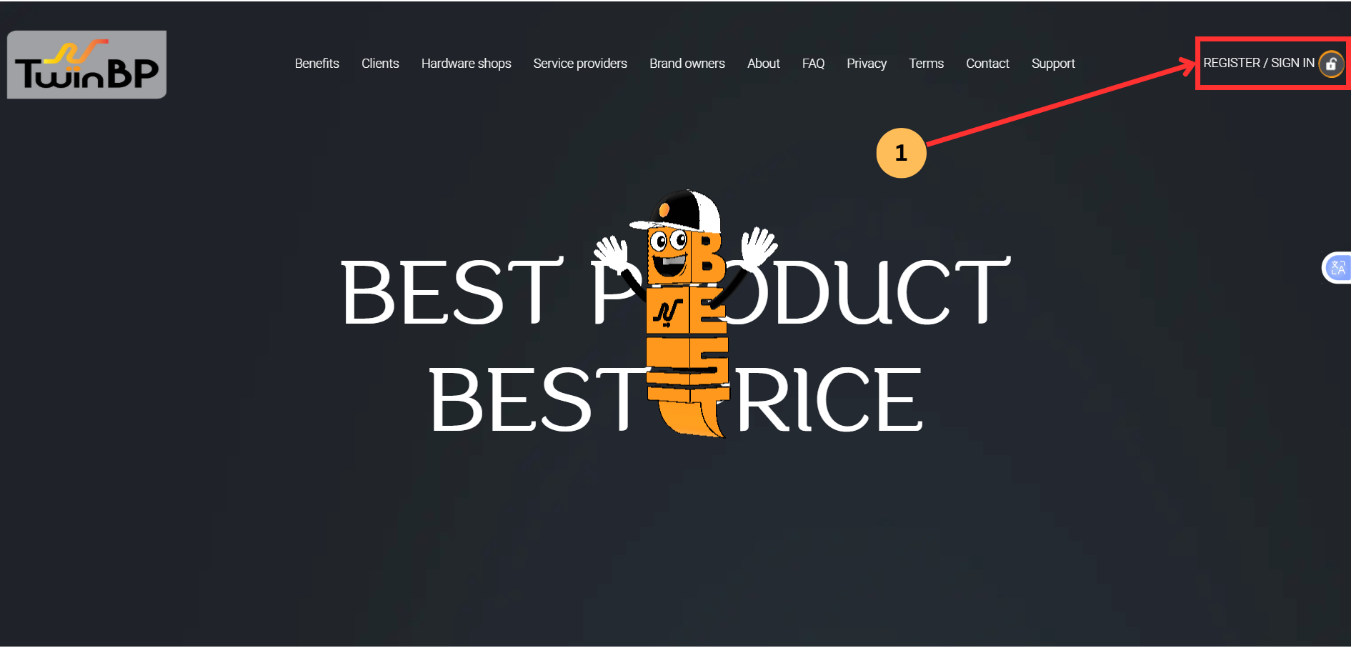
3.2 Access Website
- Click Register / Sign In at the top-right corner.
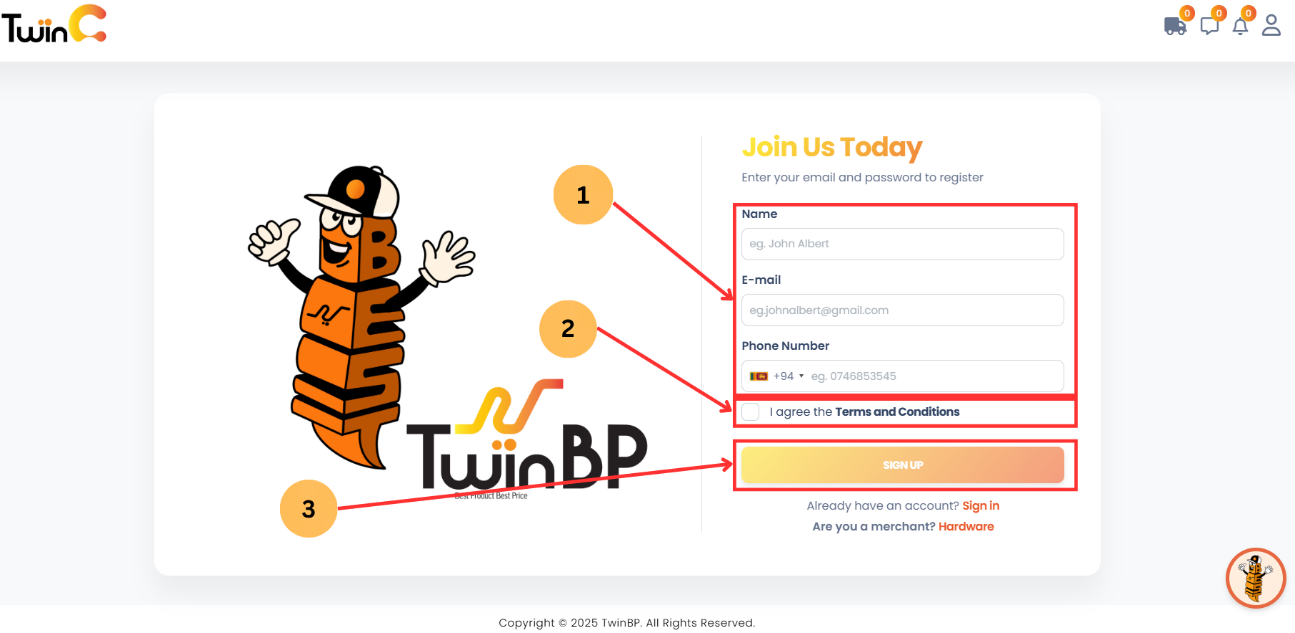
3.3 Enter User Details
-
Enter the following details:
- Name
- Email address
- Mobile number
- Select the checkbox to accept the Terms and Conditions.
- Tap Sign Up.
3.4 Verify Account
- Enter the OTP sent to the registered mobile number.
- Tap Verify.

3.5 Completion
- Upon successful verification, the home screen will be displayed.
1. Purpose
- To define the process for accessing an existing customer account in the TwinBP system.
2. Scope
- This procedure applies to all registered customers using the mobile or web application.
3. Procedure
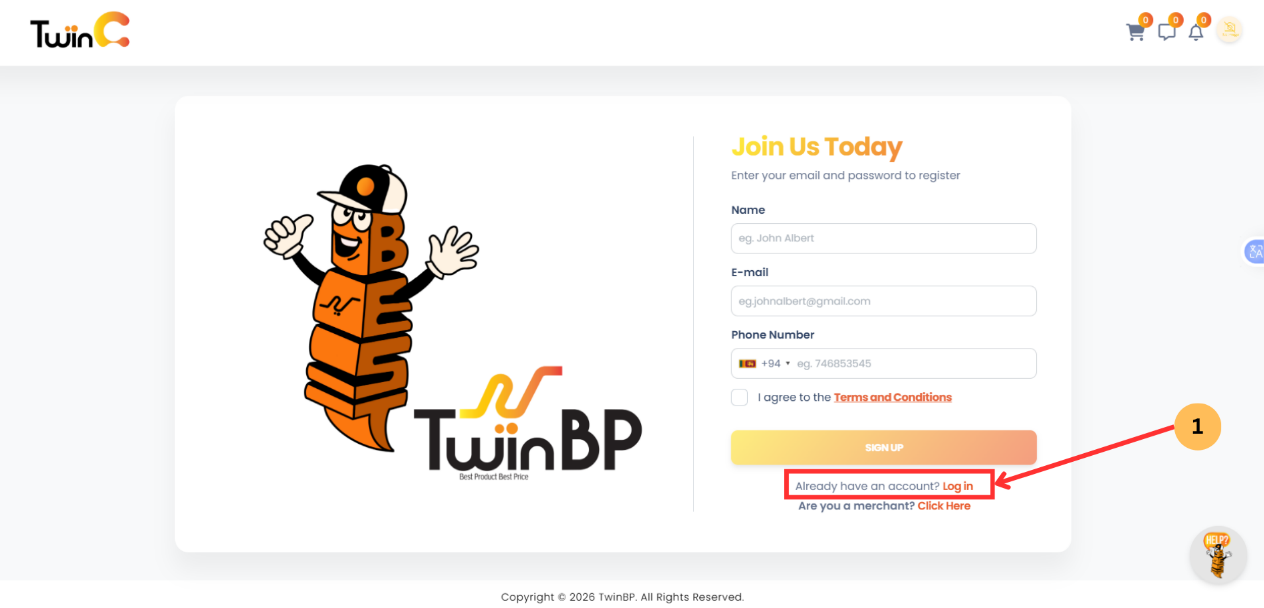
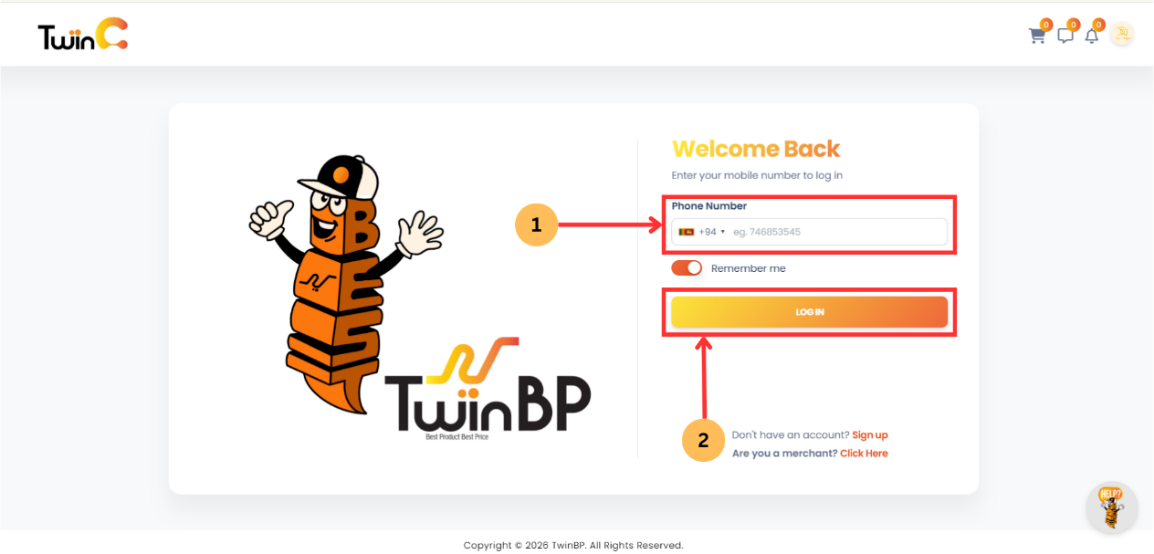
3.1 Access Login Screen
- Click Log In.
3.2 Enter Login Details
- Enter the registered mobile number (9 digits, excluding the leading "0").
- Click Log In.
- Select Remember Me. (Optional)
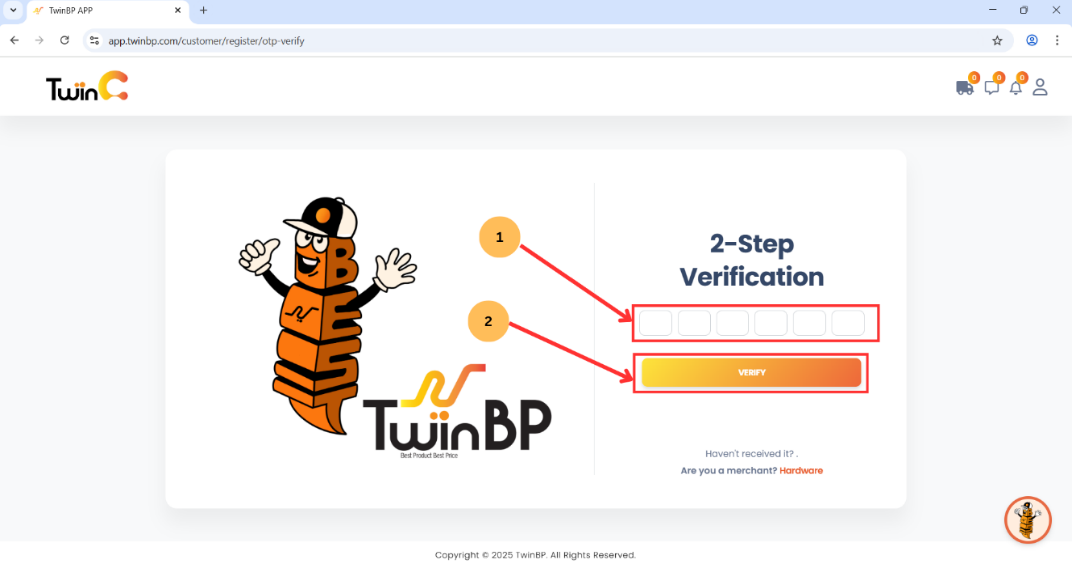
3.3 Verify Account
- Enter the OTP sent to the registered mobile number.
- Click Verify.
3.4 Completion
- Upon successful verification, the user will be redirected to the home screen.
1. Purpose
- To define the process for resending and verifying the OTP when it is not received during the sign-up or log-in process in the TwinBP system..
2. Scope
- This procedure applies to all customers who do not receive the OTP during the sign-up or log-in process on the TwinBP mobile or web applications.
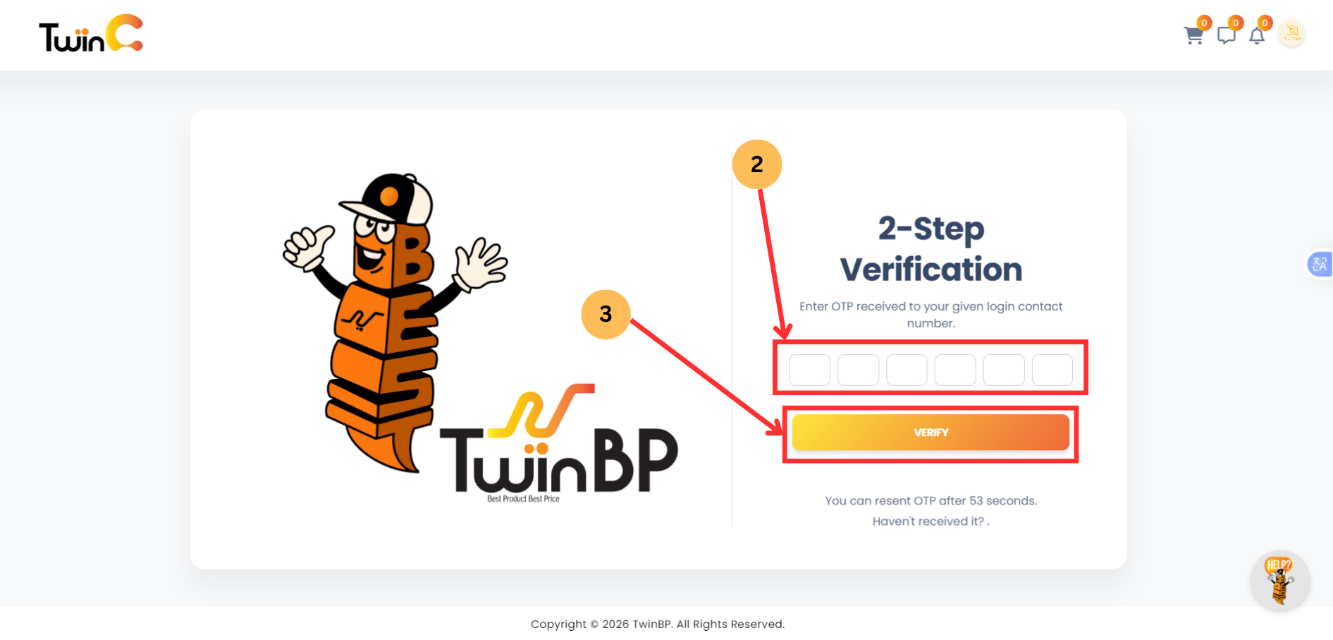
3. Procedure
- If the OTP is not received, tap Yes to resend.
- Enter the new OTP.
- Tap Verify.
- The home screen will be displayed.

1. Purpose
- To define the process for completing and updating a customer profile in the TwinBP system.
2. Scope
- This procedure applies to all registered customers using the TwinBP mobile and web applications to complete their profile information.
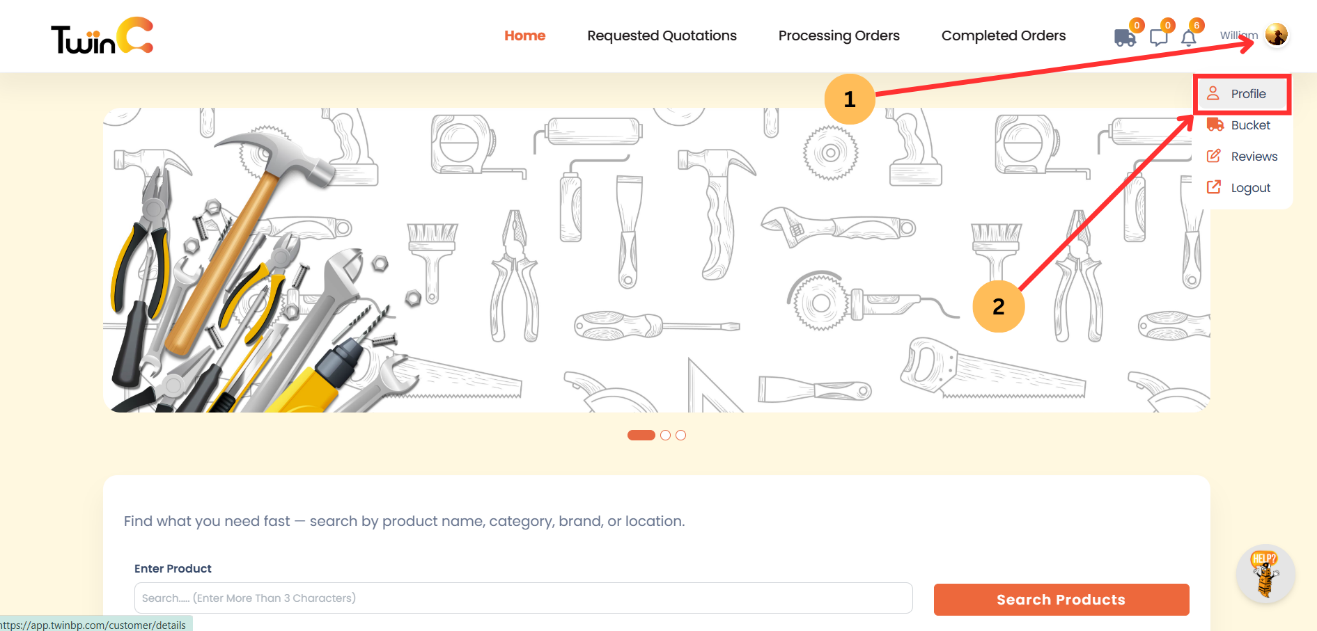
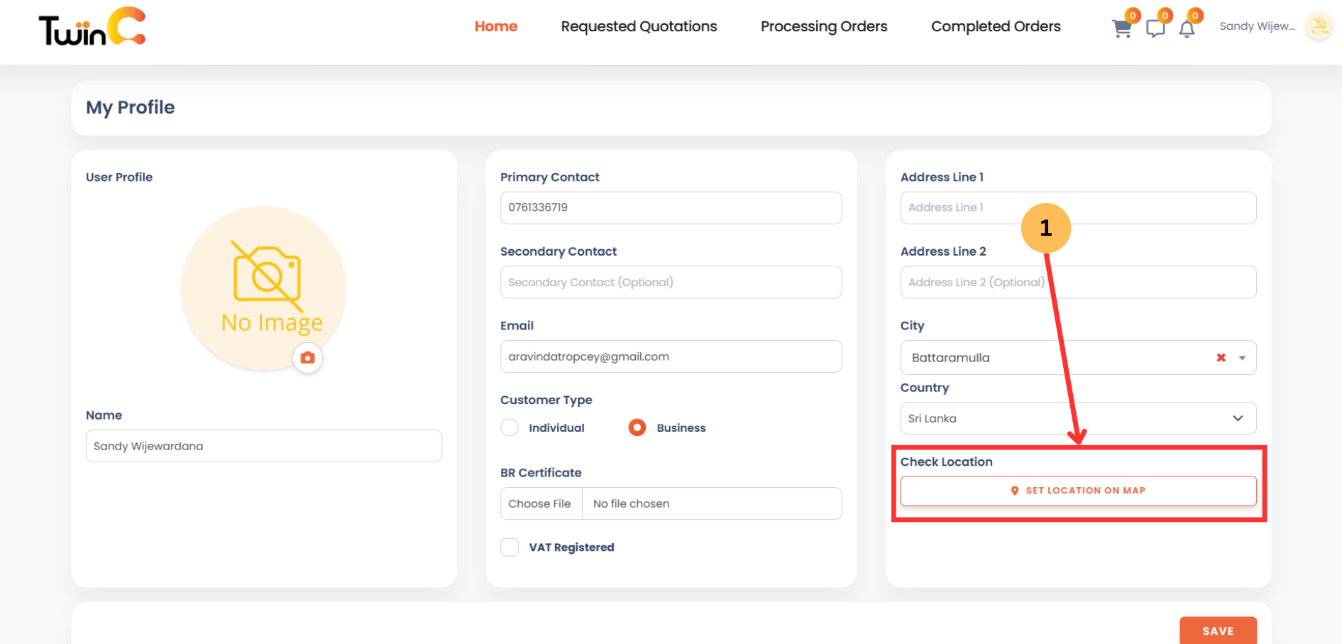
3. Procedure
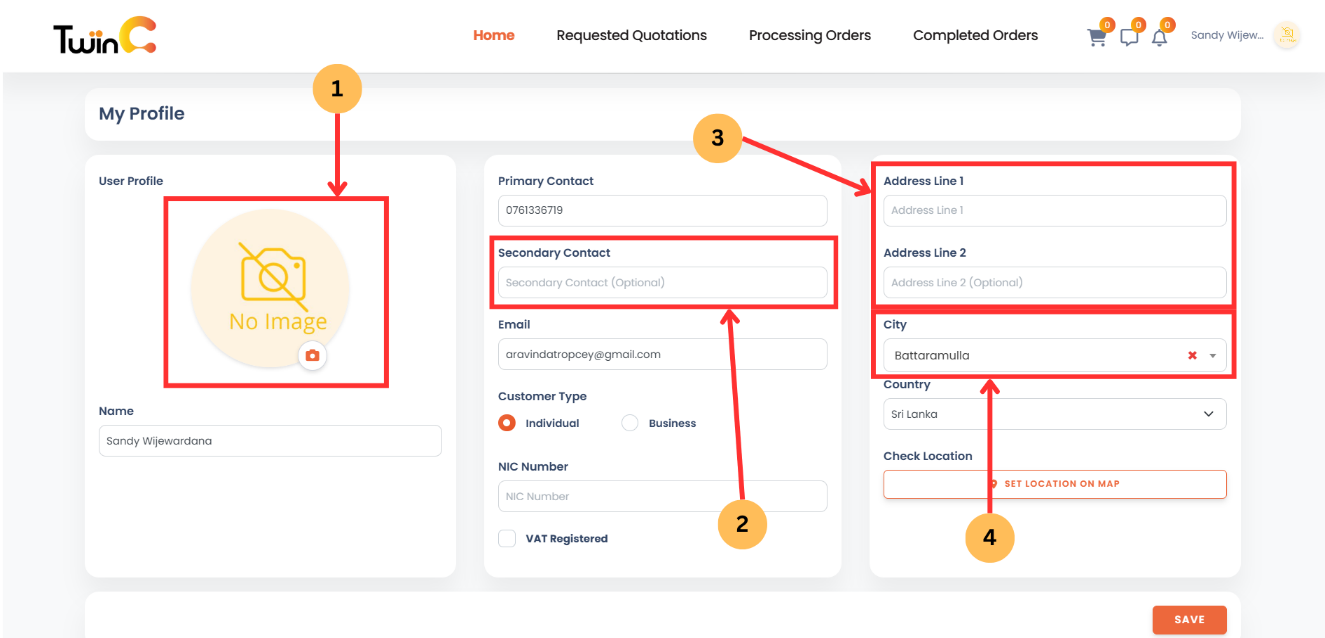
3.1 Access Profile
- Click the Profile Picture in the top-right corner.
- Click My Profile.
3.2 Access Profile
- Upload Profile Picture.
- Enter Secondary Contact (optional).
- Enter Address.
- Select City from the dropdown.
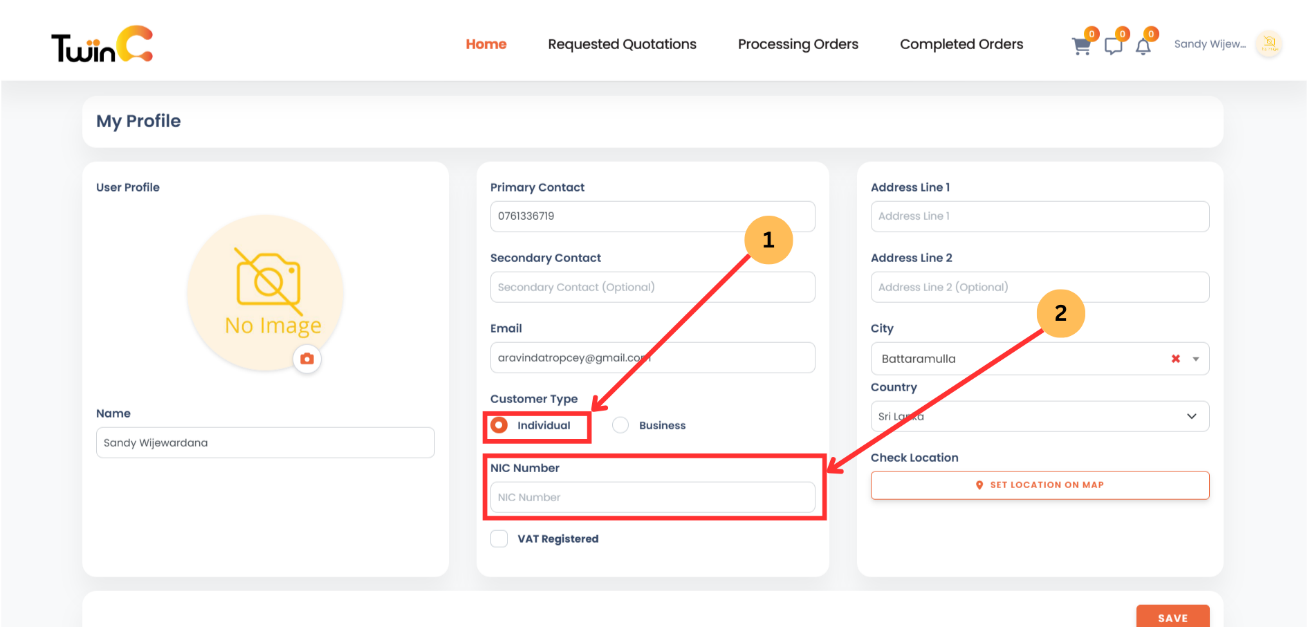
3.3 Select Customer Type
- Select Individual.
- Enter NIC Number.
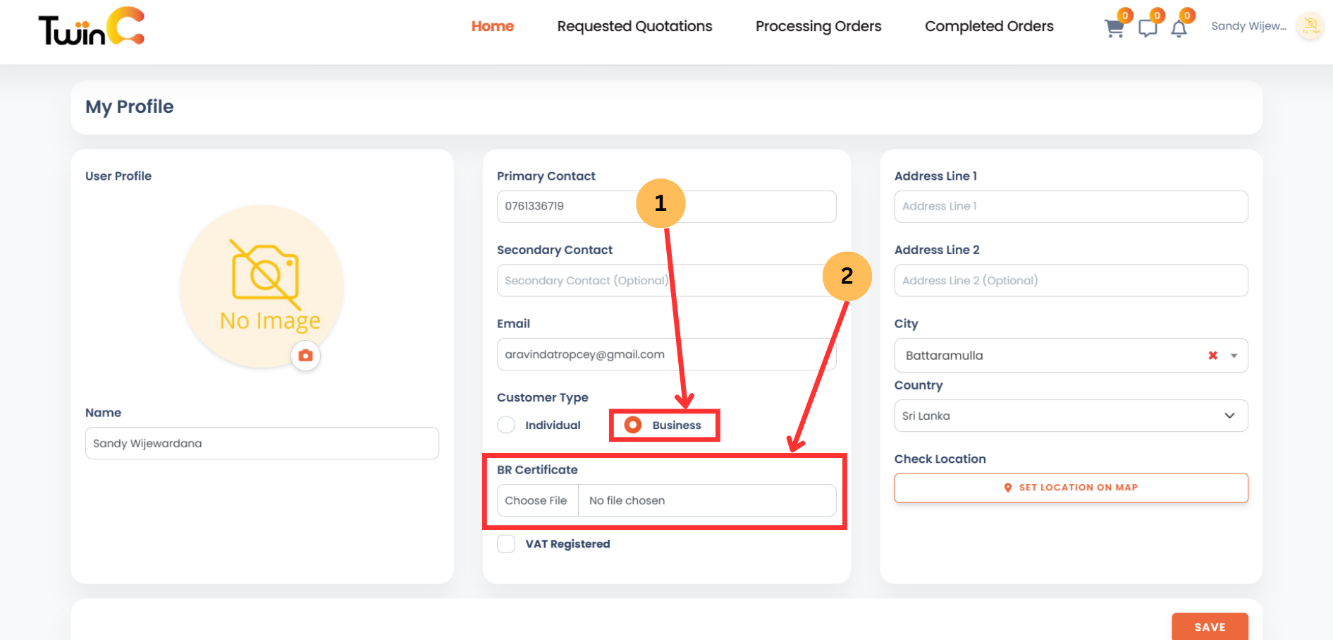
- Select Business.
- Upload BR Certificate (Business Registration).
- Wait for Admin Approval before accessing corporate features.
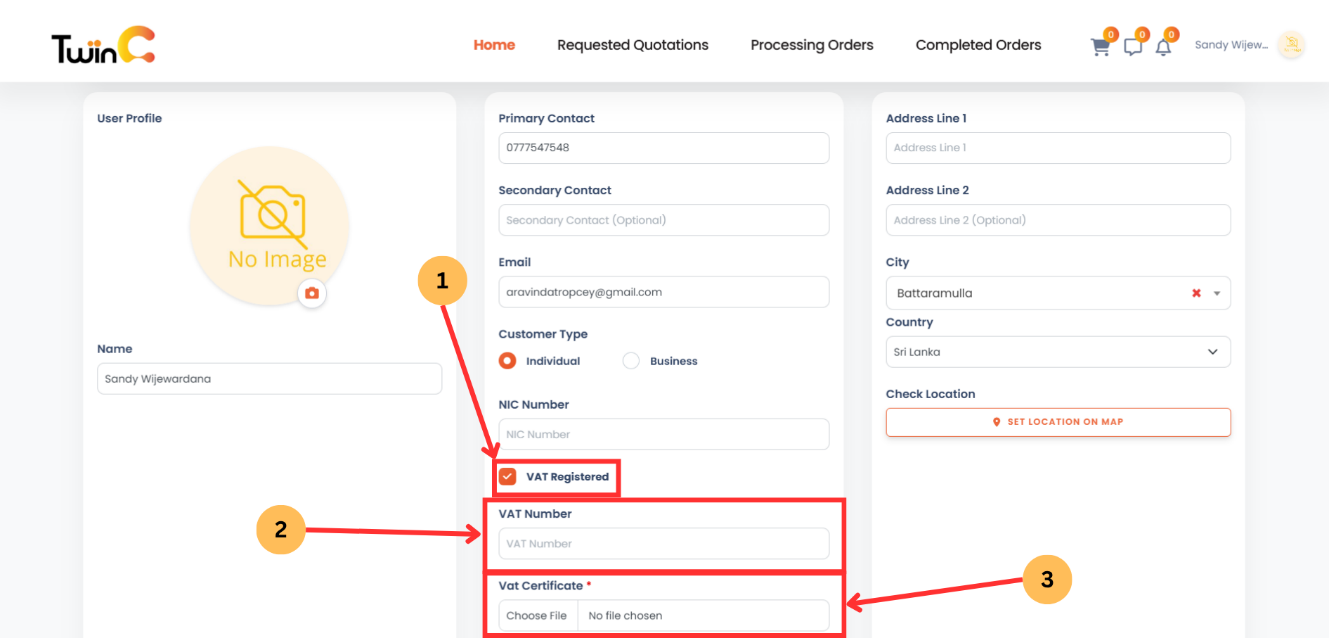
3.4 VAT Status (Optional)
- Tick VAT Registered checkbox (if applicable).
- Enter VAT Number.
- Upload VAT Certificate.
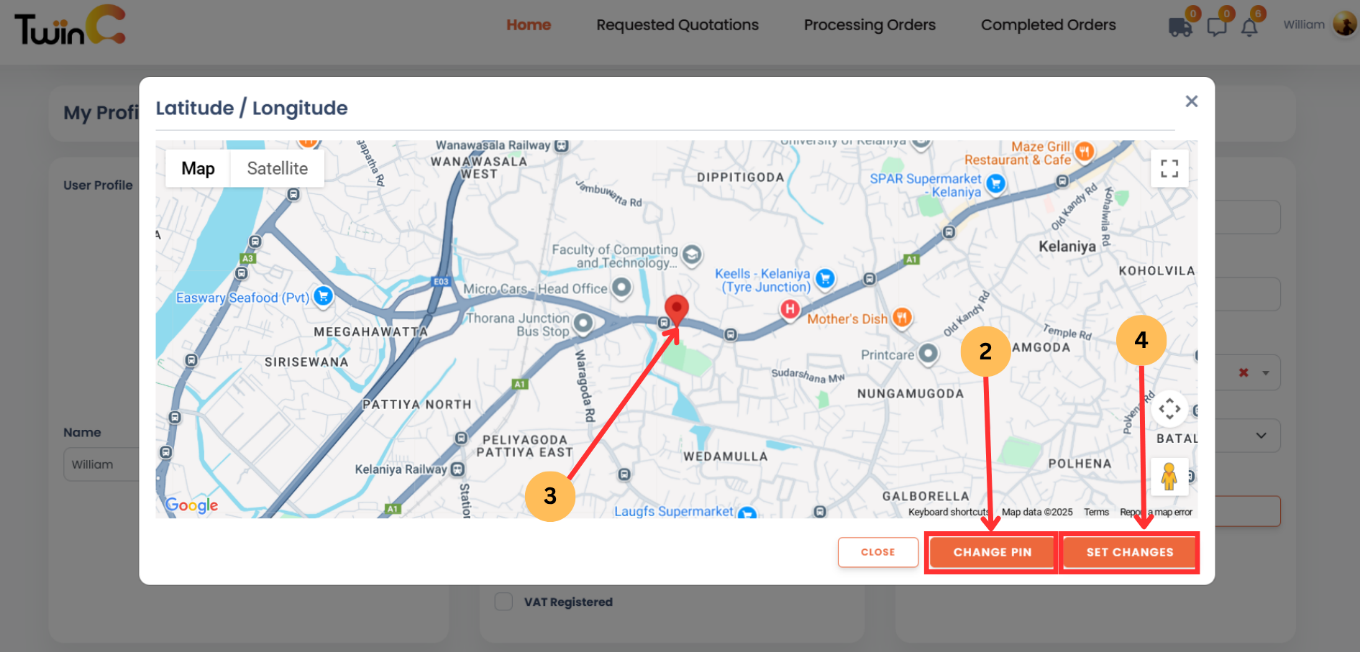
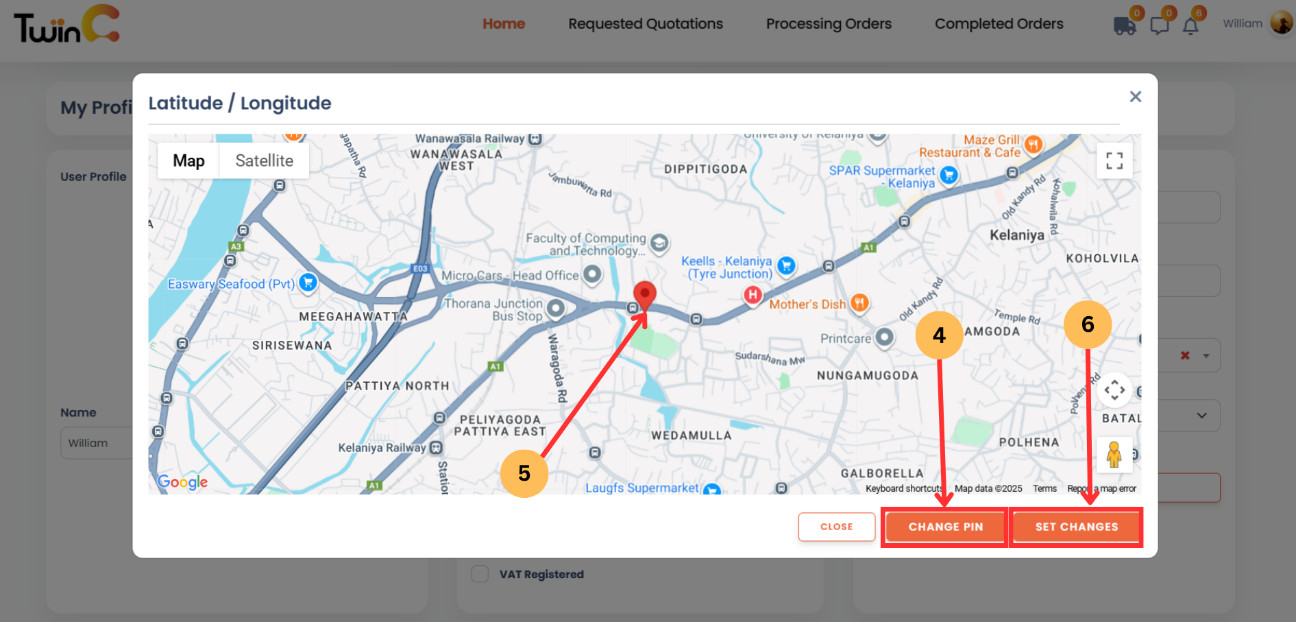
3.5 Set Location
- Click Set location on map.
- Click Change Pin.
- Select a location on the map.
- Click Set Changes.
3.6 Save Profile Information
- Click Save.
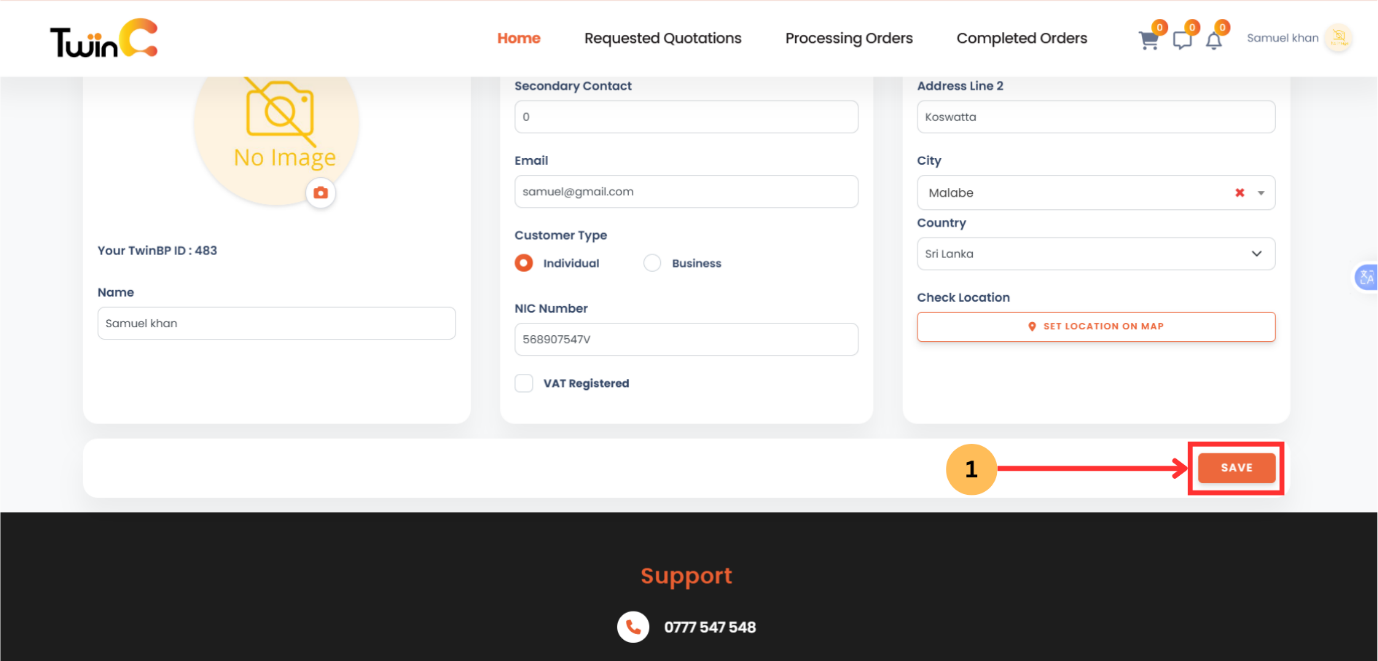
3.7 Completion
- The system displays "Profile updated successfully."
1. Purpose
- To define the process for creating and submitting product inquiries through the system.
2. Scope
- This procedure applies to all customers using the web or mobile application to send inquiries.
3. Procedure
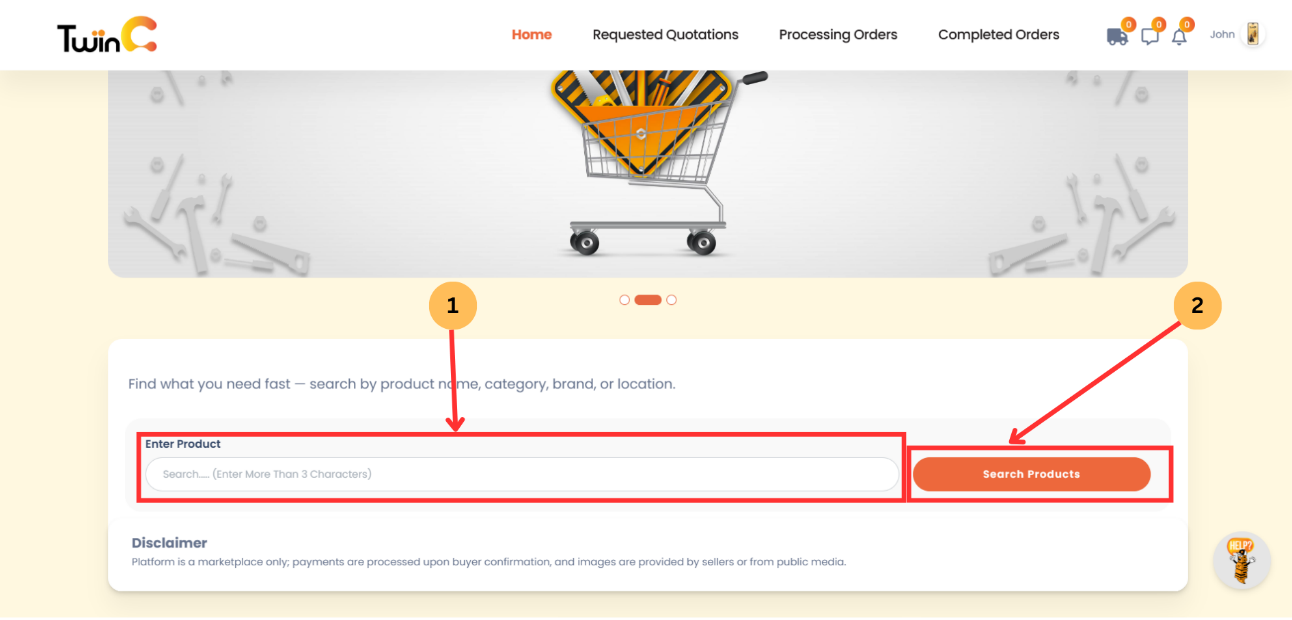
3.1 Search and Select Products
- Enter the product name in the search box.
- Click Search Products.
- Select a product from the results page.
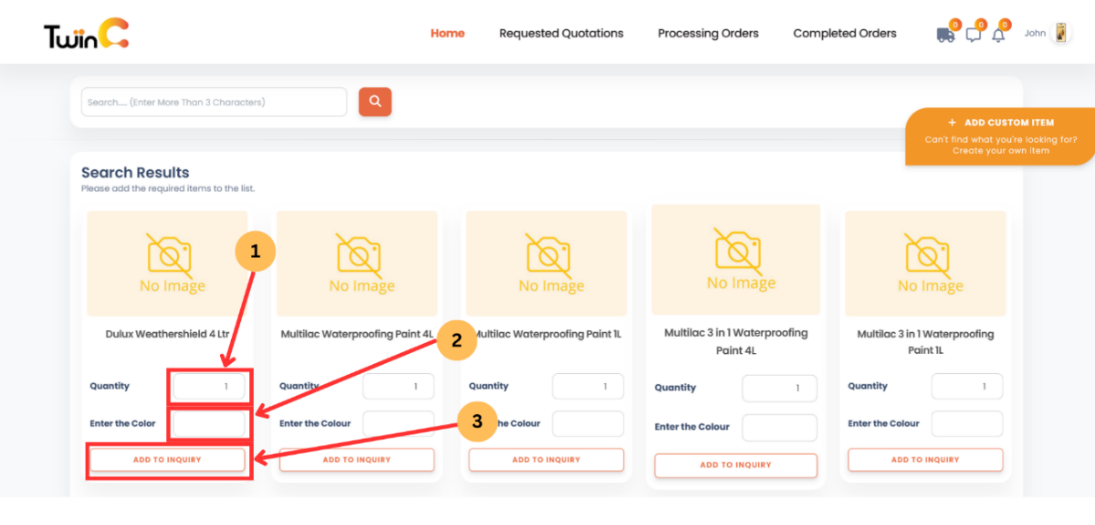
3.2 Add Products to Inquiry
- Enter the quantity.
- Enter specifications (if applicable).
- Click Add to Inquiry.
(Note: The cart icon will update automatically as items are added.)
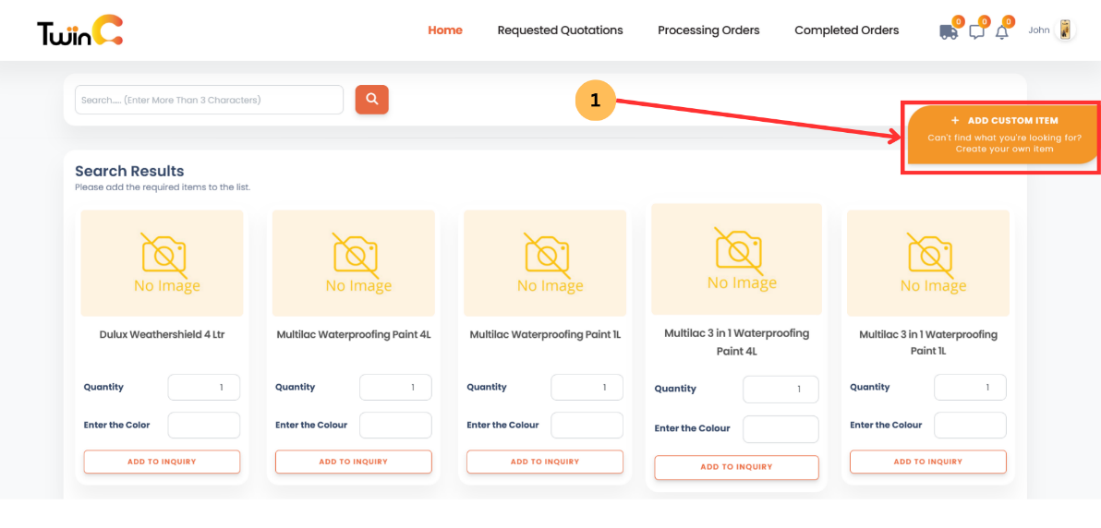
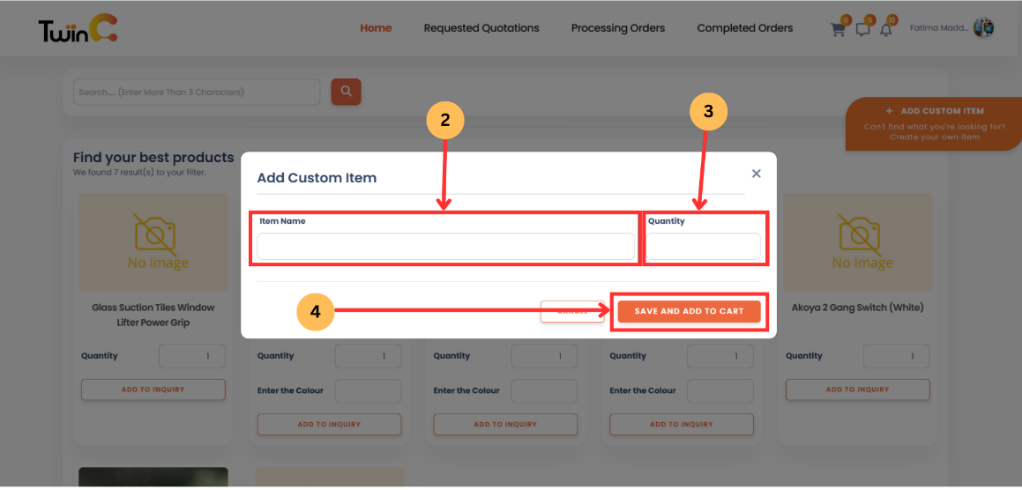
- Click Add Custom Item.
- Enter the item name.
- Enter the quantity.
- Click Add to Inquiry.
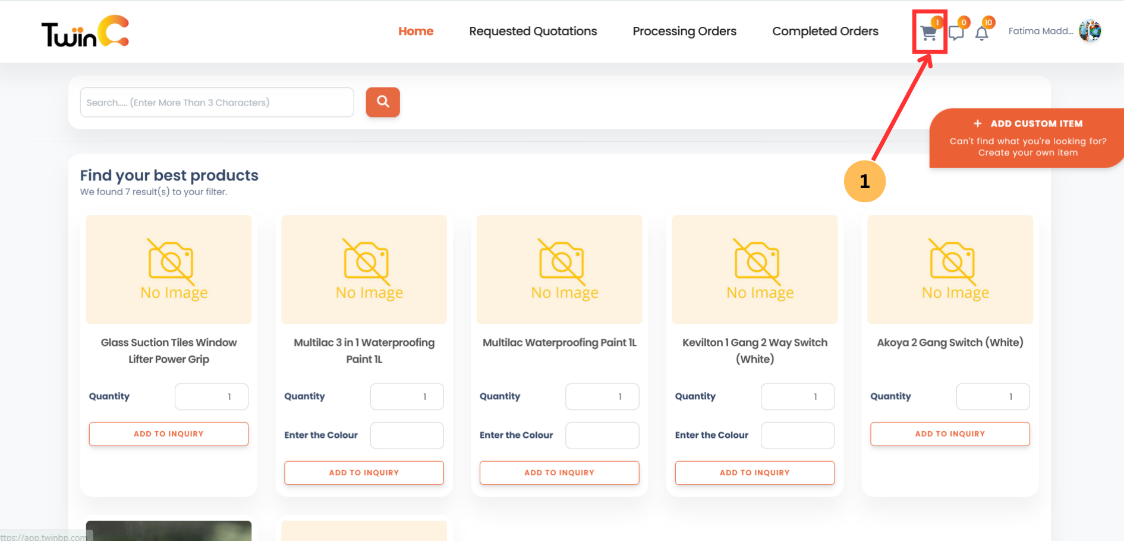
- Click the cart icon (top right, next to the message icon) to open the cart.
(Note: The cart counter will update upon successful addition.)
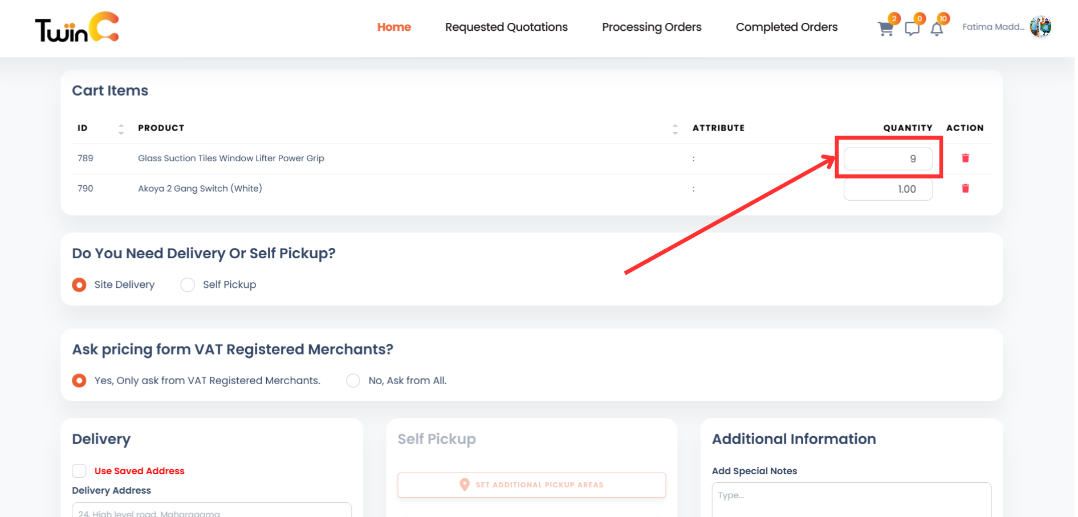
3.3 Manage Cart
- Tap the cart icon to open the cart page.
-
To update quantity:
- Enter the new quantity
3.4 Delivery Options
3.4.1 Site Delivery
- Select Site Delivery.
- Enter the delivery address.
- Click Set Delivery Location on Map.
- Click Change Pin.
- Select the location and confirm.
- Click Set Changes to save.
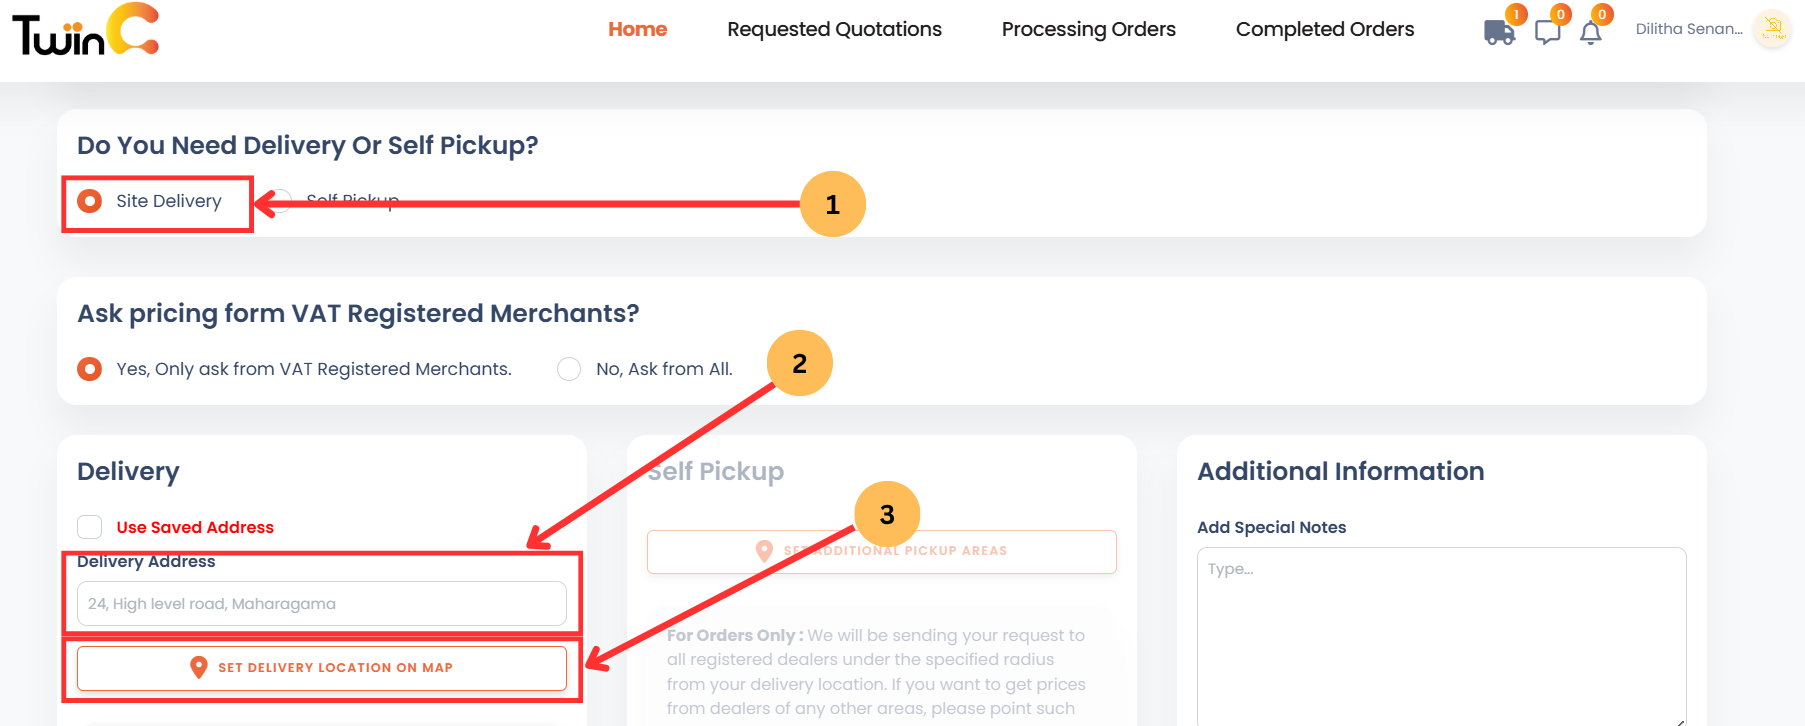
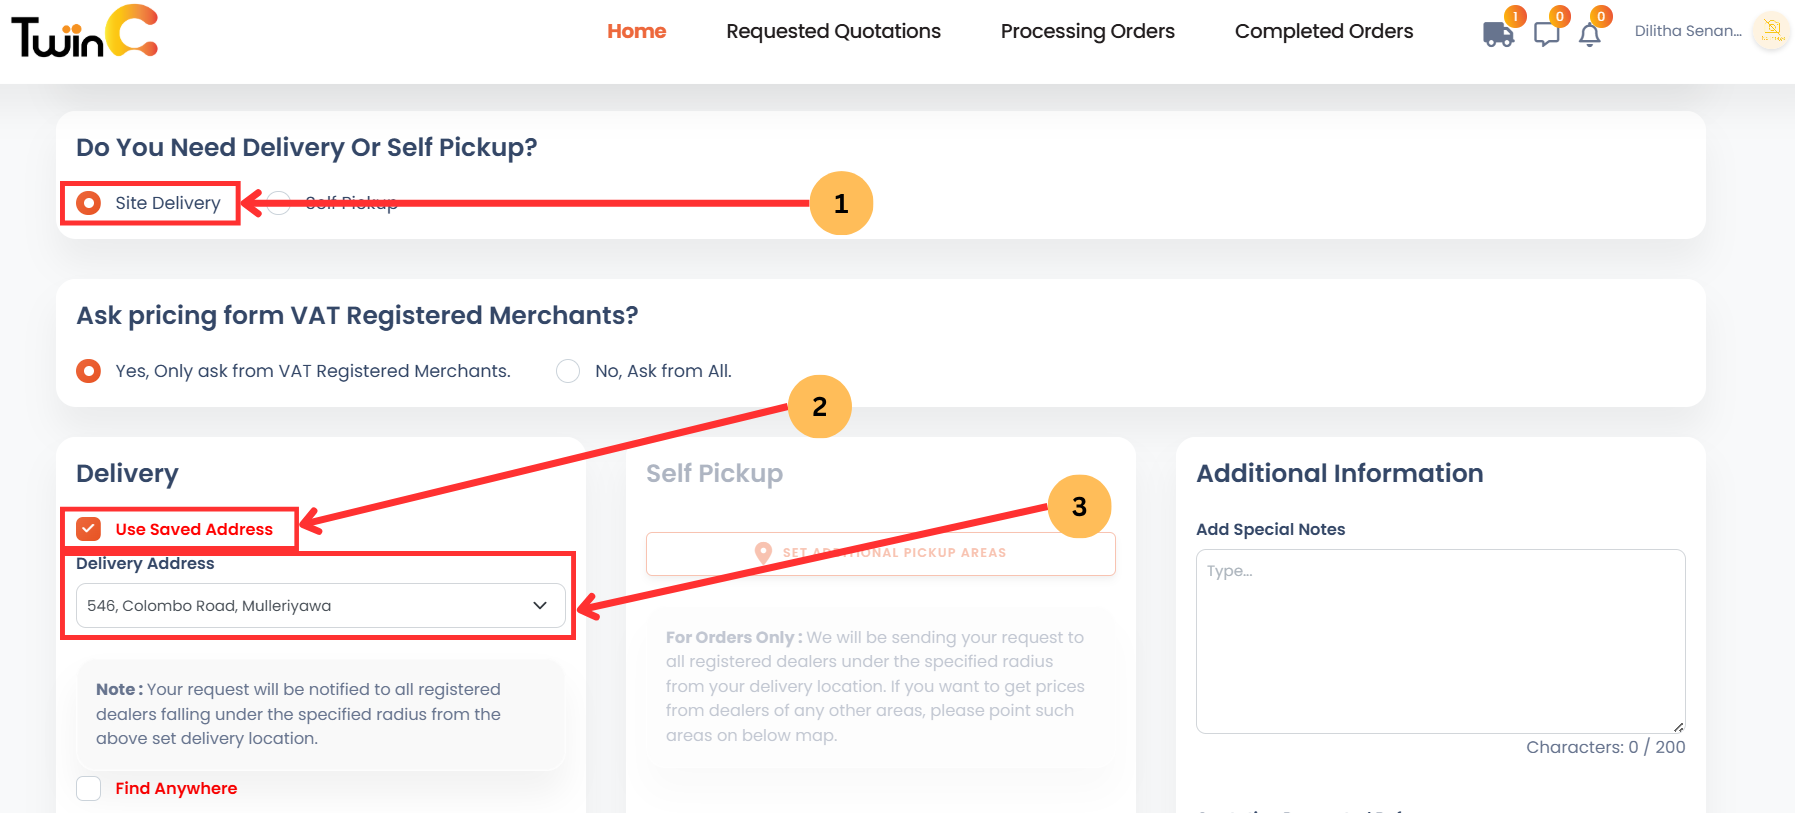
- Select Site Delivery.
- Select Use Saved Address.
- Choose an address from the list.
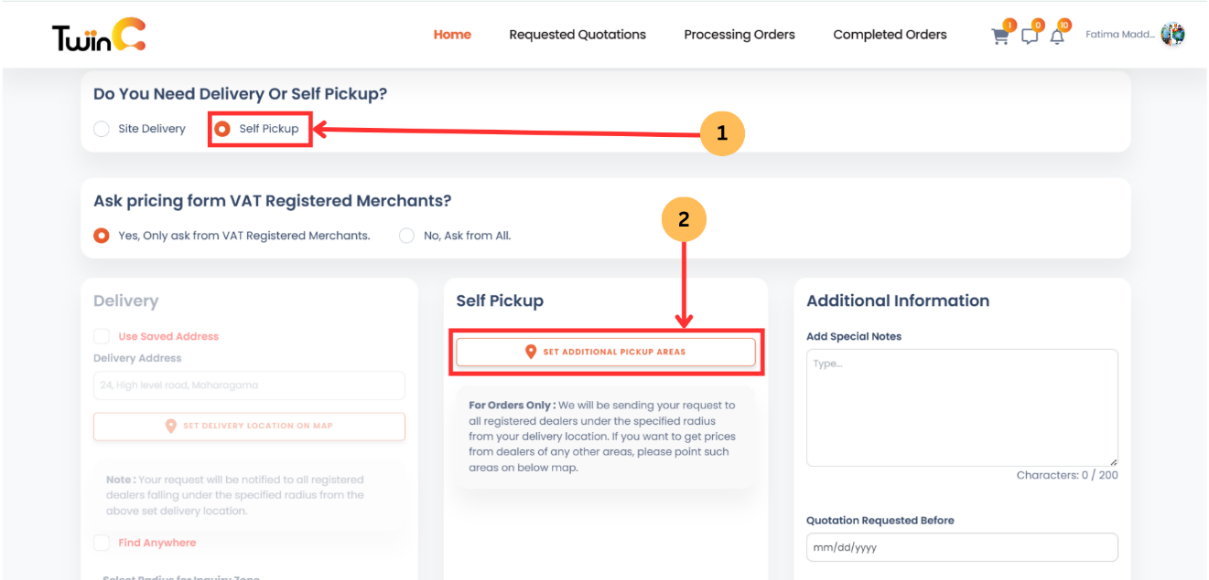
3.4.2 Self-Pickup
- Select Self-pickup.
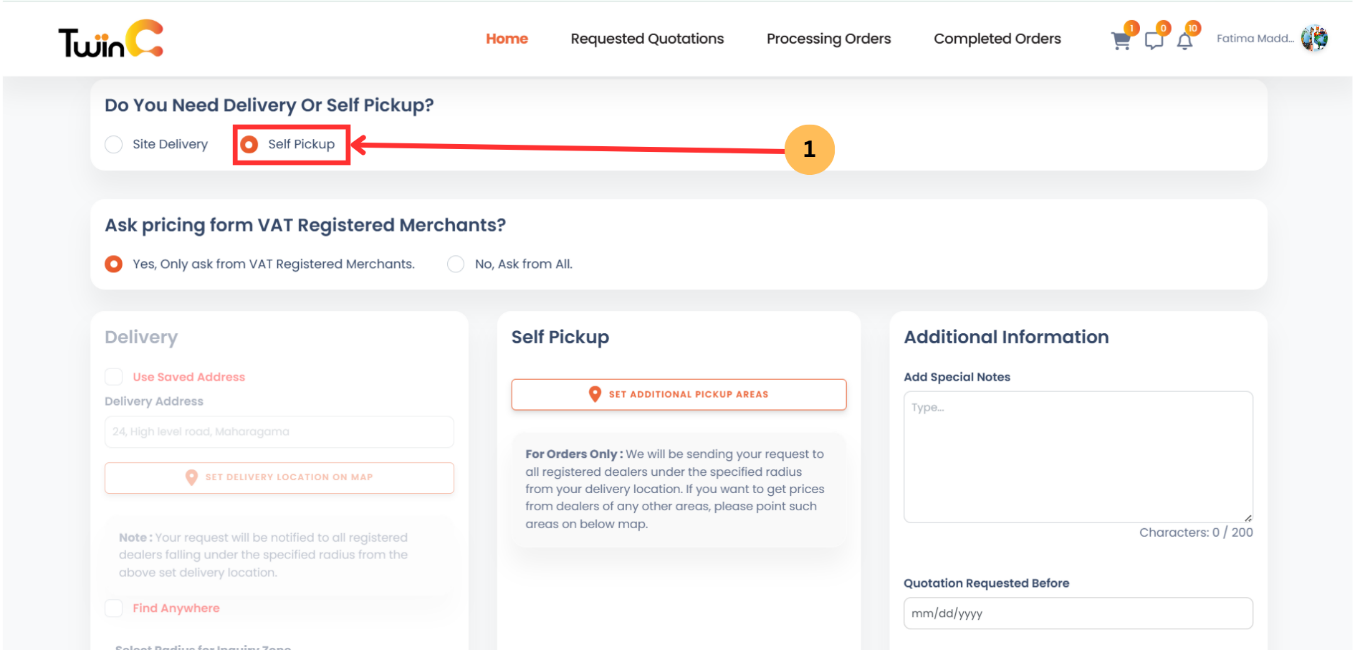
3.5 VAT Selection
- Select the appropriate VAT status for merchants.
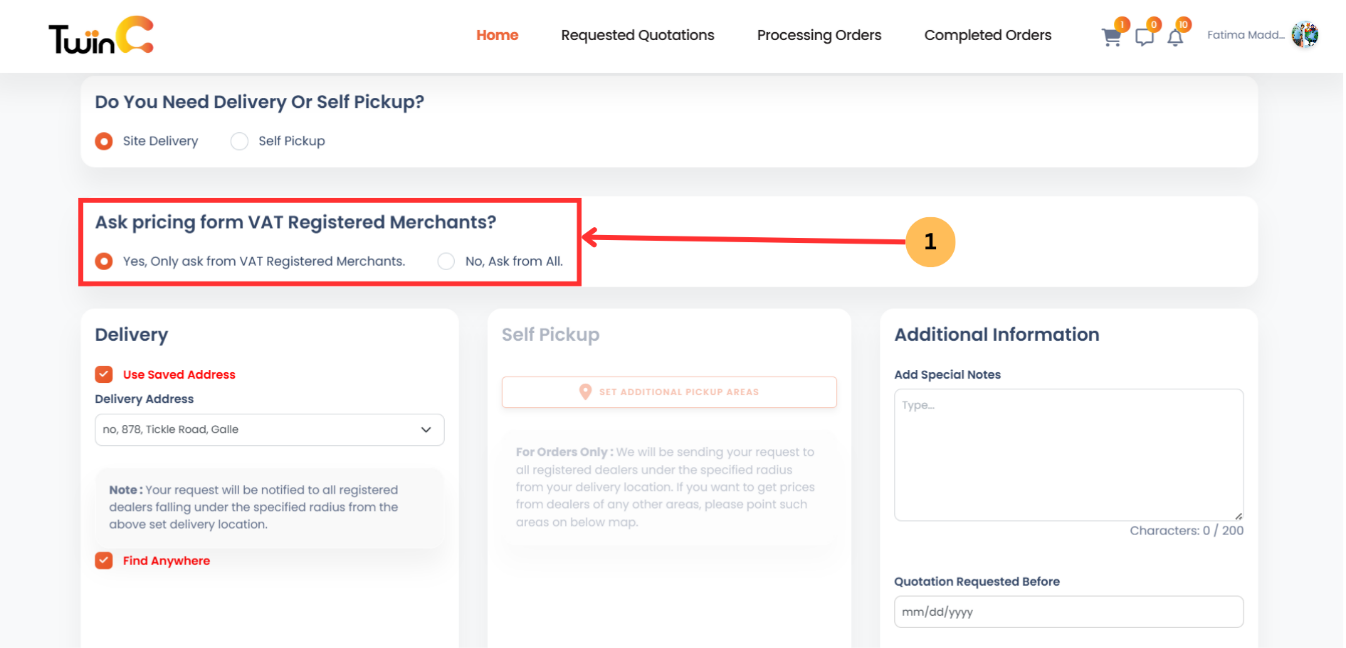
3.6 Merchant Selection
Select Find Anywhere to send the inquiry to all registered merchants.
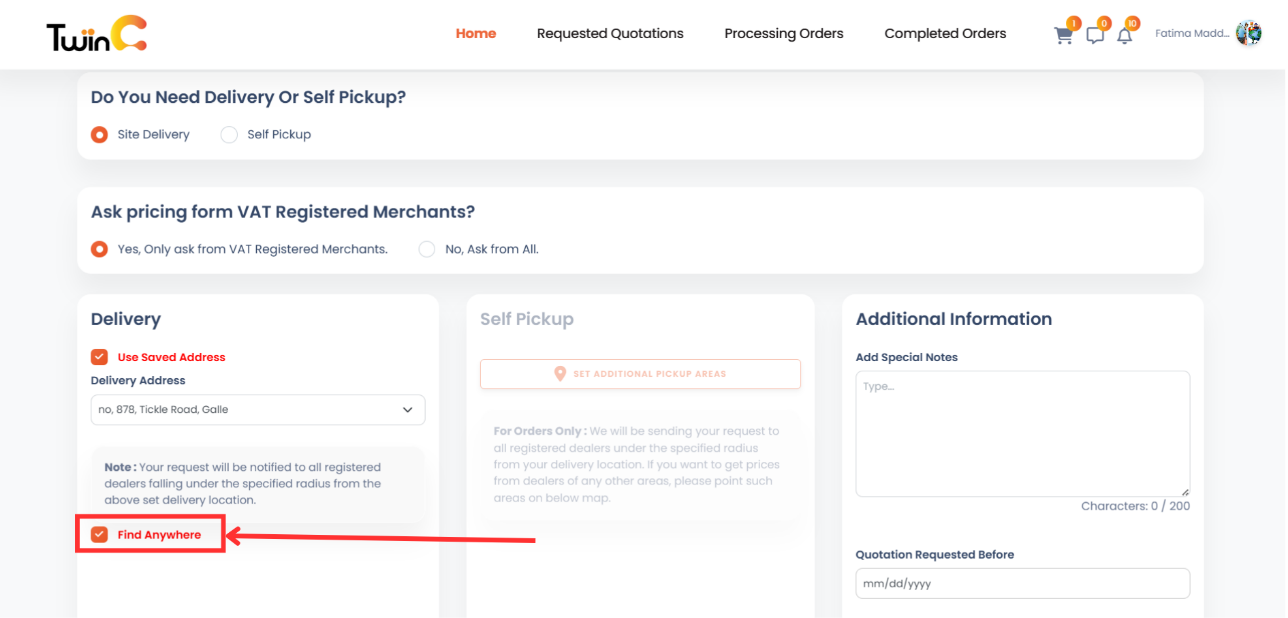
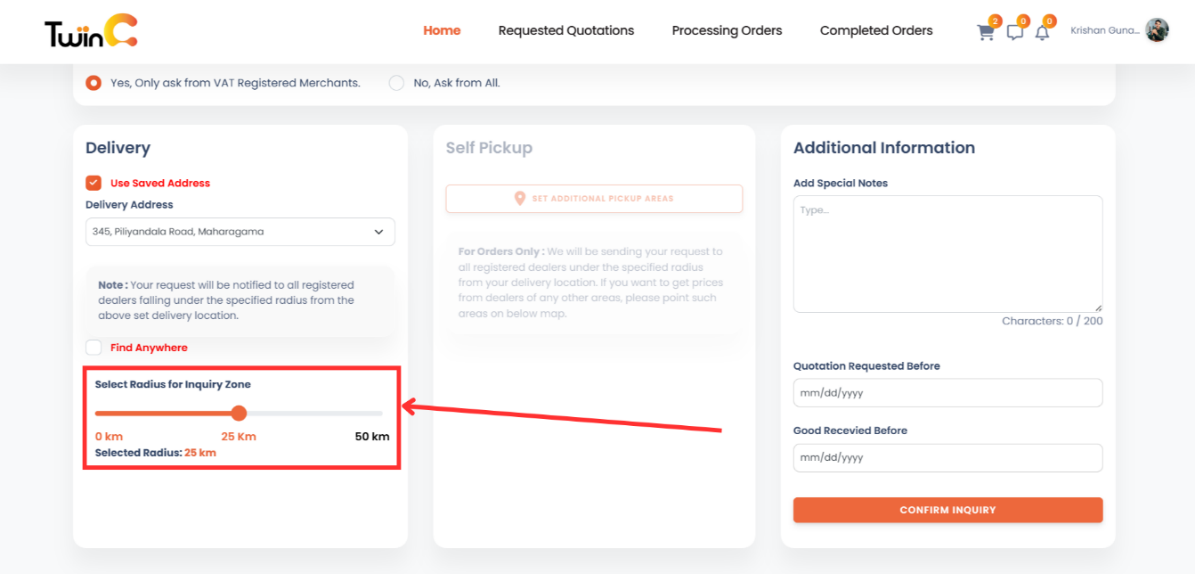
Select a radius to limit the inquiry to nearby merchants.
- Select Self-pickup.
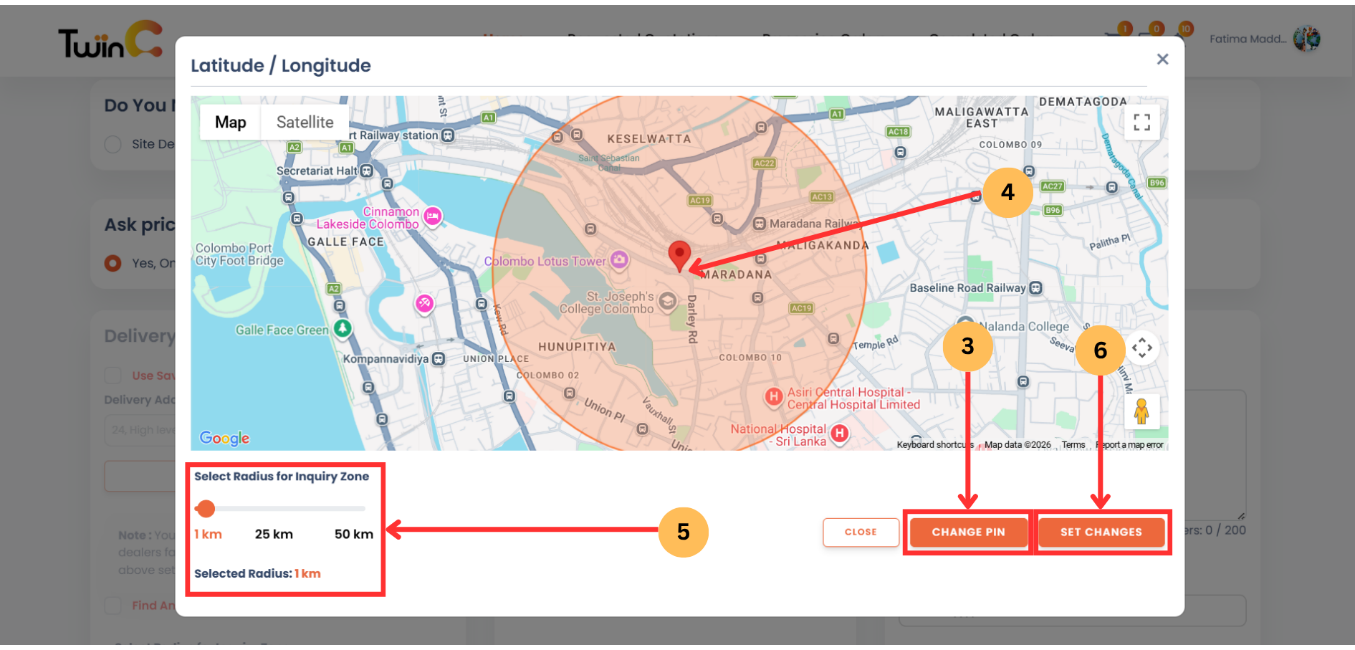
- Tap Set Additional Pickup Areas.
- Click Change Pin.
- Select the location on the map.
- Choose the preferred radius.
- Confirm the selection by tapping Set Changes.
(Note: Only merchants within the selected radius will receive the inquiry.)
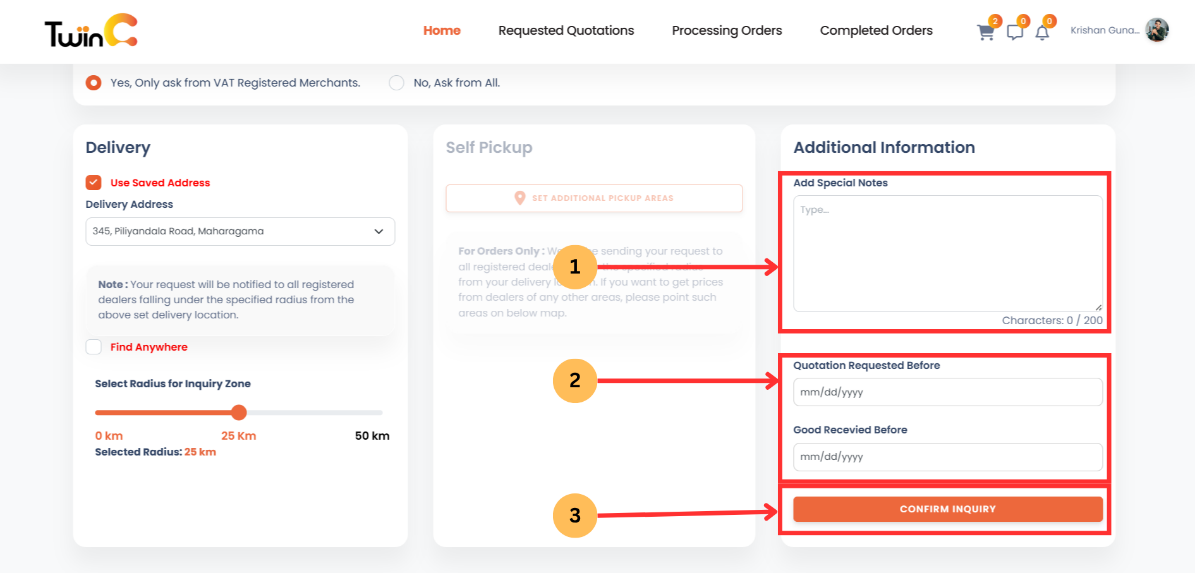
3.7 Finalizing Inquiry
- Enter special notes (optional).
-
Set the following dates:
- Quotation Requested Before (Deadline for receiving quotations)
- Goods Requested Before (Preferred delivery date)
- Tap Confirm Inquiry.
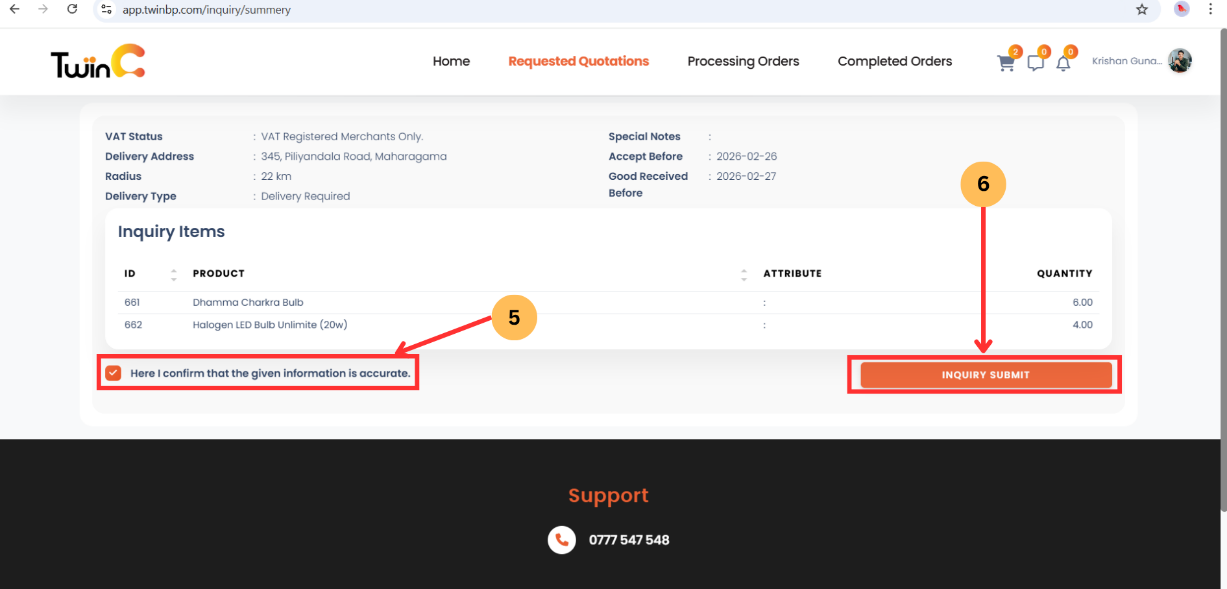
- Review the details.
- Accept the confirmation checkbox.
- Tap Create Inquiry.
(A confirmation message will be displayed: "Inquiry Created Successfully.")
1. Purpose
- To define the process for viewing quotations, accepting quotations, creating orders, and completing payments in the TwinBP system.
2. Scope
- This procedure applies to all registered customers using the TwinBP mobile and web applications to review merchant quotations, confirm orders, and complete payments.
3. Procedure
3.1 Viewing Quotations
- Click the Notification icon.
- Click Quotation Created notification.
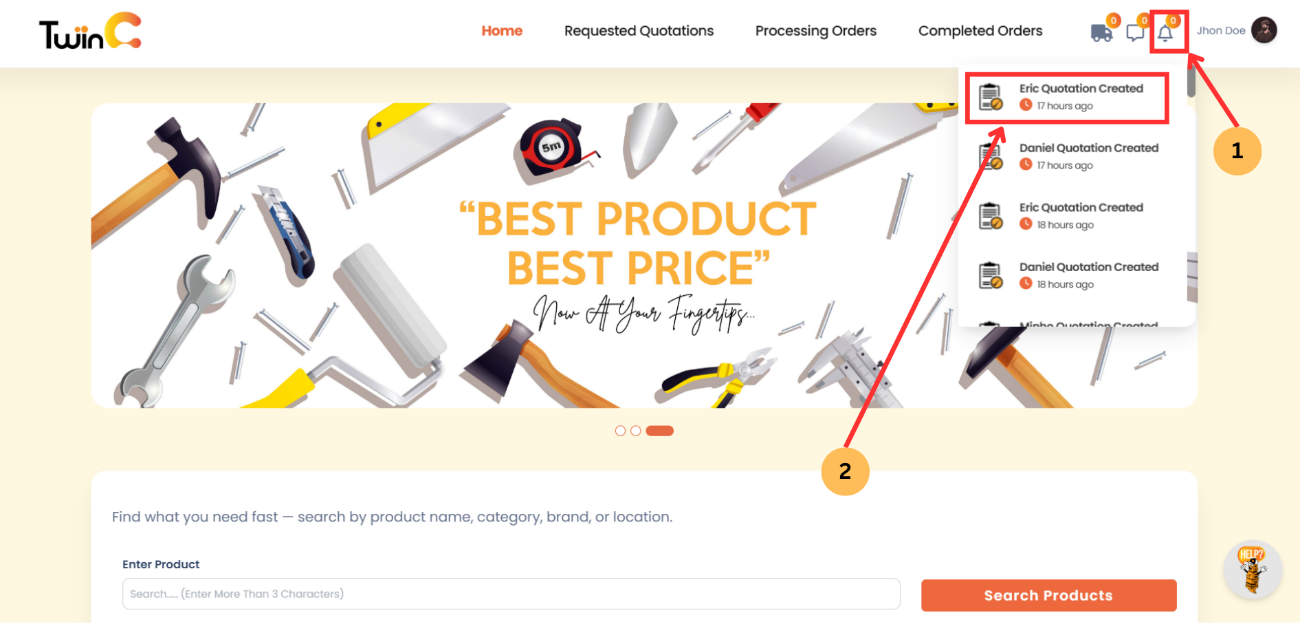
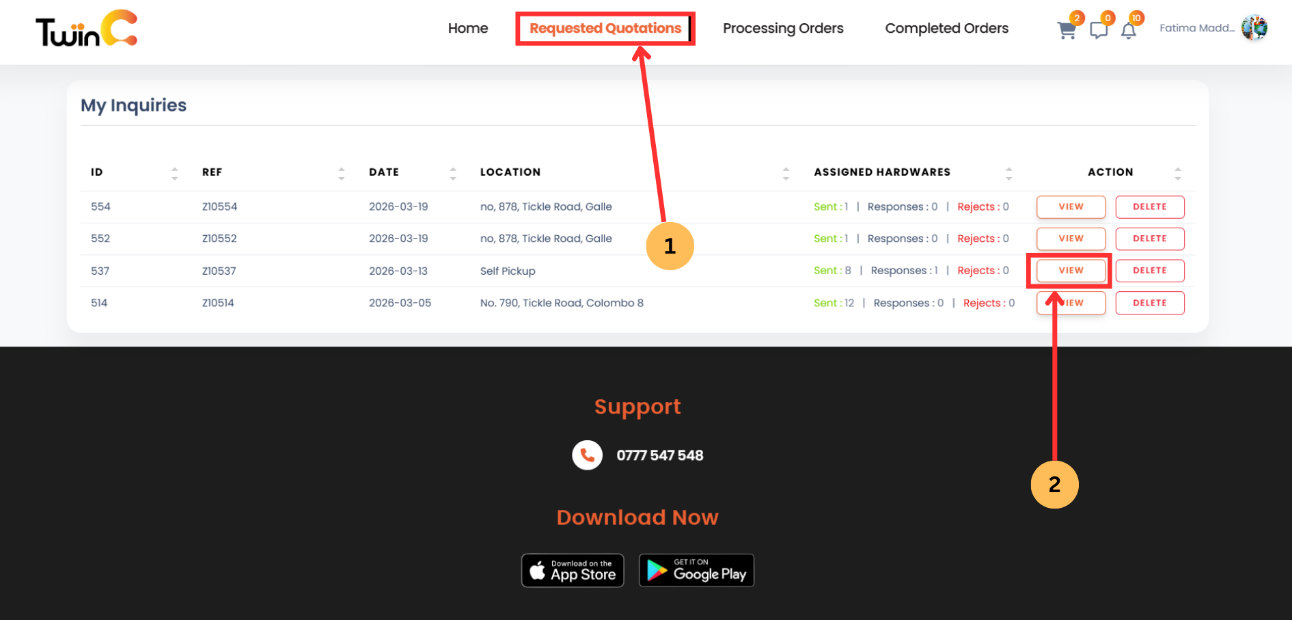
- Go to Requested Quotations.
- Click View to open the Price Comparison page.
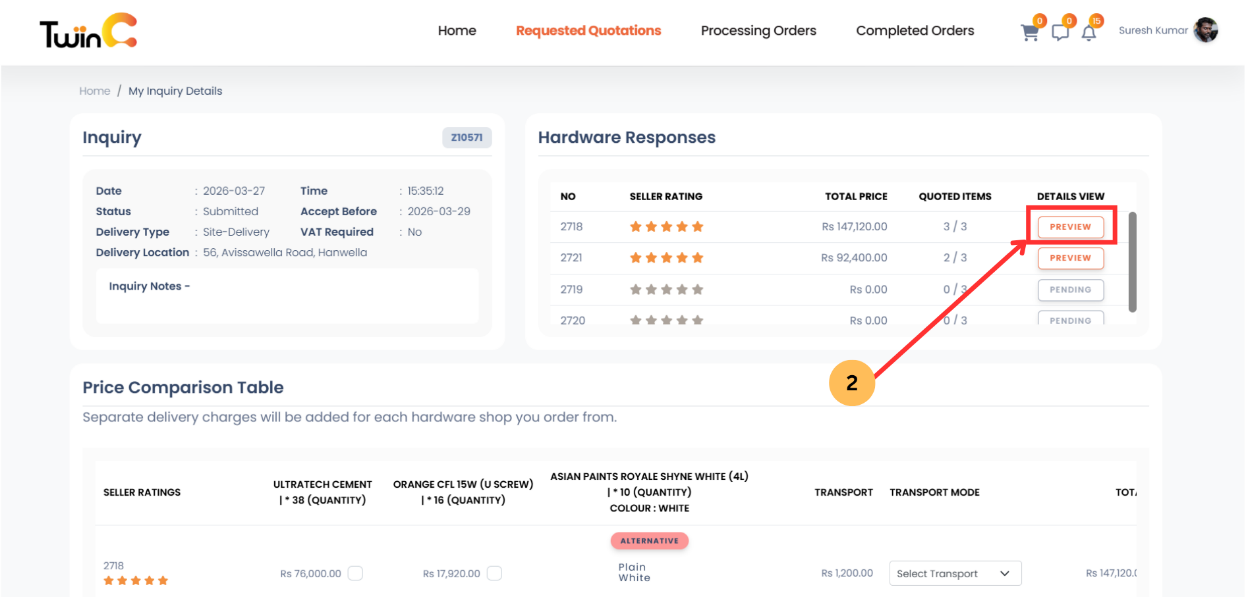
3.2 Preview Quotation
- Select an Accepted Quotation.
- Click Preview to view quotation details.
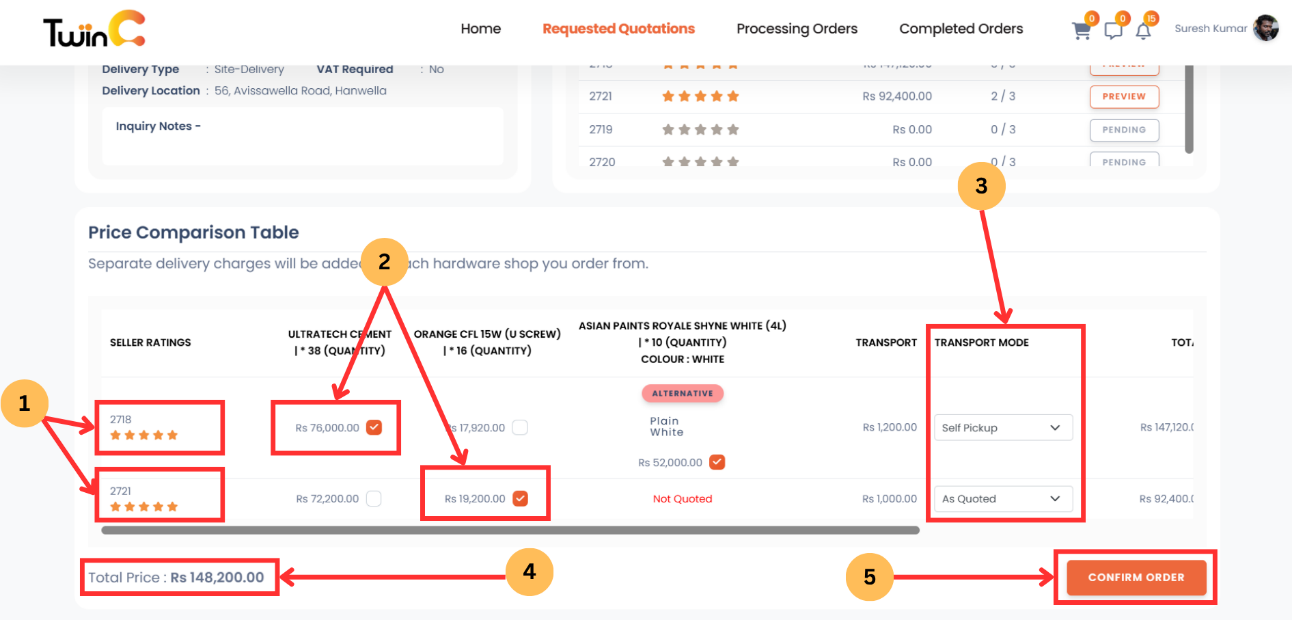
3.3 Compare and Select Items
- Compare prices from different merchants. (Each row represents a merchant.)
- Select required products using the checkbox.
- Select Transport Mode for each merchant you select.
- Review Delivery Charges and Total Amount.
- Click Confirm Quotation.
-
Note:
- Merchants may suggest Alternative Products.
- If unavailable, the item will be shown as Not Quoted.
- If you select items from different merchants, Delivery Charges will vary by merchant.
3.4 Create Order
- Review order details.
- Enter the Expected Delivery Date.
- Enter Remarks (if required).
- Tick the confirmation checkbox.
- Click Create Order.
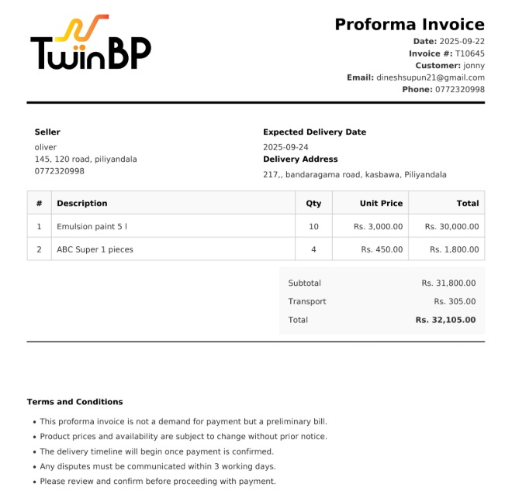
Output: Proforma Invoice is sent to the registered email address.
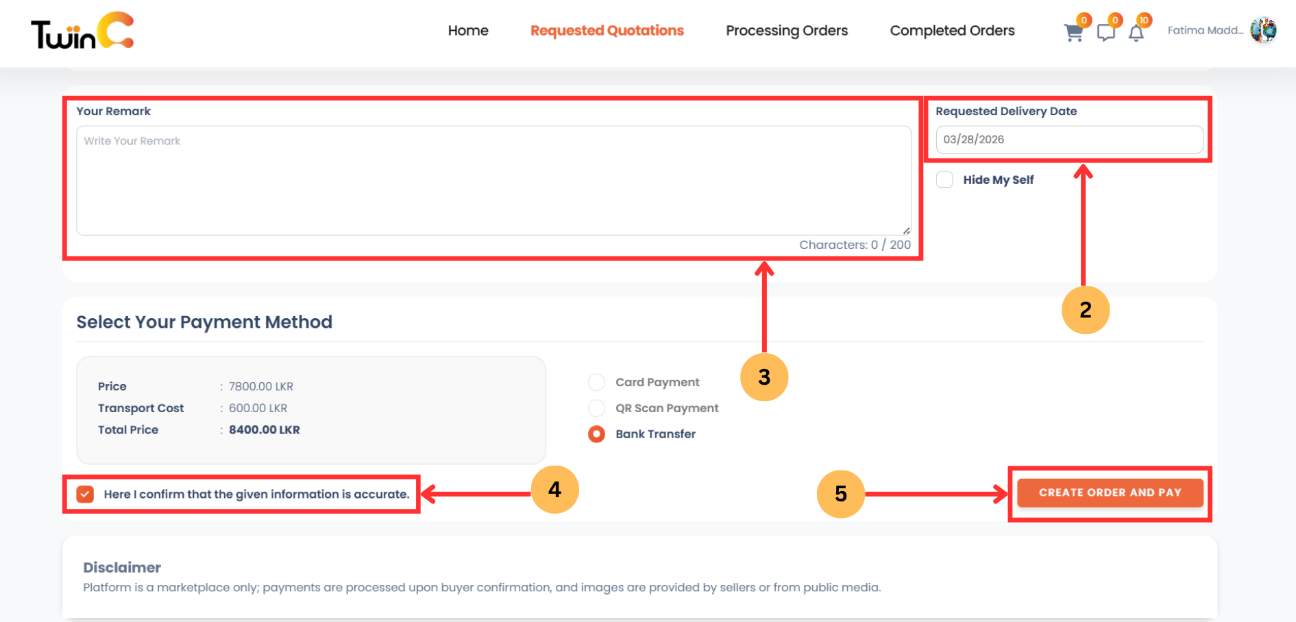
The Output: Sample Proforma Invoice.
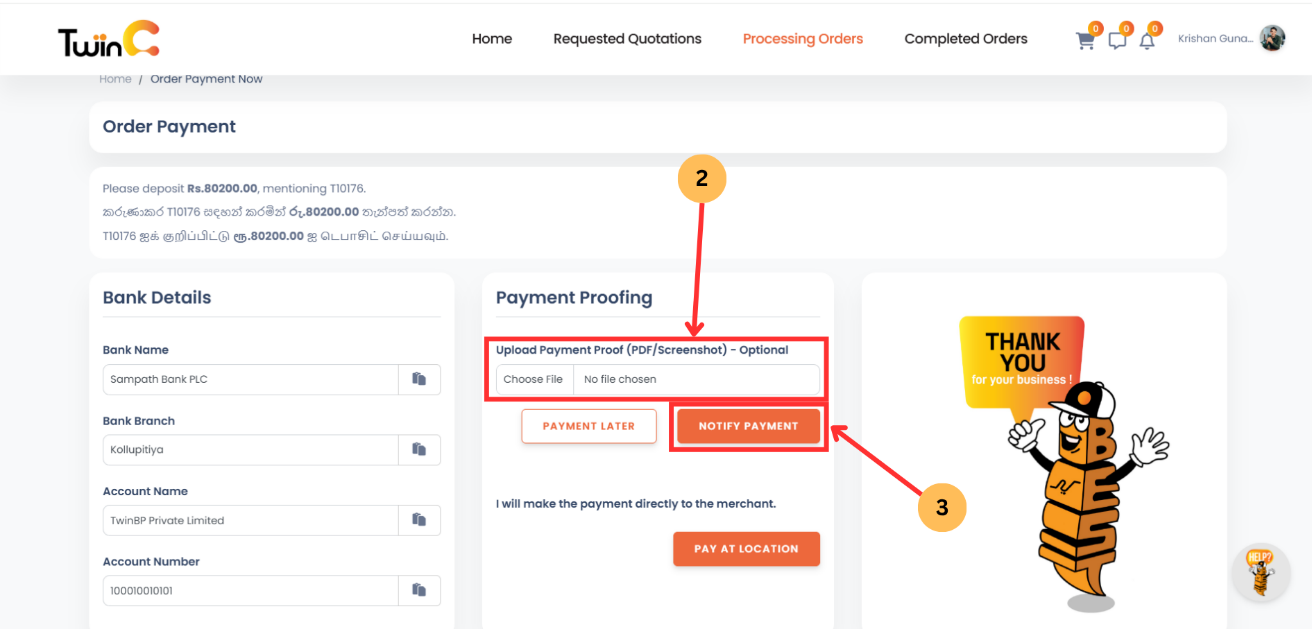
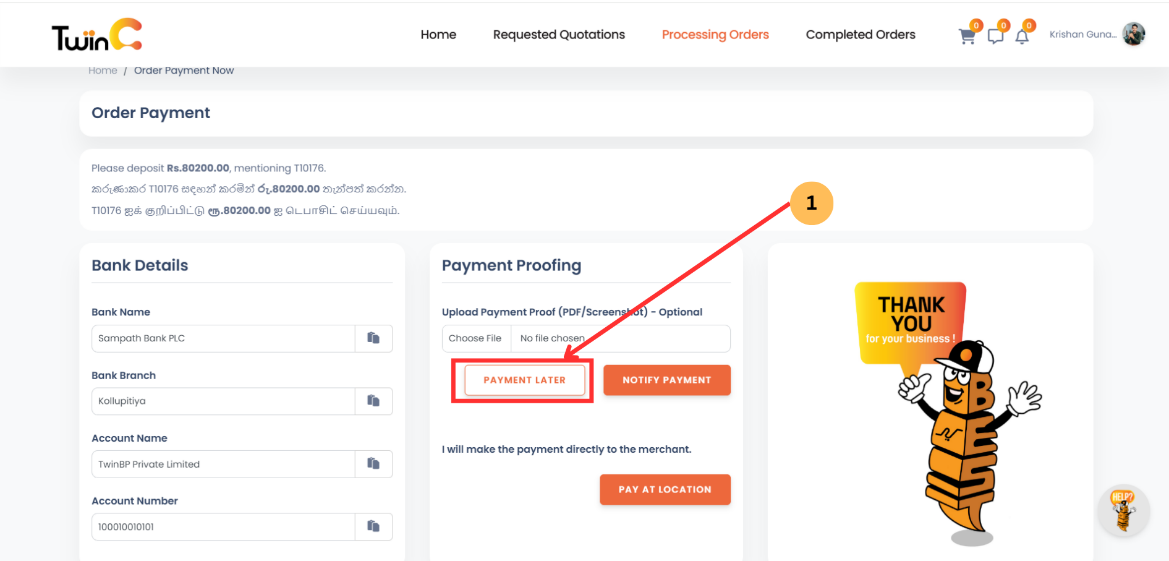
3.5 Payment Options
Three payment options are available:
- Transfer funds to the provided bank account (Bank Transfer/ CDM).
- Upload Payment Proof.
- Click Notify Payment.
Applicable for:
- Seif-Pickup Orderrs
- Site-Delivery Order
Note:
The order will move to Dispatch stage after admin approval.
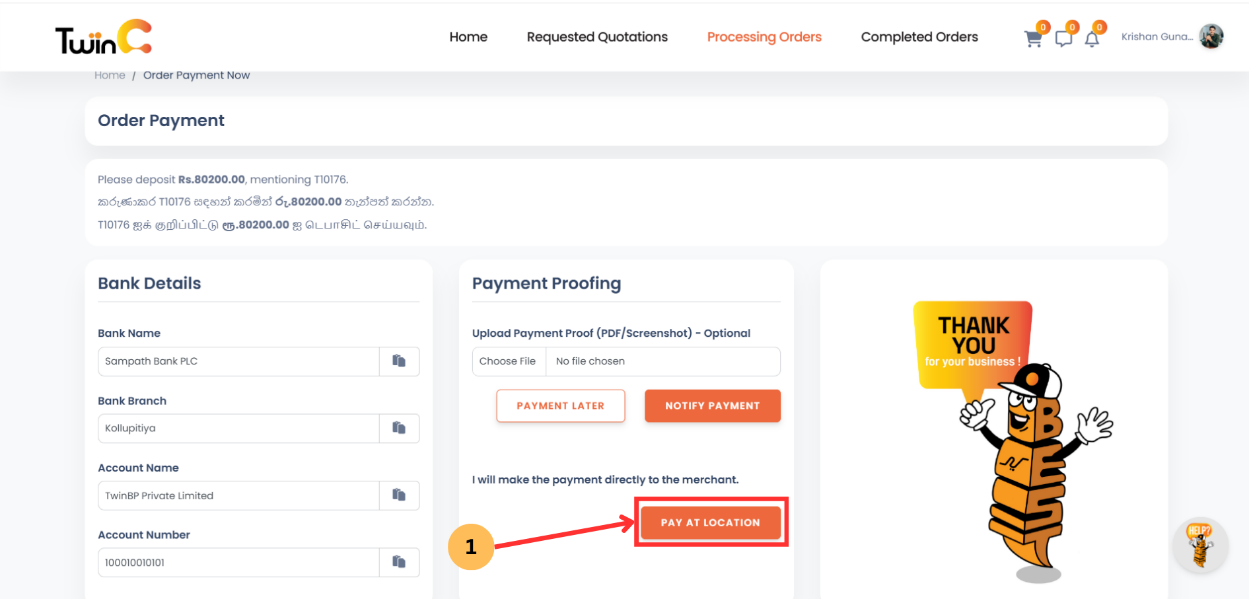
- Tap Pay at Location.
- Pay at the hardware store.
Applicable for:
- Seif-Pickup Orders Only
Note:
- No admin verification is required for Pay at Location.
- The customer settles the payment directly at the hardware store.
- Click Payment Later.
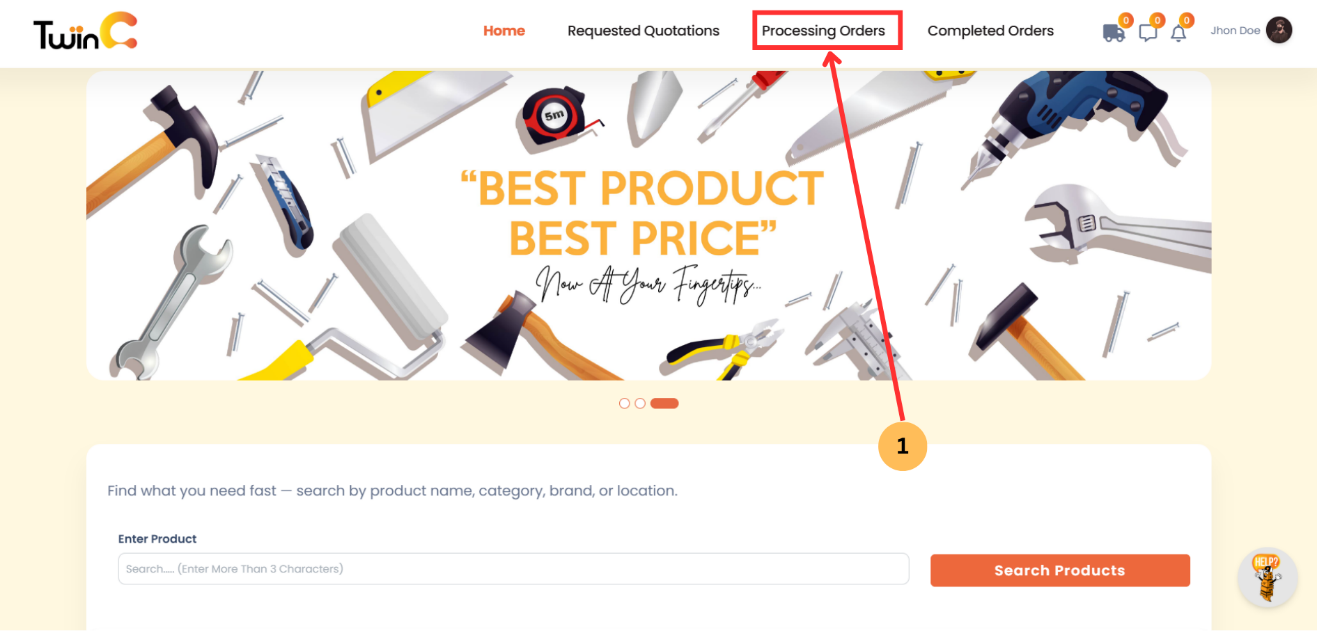
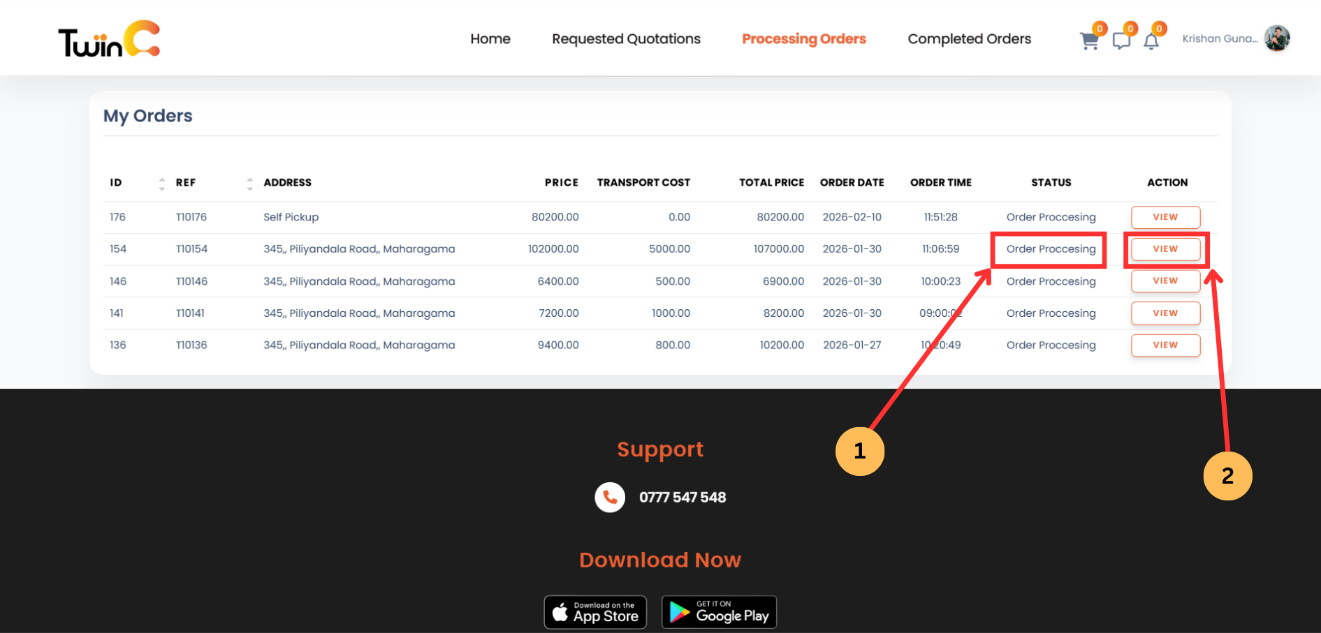
- Go to Processing Orders.
- Select the order with the status Waiting for Payment and click View.
- Tick confirmation checkbox.
- Click Create Order and Pay.
- Upload payment proof.
- Click Notify Payment.
Applicable for:
- Seif-Pickup Orders
- Site-Delivery Orders
Note:
The order will move to Dispatch stage after admin approval.
3.6 After Payment:
- Wait for Admin Verification.
-
The customer receives an SMS confirmation:
"Your TwinBP order (T---) payment has been approved. The order will be processed soon." - Wait for merchant delivery updates.
1. Purpose
- To define the process for completing a customer order in the TwinBP system after delivery or self-pickup.
2. Scope
- This procedure applies to all registered customers using the TwinBP mobile and web applications to complete processing orders.
3. Procedure
3.1 Access Processing Orders
- Navigate to Processing Orders.
3.2 Select an Order
- Select an order with Order Processing status.
- Click View to see order details.
3.3 Complete an Order
- Enter Order Completion Password sent to the registered mobile number.
- Click Complete.
Note:
- The merchant may request the customer to complete the order.
- The password is sent via SMS.
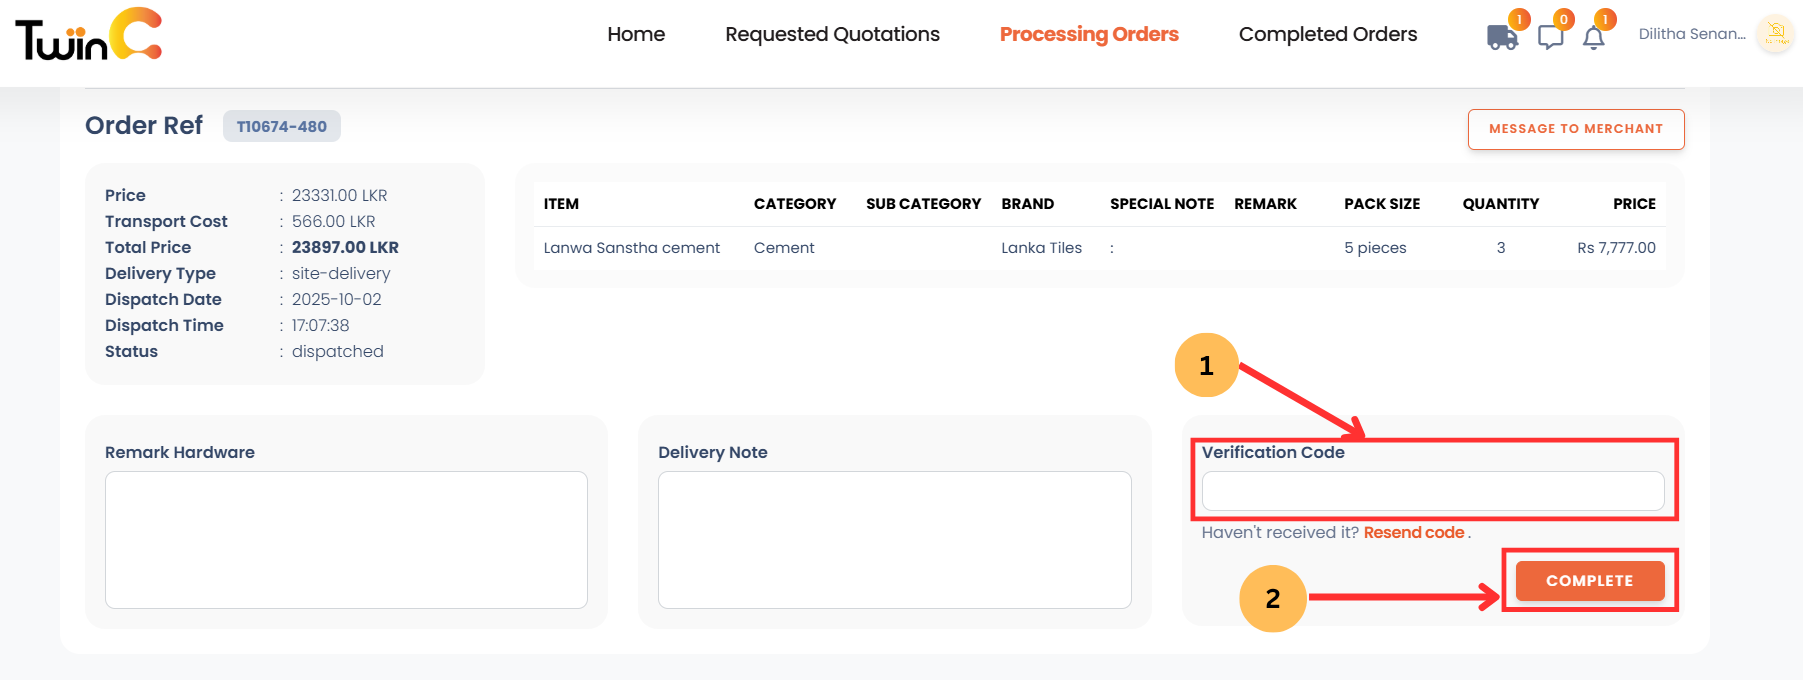
3.4 Completion
- The order will be marked as Completed.
1. Purpose
- To define the process for submitting customer reviews for completed orders in the TwinBP system.
2. Scope
- This procedure applies to all registered customers using the TwinBP mobile and web applications to submit reviews for completed orders.
3. Procedure
3.1 Access Completed Orders
- Navigate to Completed Orders.
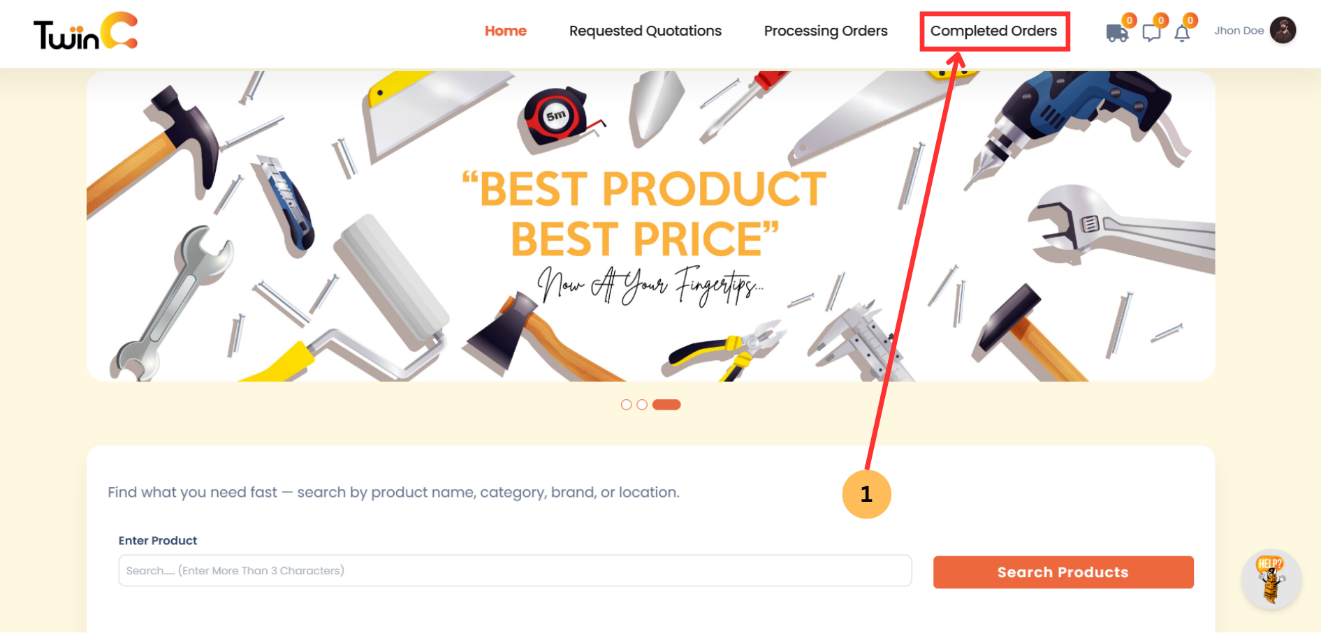
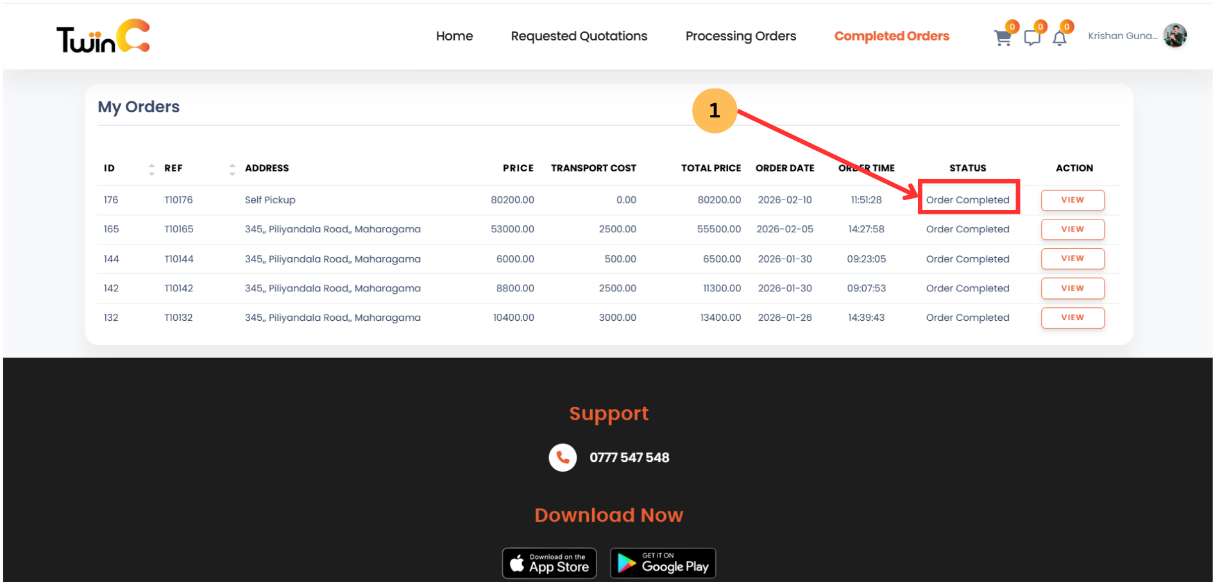
3.2 Select Order
- Click View under the required completed order.
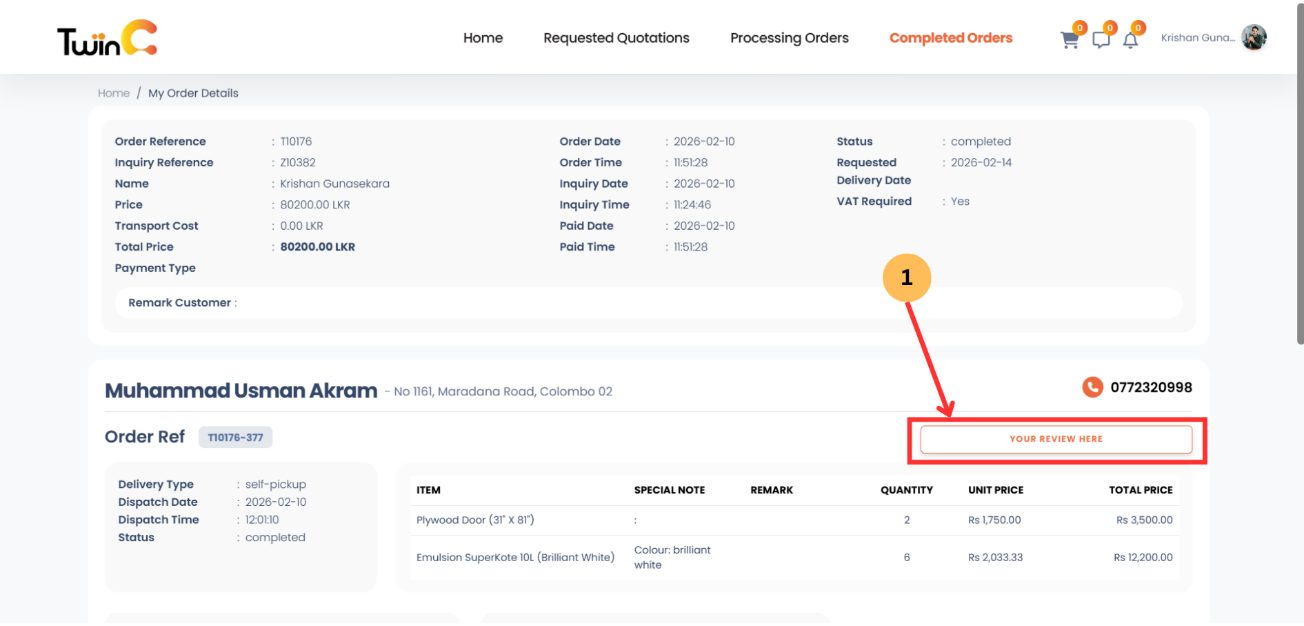
3.3 Submit Review
- Click Your Review Here.
- Enter Rating.
- Enter Feedback.
- Click Submit.

3.4 Completion
- The review will be published.
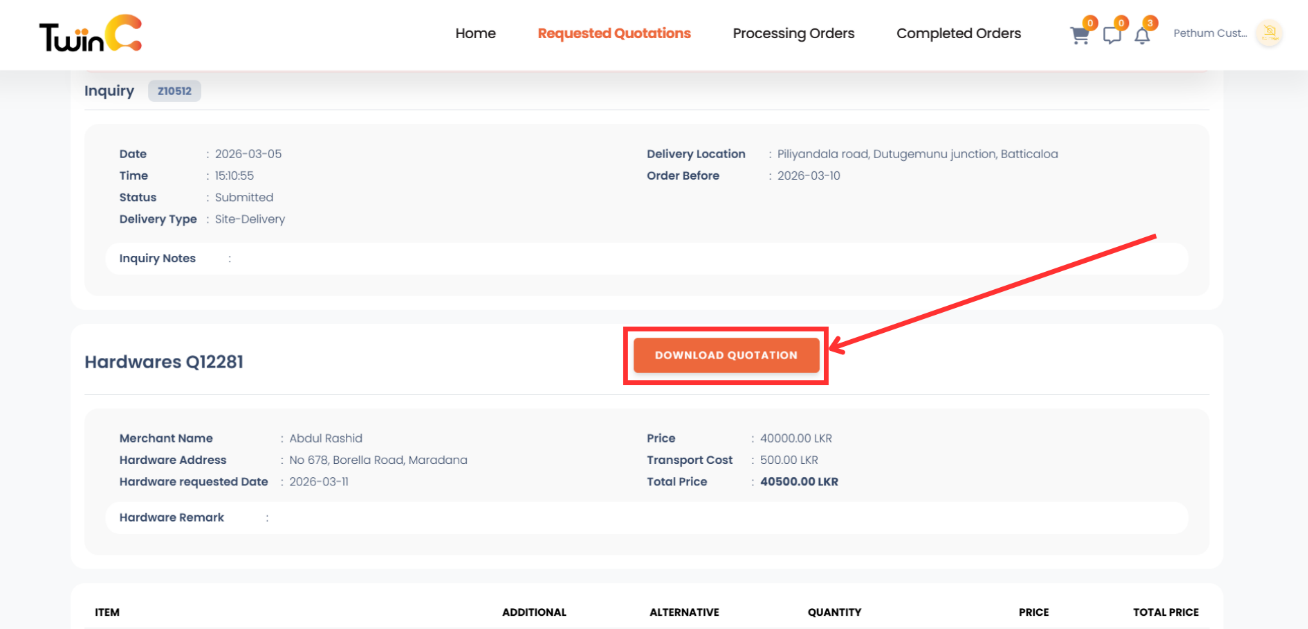
Feature 01: Download a Quotation (Business Customers)
- Navigate to Requested Quotations or Archived. (if the order has already been completed).
- Find the quotation you want to download.
- Click the Download Quotation button.
Feature 02: Support and issue reporting
For support, click the Help Mascot in the app to contact us via phone or email us at [email protected]
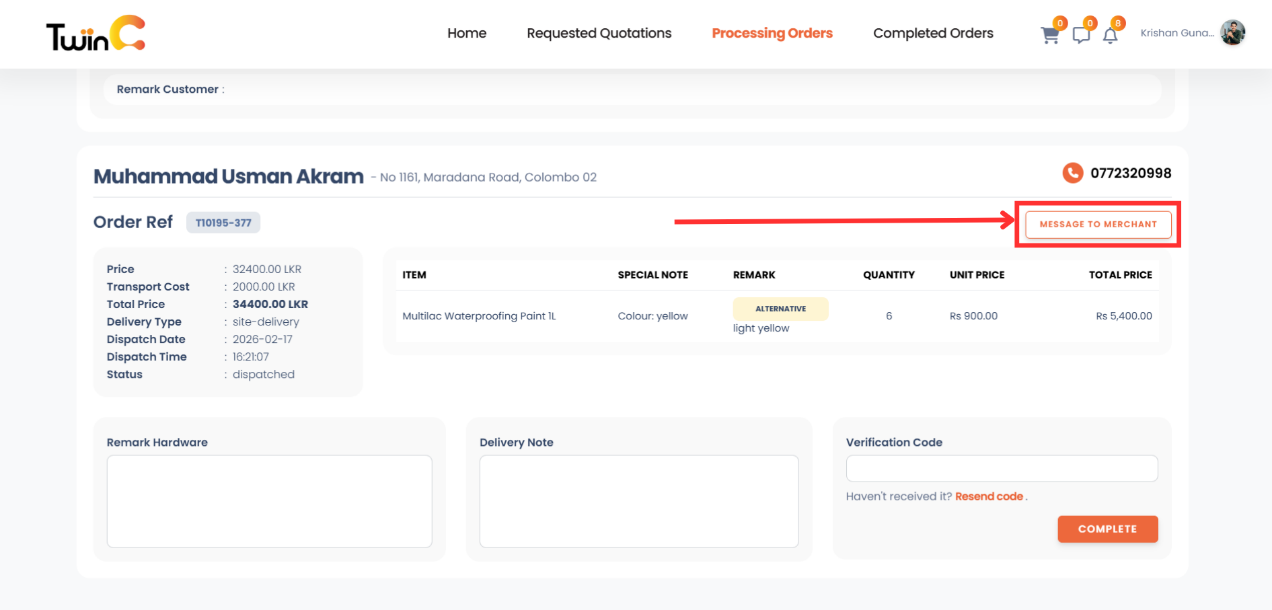
You can message the merchant through the Processing Orders and Completed Orders sections; this option becomes available after the admin approves the payment and remains accessible until the order is completed.
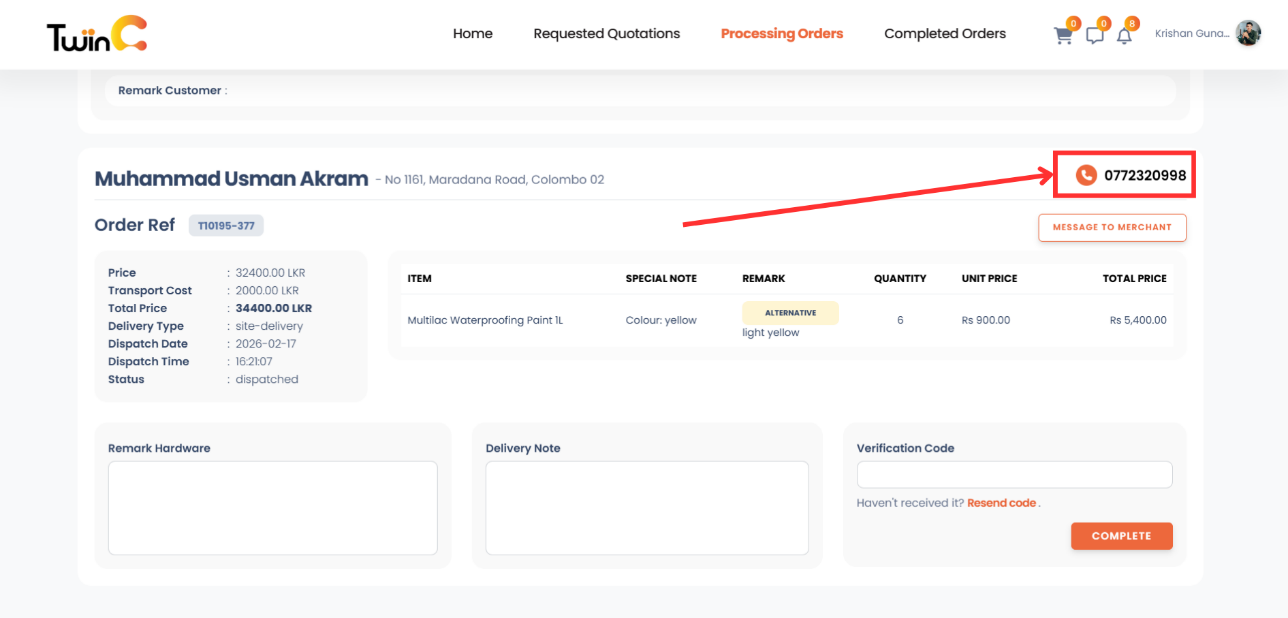
You can call the merchant through the Processing Orders and Completed Orders sections; this option becomes available after the admin approves the payment and remains accessible until the order is completed.
TwinBP Full Features List
-
User Access & Authentication
- Sign up with OTP verification
- Log In using registered credentials
- OTP resend option if not received
-
User Roles
- Customers can create inquiries, receive quotations, make payments, complete orders, and submit reviews.
- Merchants can receive inquiries, submit quotations, dispatch orders, track payments, and view reports.
-
Inquiry Management (Customer)
- Customers can search products, add them to the inquiry bucket, or create custom items.
- Submitted inquiries are sent to merchants and tracked in real time.
-
Quotation Management (Merchant)
- Merchants receive inquiries and submit quotations with pricing and delivery details.
-
Quotation Selection (Customer)
- Customers compare quotations and select the preferred one.
- A Proforma Invoice is generated after selection.
-
Payment Process
- Payments are made via bank transfer and confirmed through the app.
-
Purchased Order & Dispatch (Merchant)
- Merchants issue a purchase order and dispatch items after payment confirmation.
-
Order Completion (Customer OR Merchant)
- Orders can be completed by either party, sometimes using a completion password.
-
Download Quotation (Business Customers)
- Business customers can download their quotations from the Requested Quotations or the Archived section
-
Reviews & Ratings (Customer and Merchant)
- Both customers and merchants can submit reviews after order completion.
-
Reports Section (Merchant)
- Includes Sales, Product, Orders, Customers, and Payment reports.
- Reports can be downloaded in Excel format using CSV.
-
Finance Section (Merchant)
- Shows Pending and Released payments from TwinBP to merchants.
-
Notifications (Customer and Merchant)
- Users receive alerts for inquiries, quotations, payments, dispatch, and completion.
-
Support & Help (Customer and Merchant)
- Support is available via the Help Mascot or by emailing [email protected]
-
Security & Transparency
- OTP-based authentication, transaction tracking, and role-based access.
-
Benefits of TwinBP
- Transparent pricing, efficient order management, financial clarity, and centralized marketplace experience.