Mobile Merchant Support
Find answers to common questions and get help with your web experience.
-
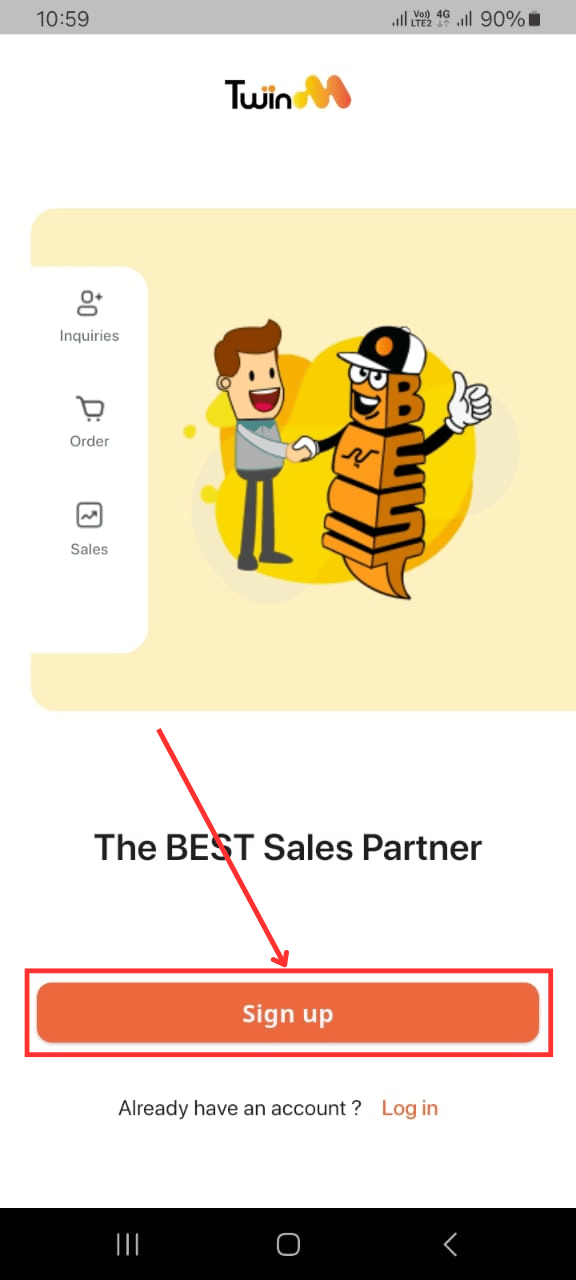
Click on the "Sign Up" button.
-
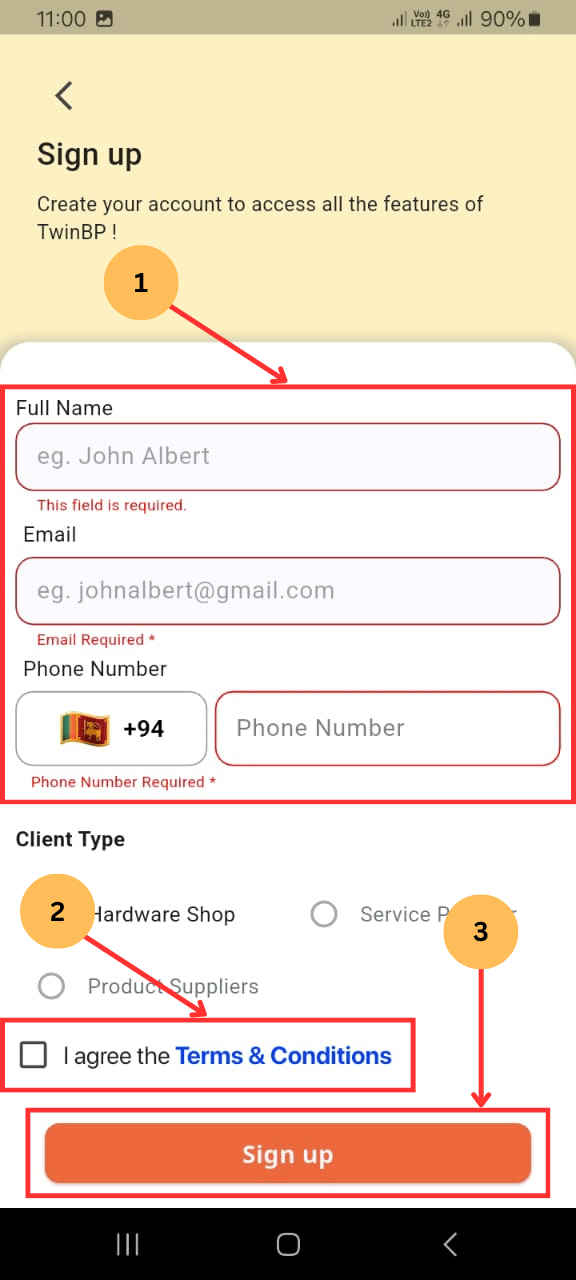
(1) Fill in the merchant’s name, email, and mobile number (Note: The client type is predetermined as "Hardware").
-
(2) Tick the checkbox to accept the "Terms & Conditions"
-
(3) Click on the "Sign Up" button.
-
(1) The OTP screen will appear. Enter the OTP sent to the phone number used during registration.
-
(2) Click "Verify", and the TwinBP Merchant account home screen will appear.

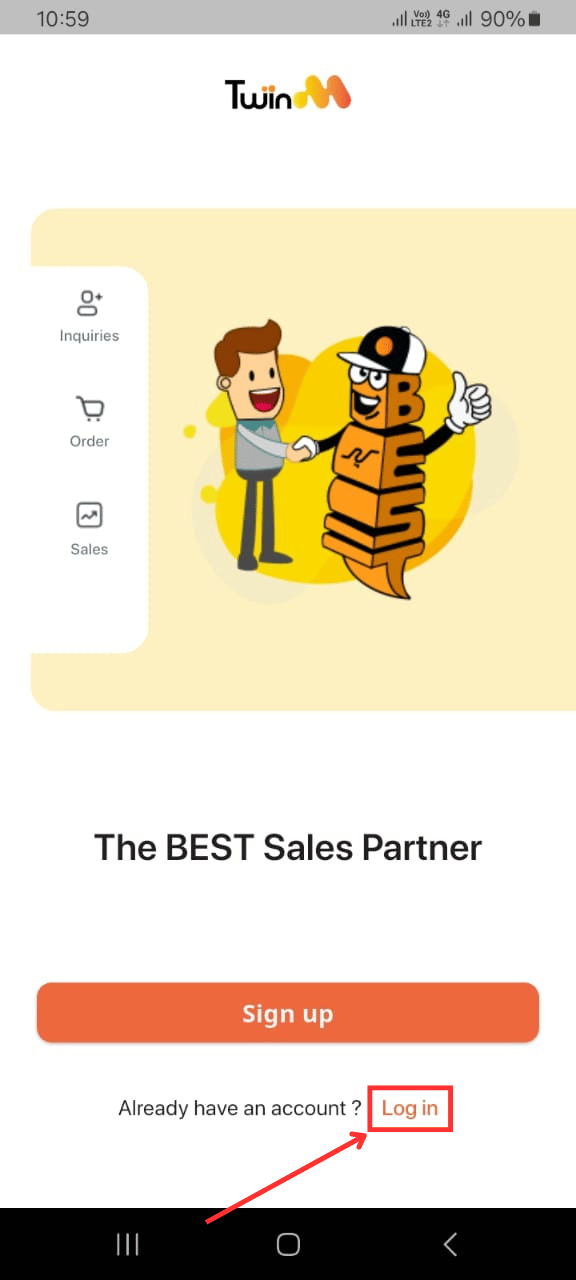
1. If you already have an account, click "Log In" to go to the login screen.
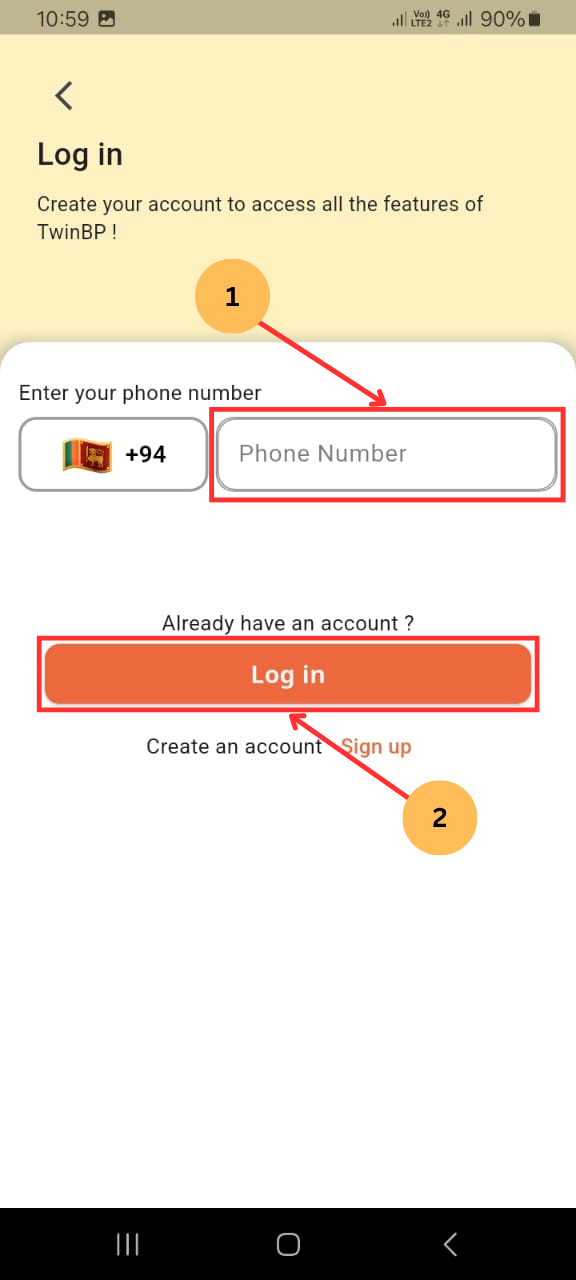
2. (1) Enter the phone number used during registration (9 digits, without the leading 0).
3. (2) Click on the "Log In" button.
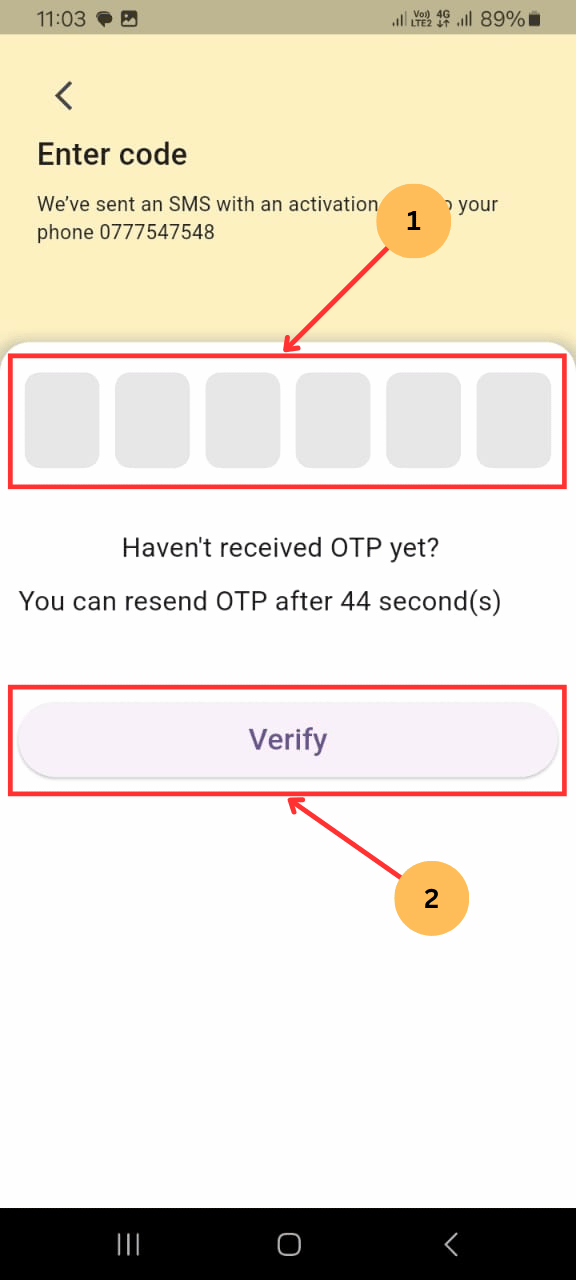
4. (1) The OTP screen will appear. Enter the OTP sent to your phone.
5. (2) Click "Verify", and your TwinBP Merchant account home screen will appear.
1. If you haven’t received the OTP, click "Resend OTP."
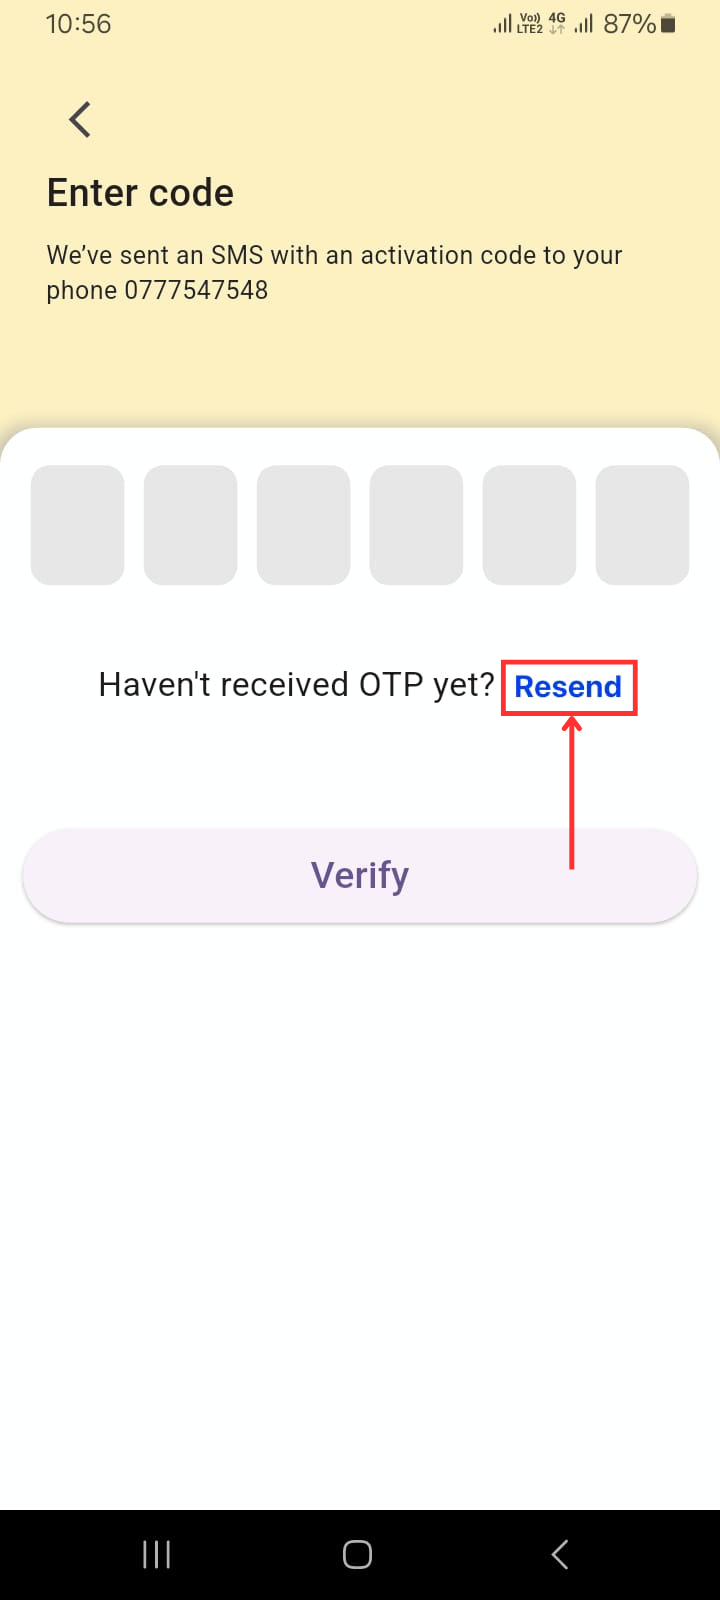
2. Enter the new OTP, then click "Verify", and your TwinBP Merchant account home screen will appear.
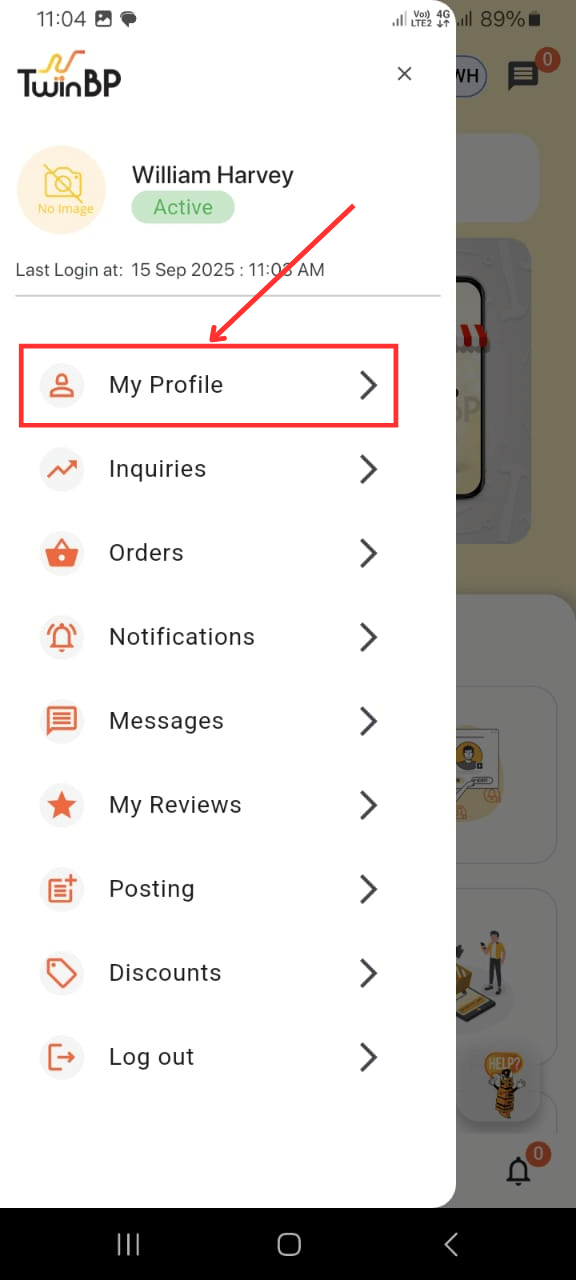
1. In your merchant account, click on the menu icon → then click on "My Profile." You will be able to see your customer profile information.
2. Add your profile picture by clicking the edit icon on the picture box at the top of the page.

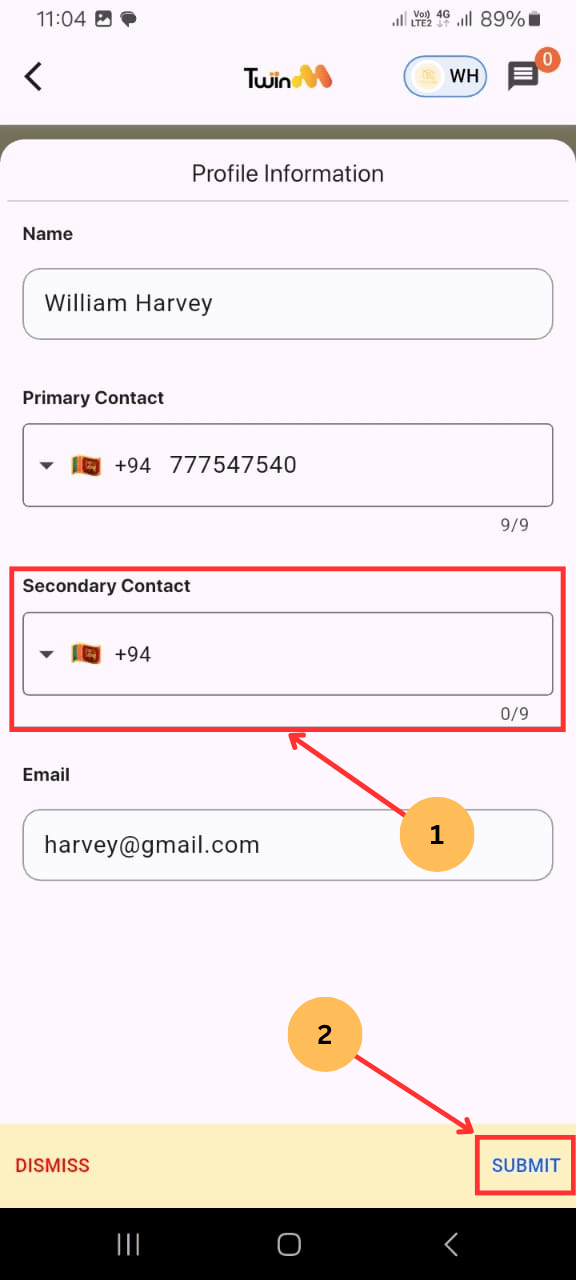
3. To add a secondary contact:
- Click the "Edit" button beside "Profile Information"
- (1) The Profile Information window will pop up.
- (2) Fill in the secondary contact and click "Submit"
- You will see the message: "Profile updated successfully."

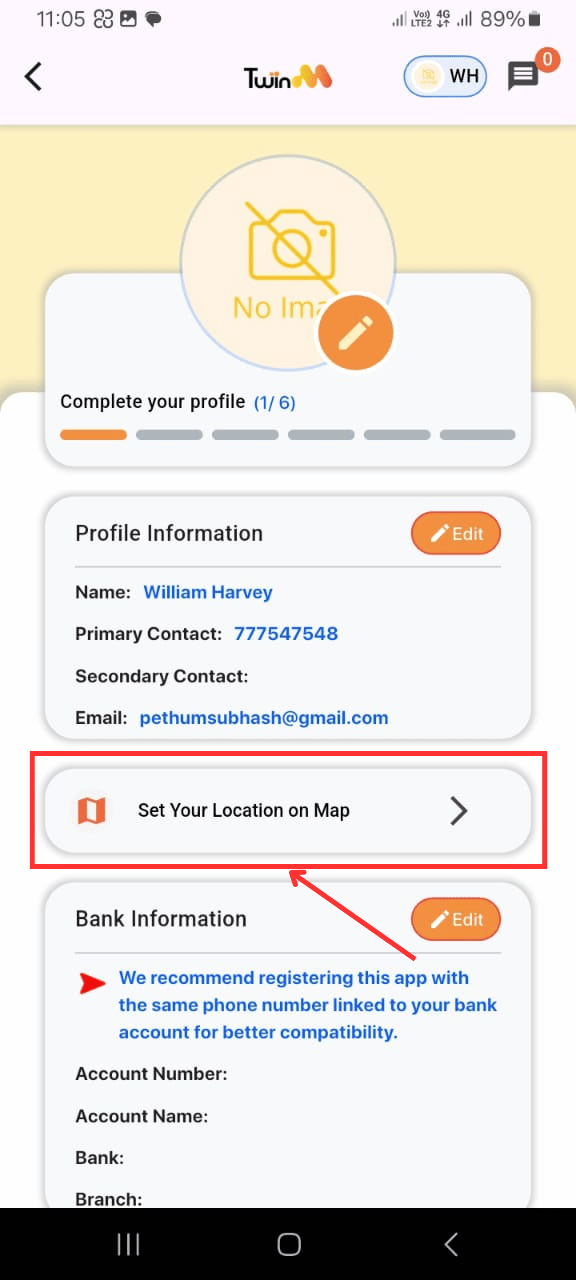
4. To set your location:
- Click on "Set your location on the map"
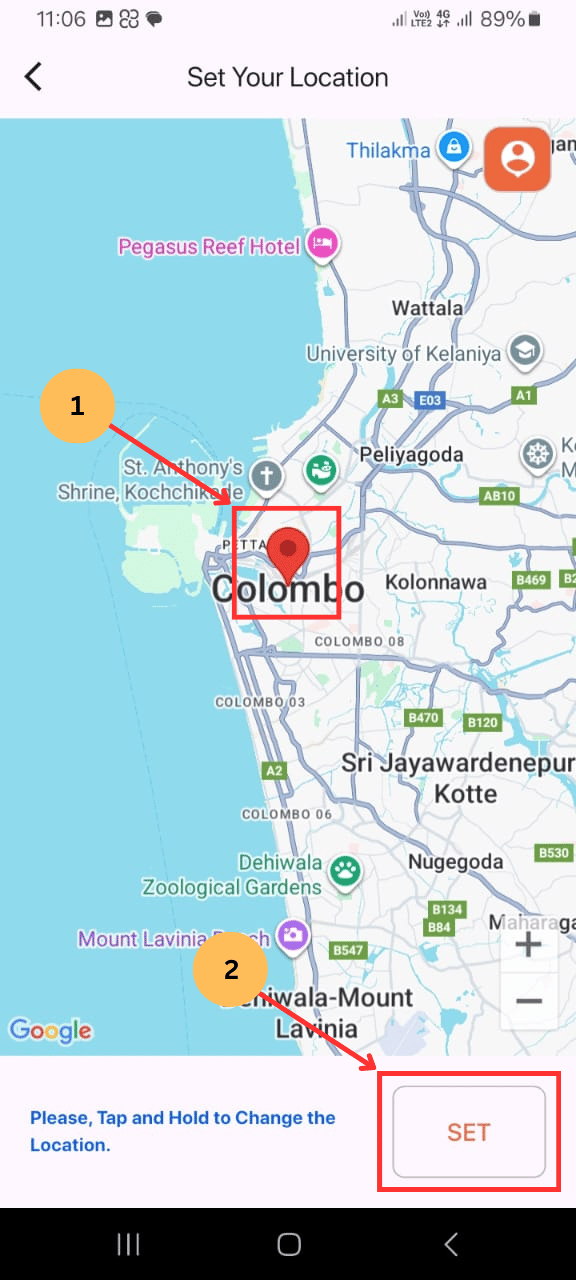
- (1) Select your business location by tapping on the exact place on the map.
- (2) Click "Set" to save.
- You will see the message: "Location Changed Lat_ _ _."
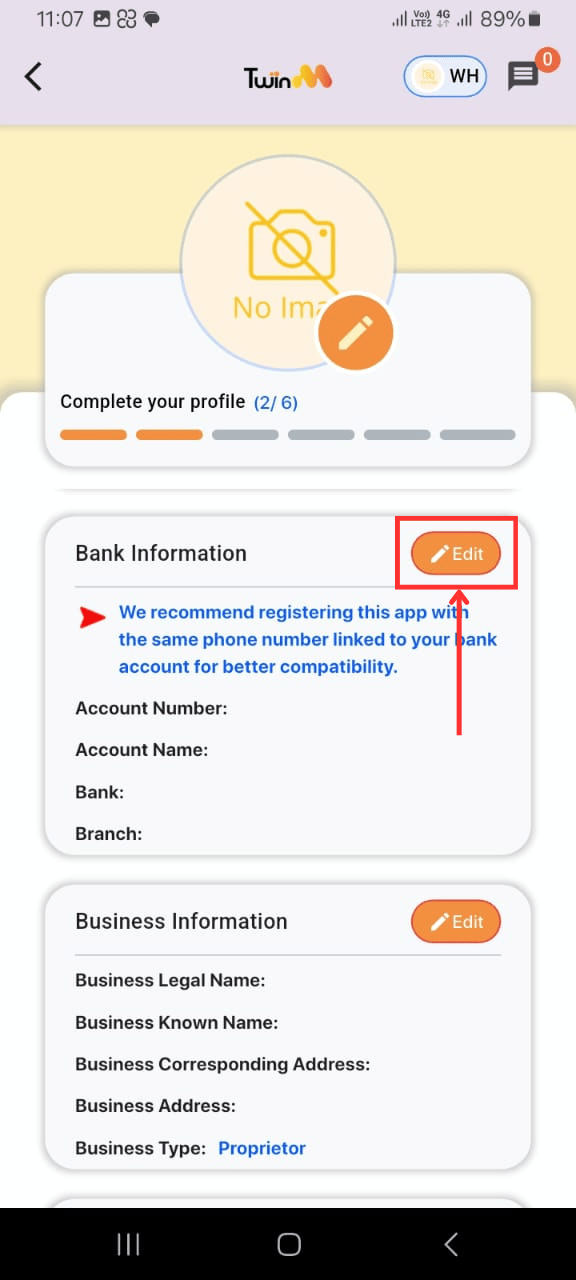
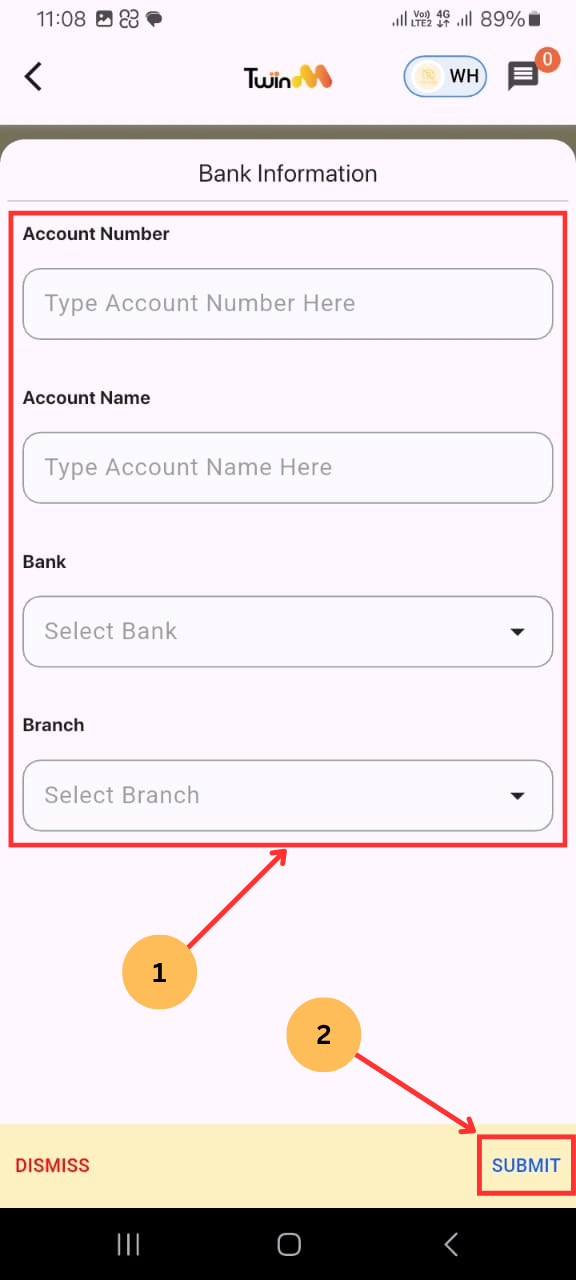
5. To add bank information:
- Click the "Edit" button beside "Bank Information"
- The bank Information pop-up will appear.
- (1) Fill in the account number, account name, bank name, and branch.
- (2) Click "Submit"
- You will see the message: "Profile updated successfully."
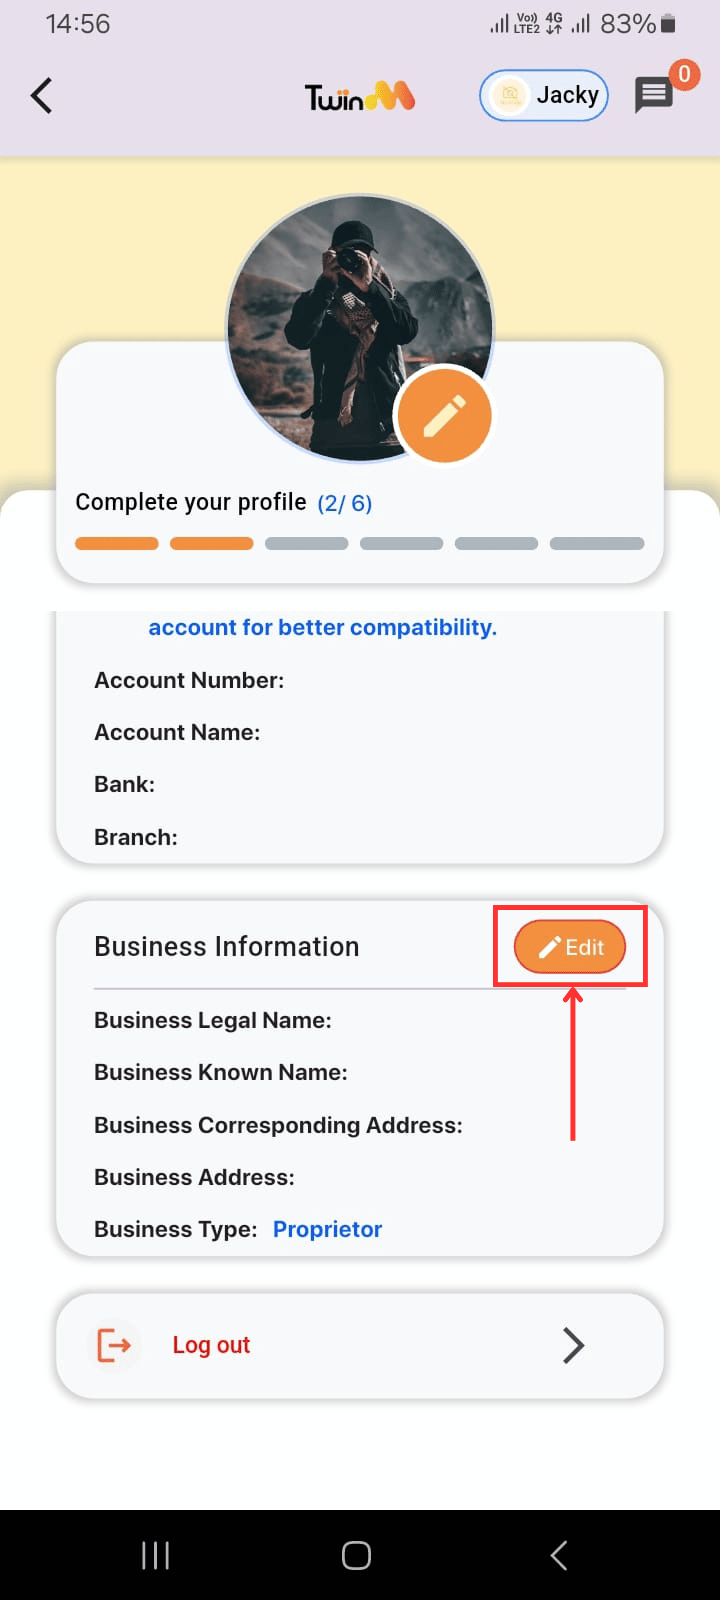
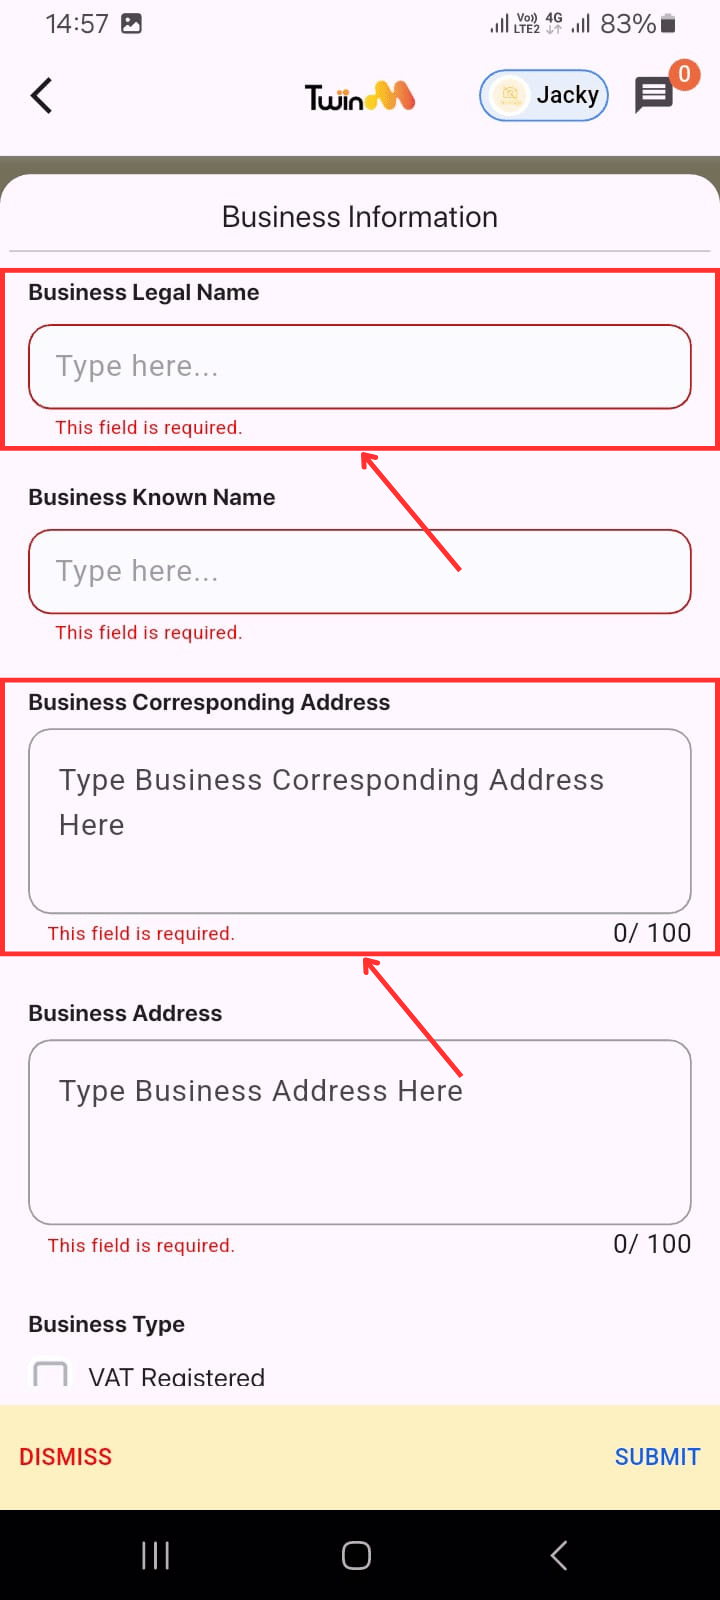
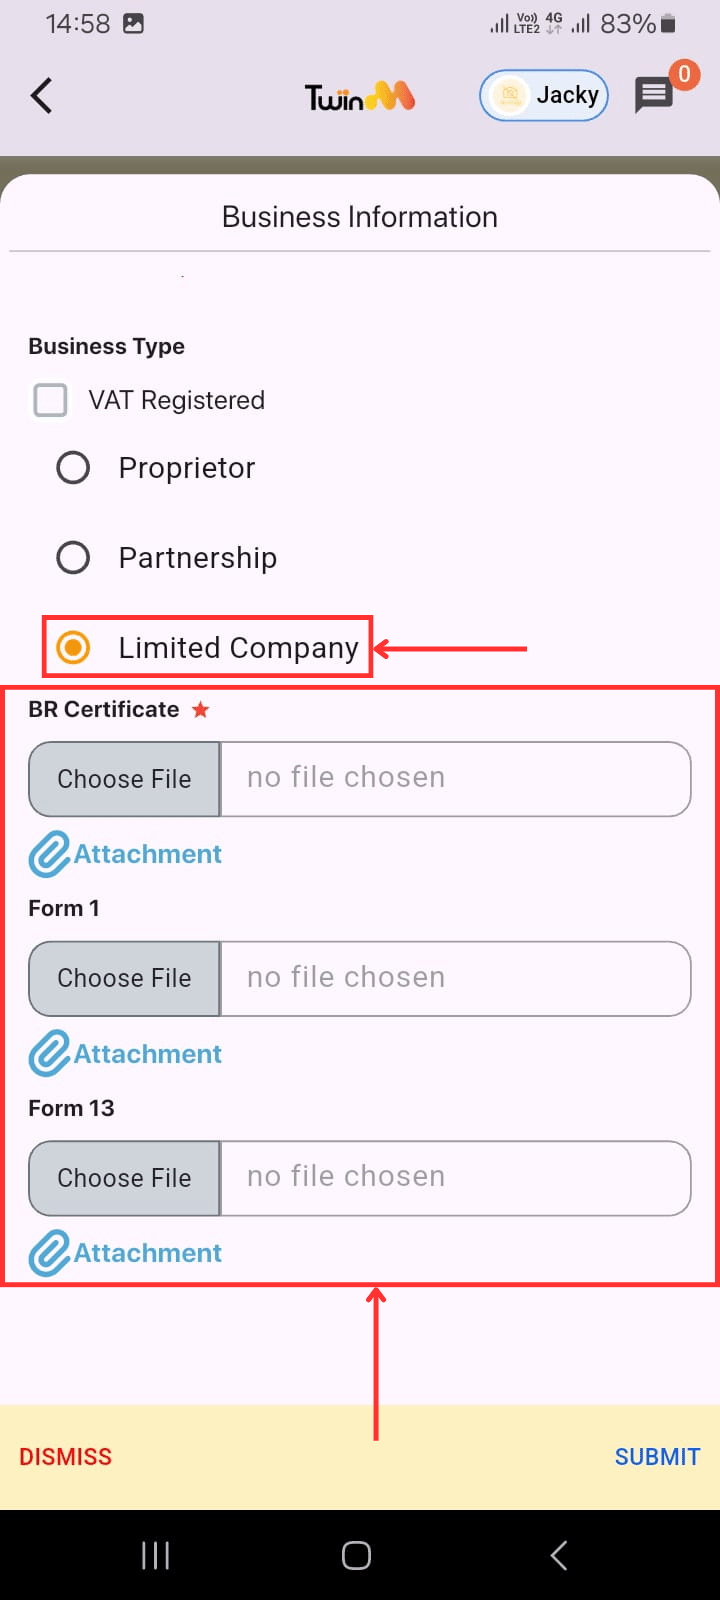
6. To add business information:
- Click the "Edit" button beside "Business Information".
- Fill in the Business Legal Name and Corresponding Address (as per registration documents).
- Fill in the Business Known Name (commonly used name) and current Business Address in the Business Address text box.
- If VAT-registered, tick the box and enter your VAT number (optional).
- Select the business type and attach the required documents:
- Proprietor → Attach BR Certificate
- Partnership → Attach BR Certificate
- Limited Company → Attach BR Certificate & (Form 1, Form 13 (optional))
- Click "Submit"
- You will see the message: "Profile updated successfully."
Note: Wait for admin approval before using your account. After approval, you will receive a text message stating, “Your TwinBP merchant account has been approved. You can now start using your account.”
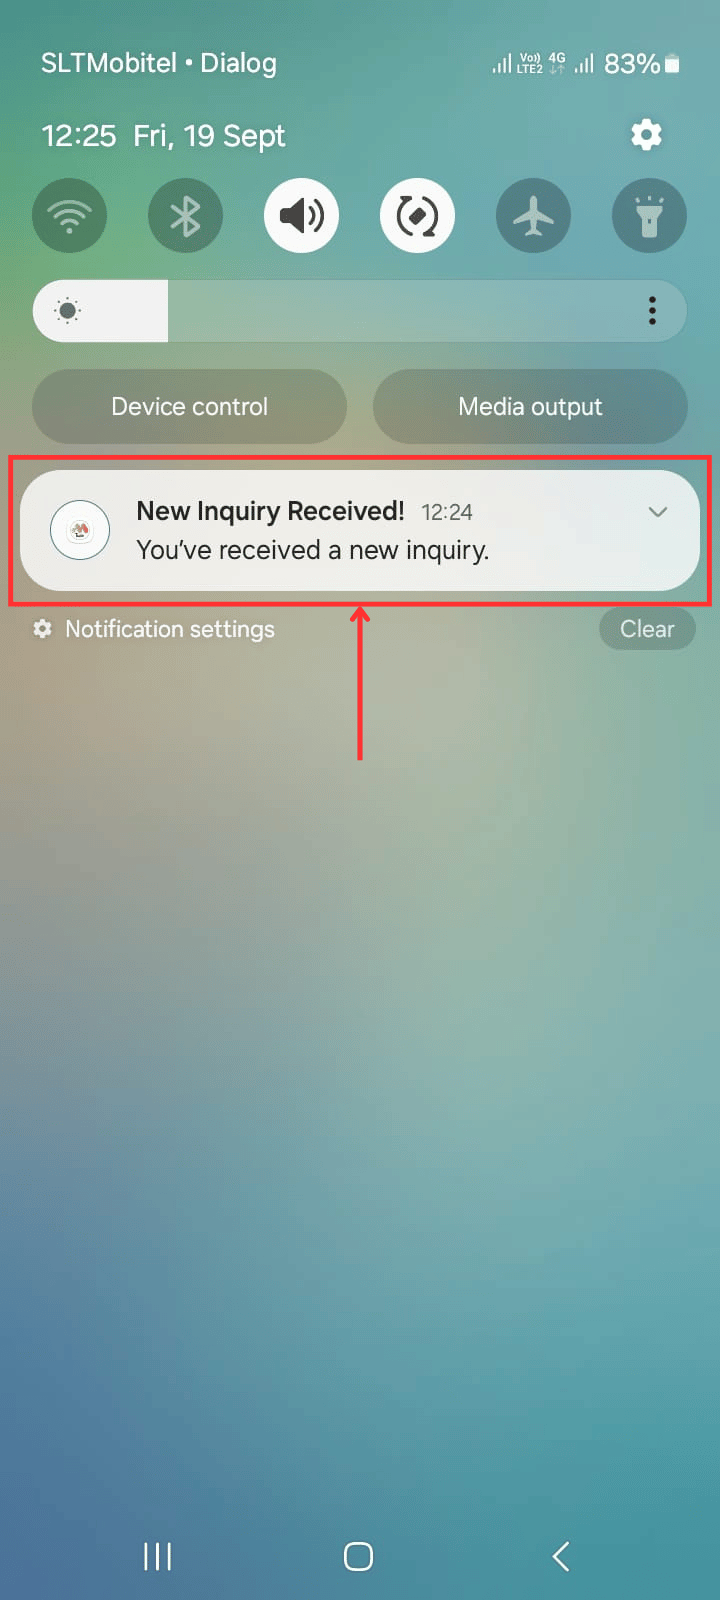
There are three ways to access inquiry notifications:
1. Tap the inquiry notification in your mobile notifications (this opens the "Notifications" tab).
- Click on the "Inquiry Created" notification
2. Log in to the TwinBP Merchant app.
- (1) Tap the notification bell icon in the bottom navigation bar (this opens the "Notifications" tab).
- (2) Click on the "Inquiry Created" notification.


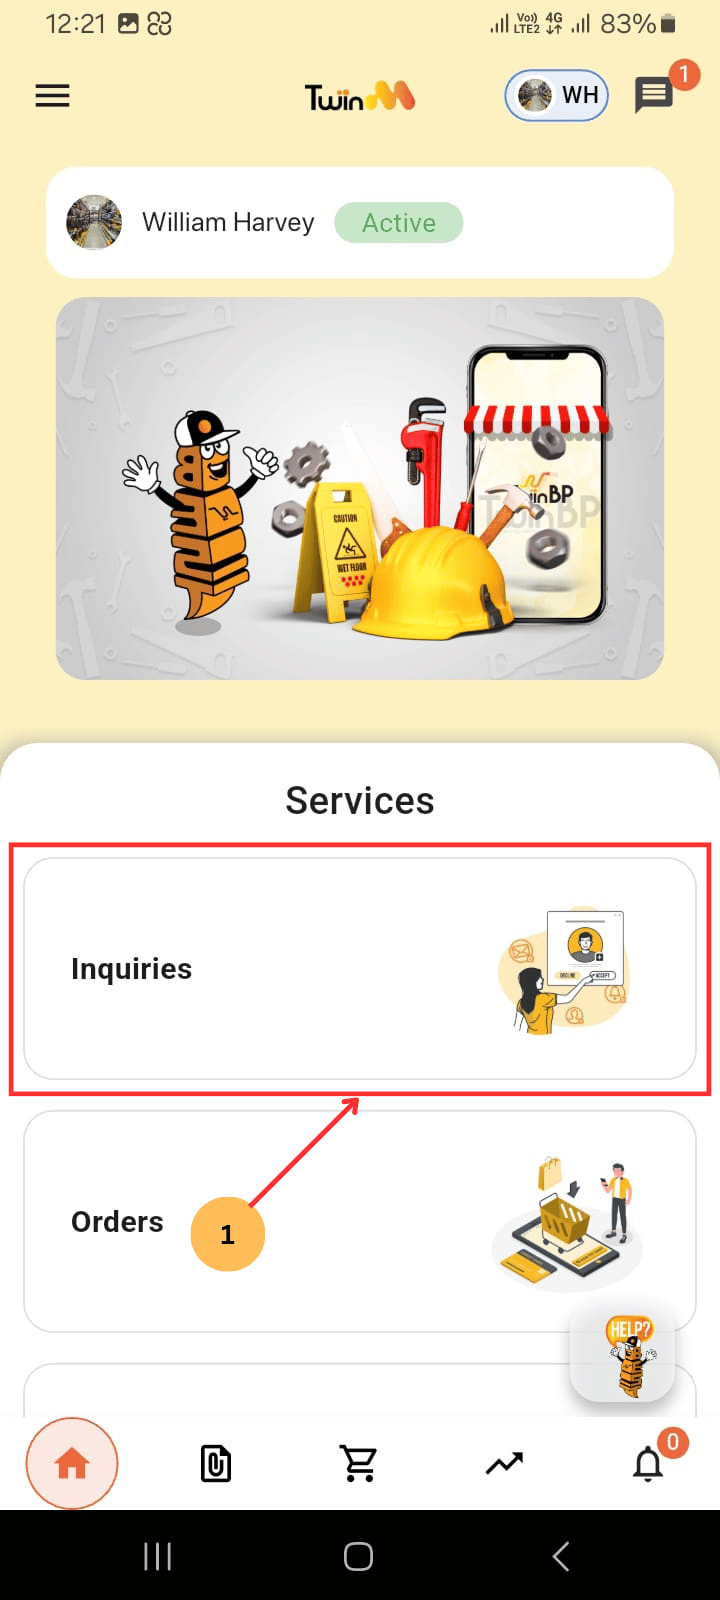
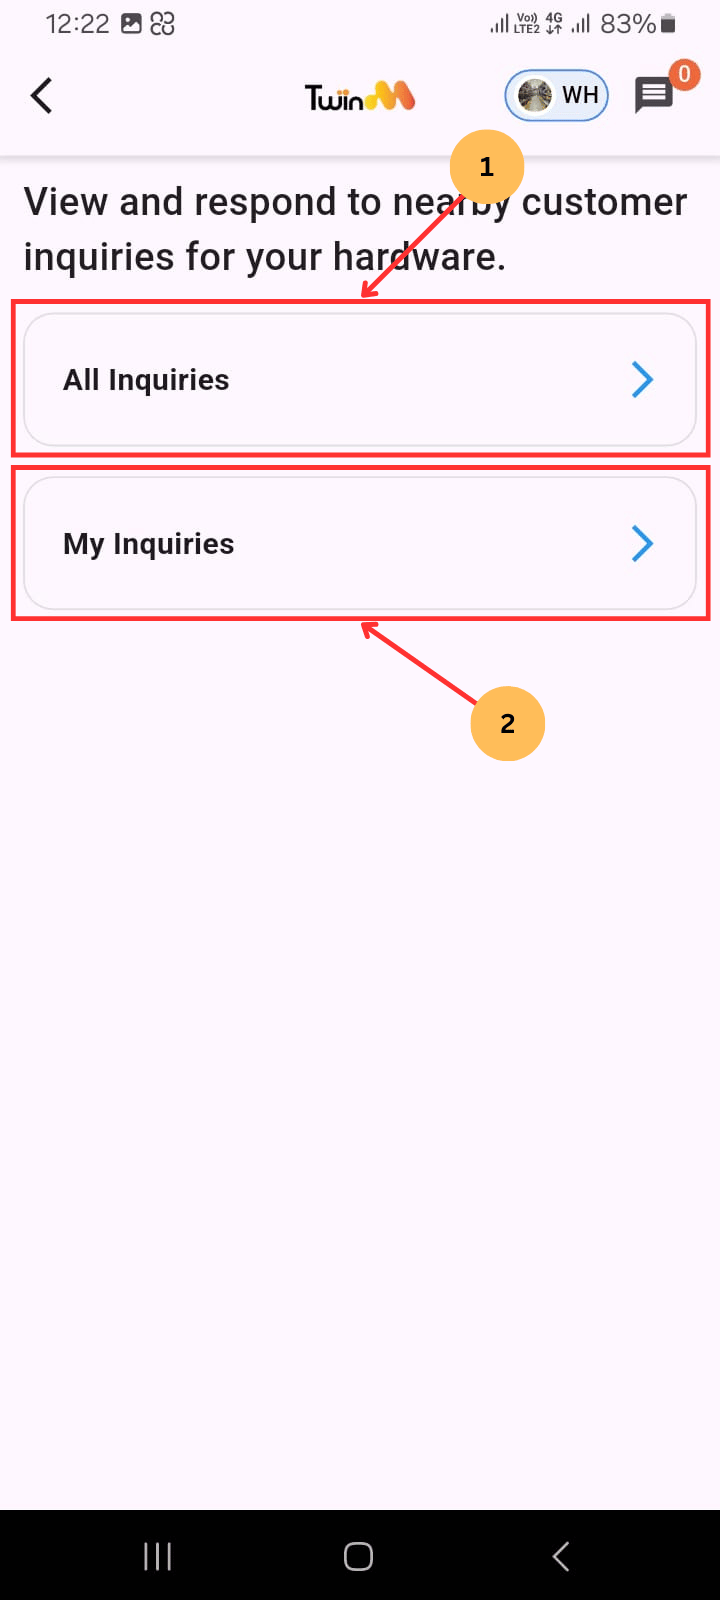
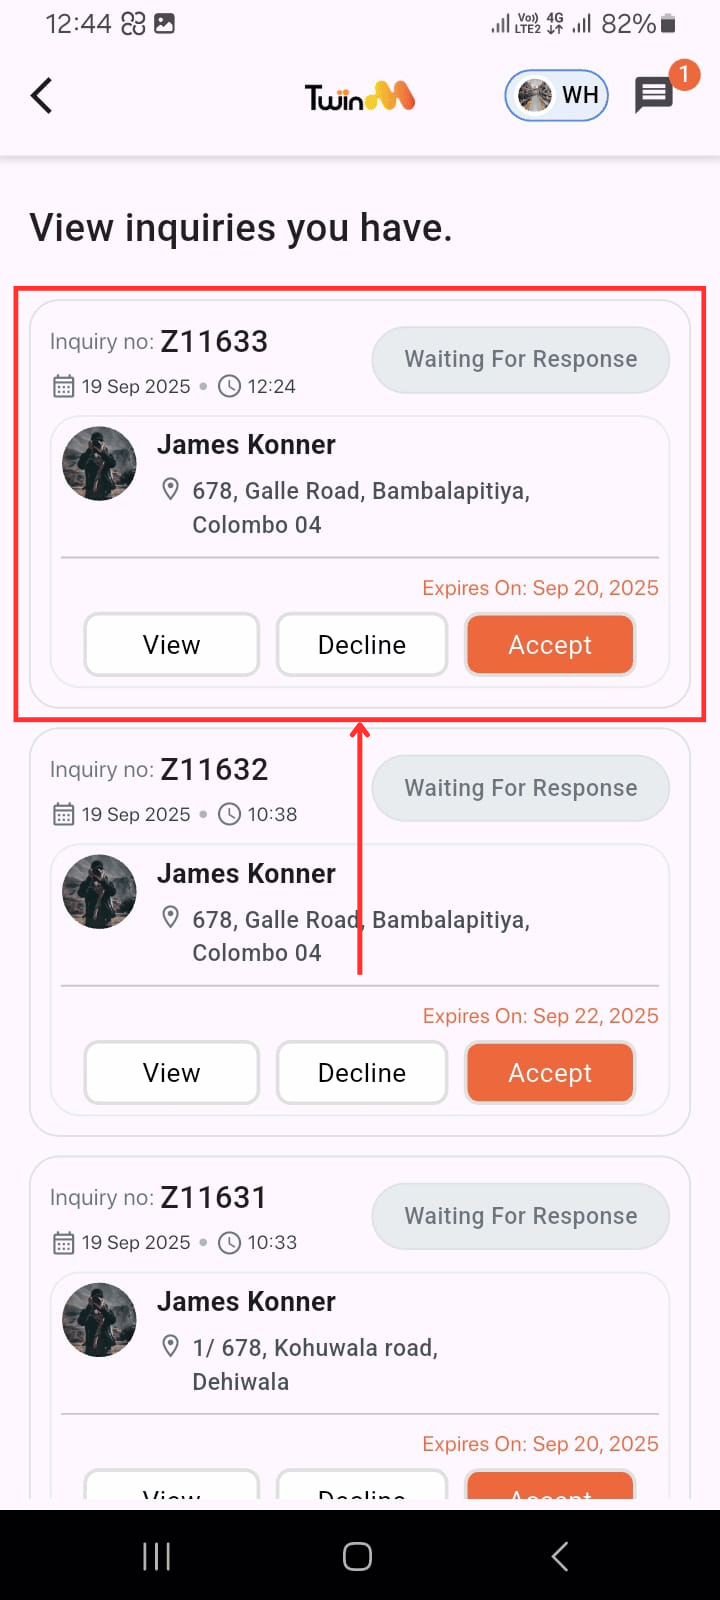
3. Log in to the TwinBP Merchant app.
- (1) Tap the "Inquiries" tab
- Choose:
- (2) All Inquiries – all customer inquiries across the island (transport costs may be higher).
- (3) My Inquiries – inquiries tailored to you (based on transport, preferences, and location).
- Tap "View" on an inquiry labeled "Waiting for Response."
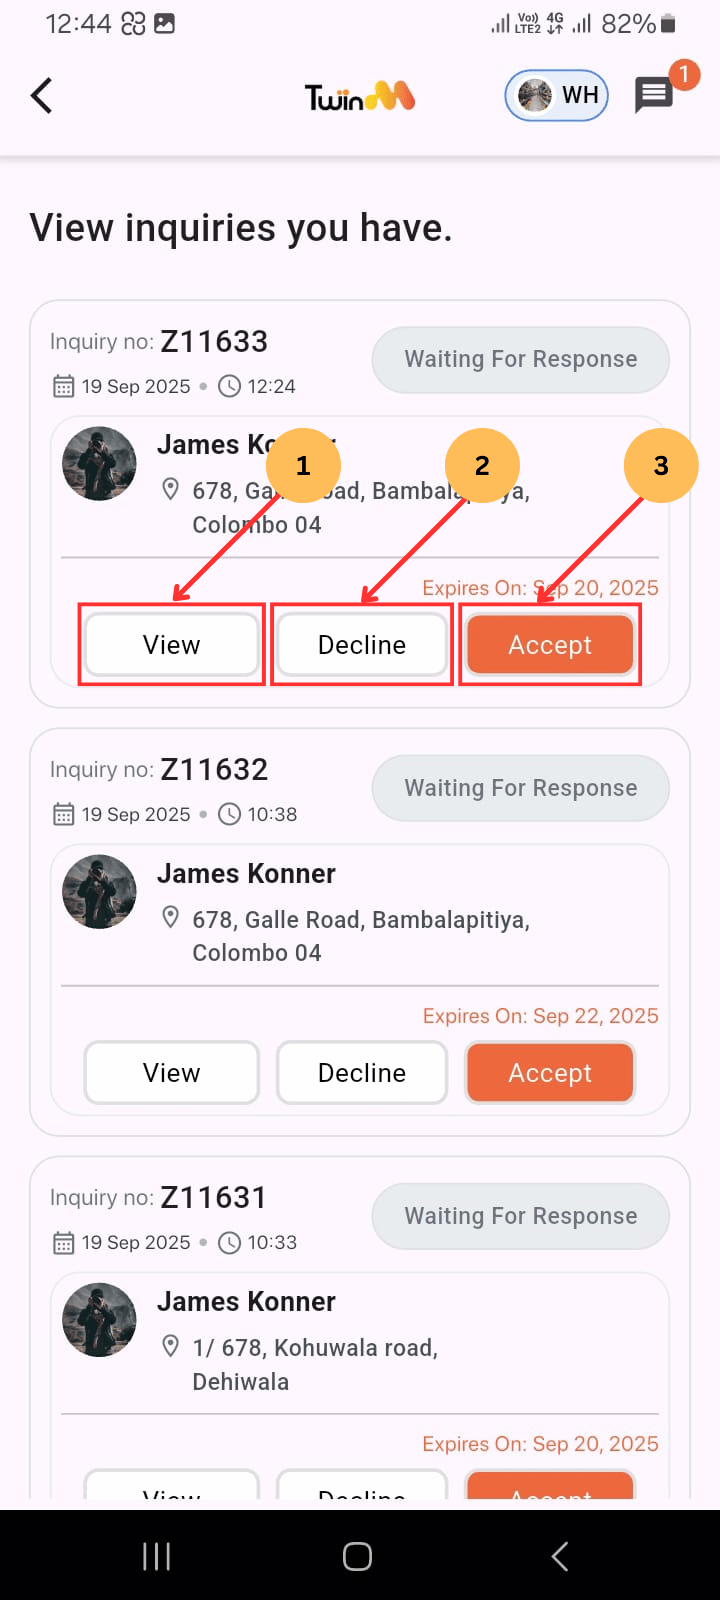
4. Making the quotation:
- (1) First, view the product details.
- (2) If you don’t wish to quote, tap "Decline."
- (3) If you wish to quote, tap "Accept."
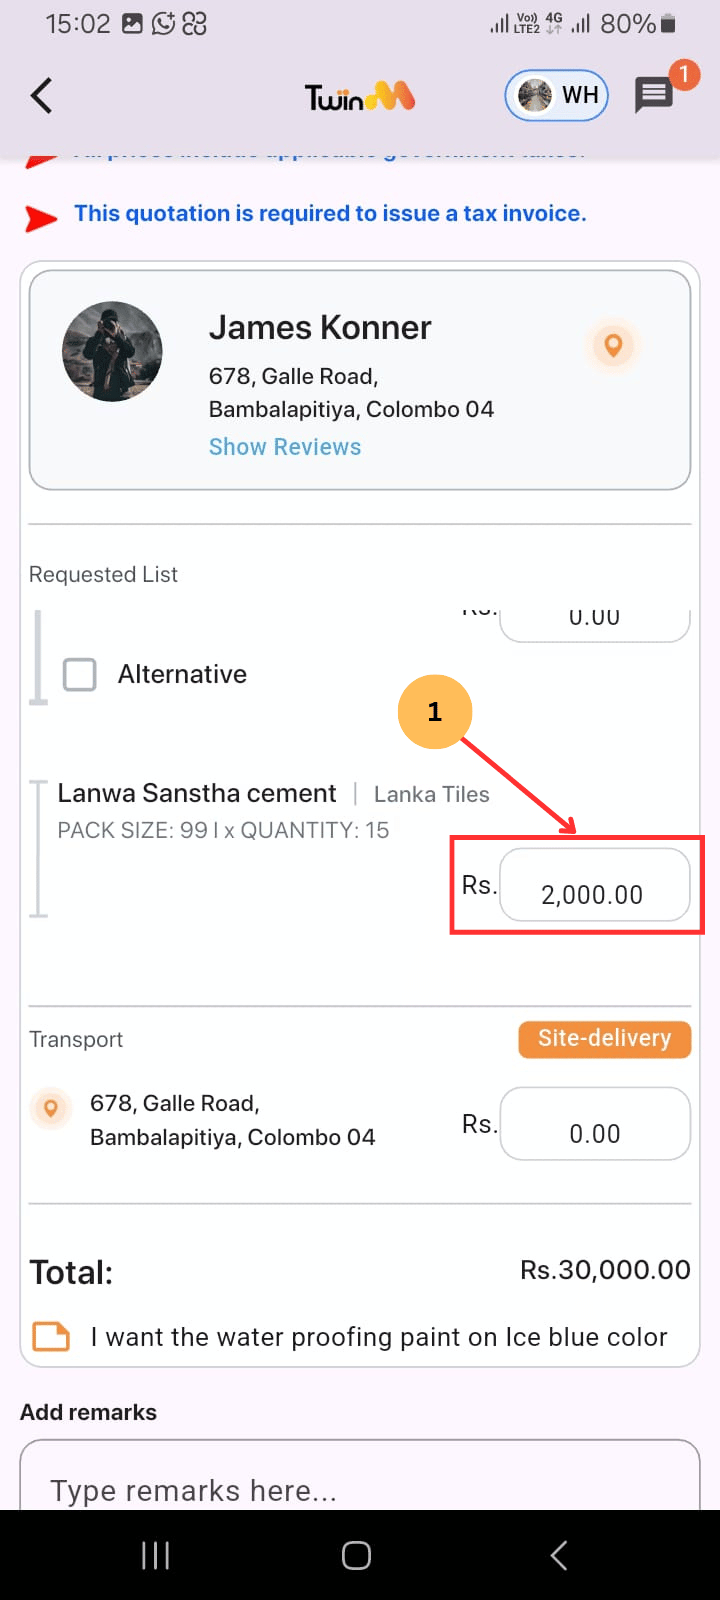
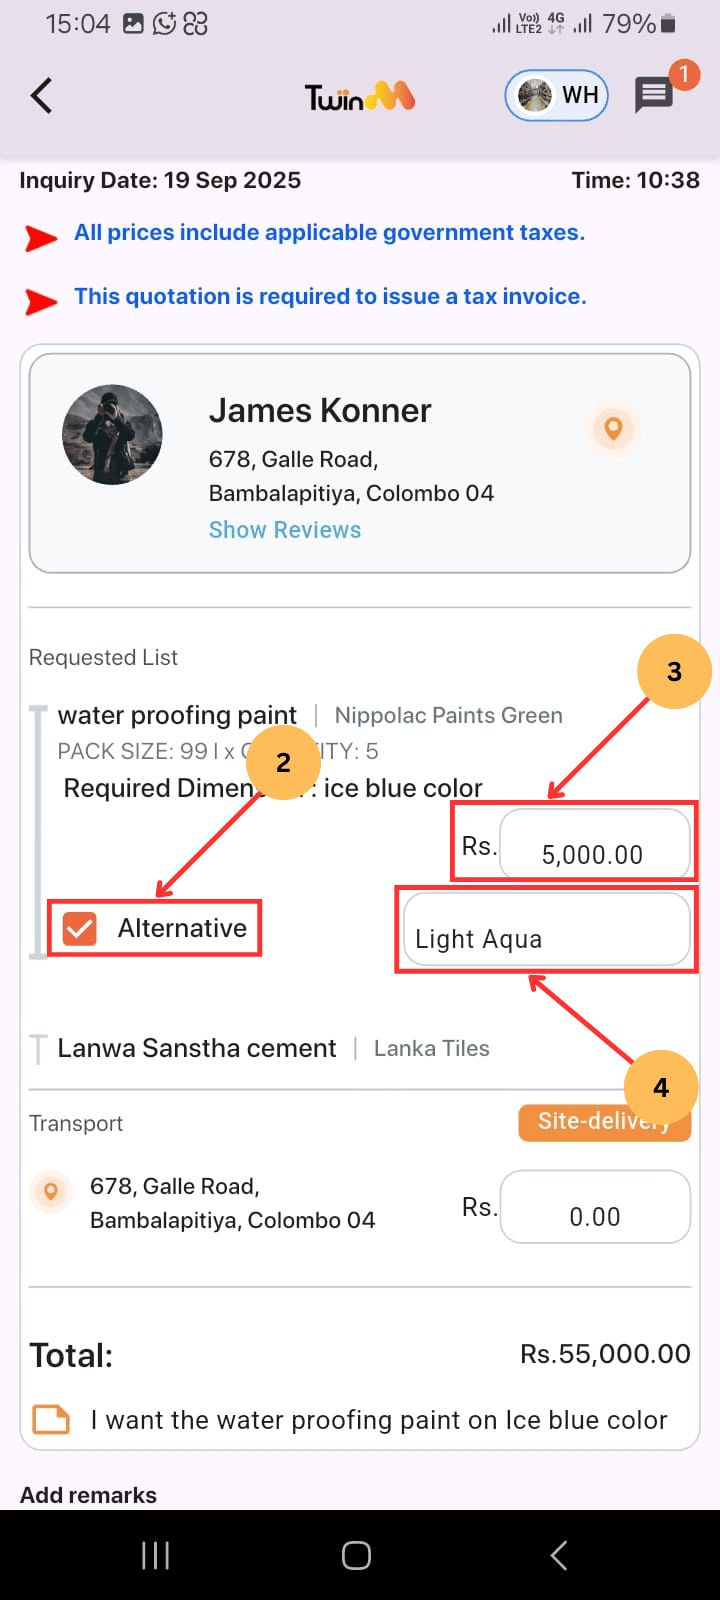
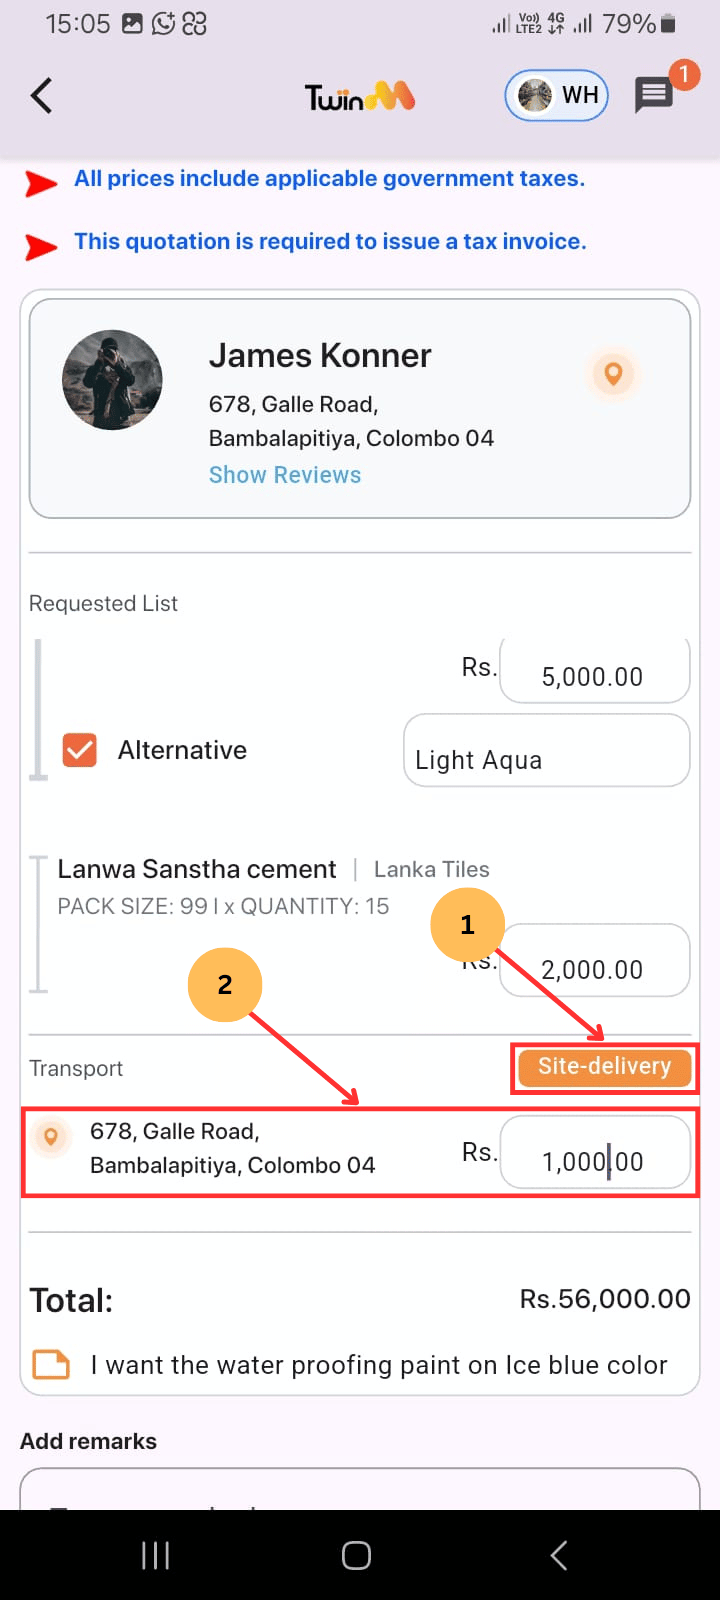
- (1) After accepting, enter the price for each product.
- If you don’t have the product the customer asked for but have an alternative product (e.g., customer requests sea blue emulsion paint but you have cobalt blue), (2) tick the “Alternative” check box. → (4)n Provide its name as a remark (remark: Like a new color you can provide) → (3) Provide its price as the alternative’s price.
- Do not quote for products you don’t have; simply leave them blank. On the customer side, they will appear as “Out of Stock” products.
- If delivery is required, (1) it will show as “Site Delivery,” and (2) you can view the transport location to add the transport cost.
- If it’s a “Self-pick up” no need for delivery cost.
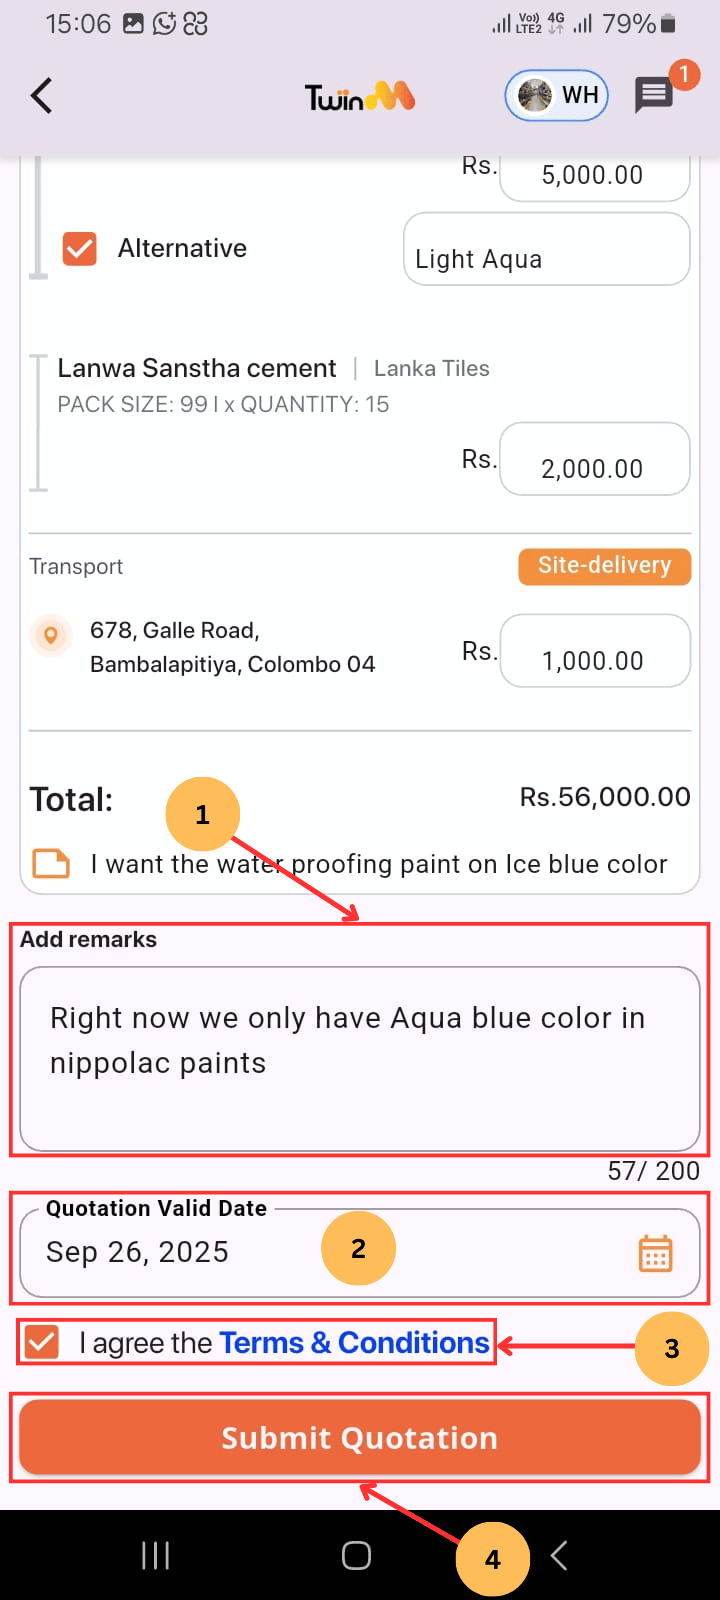
- (1) Add a remark and (2) set a quotation validity date.
- (3) Tick the checkbox to agree to Terms & Conditions
- (4) Click "Submit Quotation."
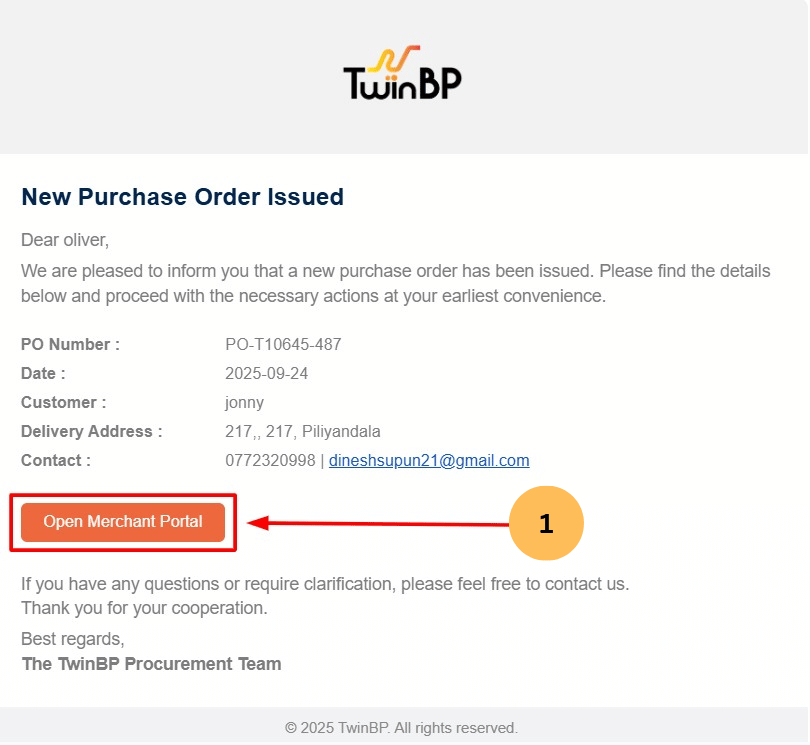
You will receive:
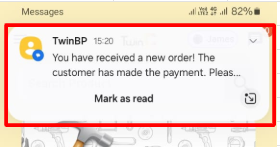
- A text message: "You have received an Order! The customer has made the payment. Please process from your side!"
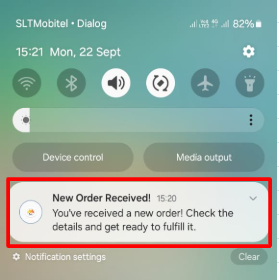
- A merchant app notification: "New Order Received!"
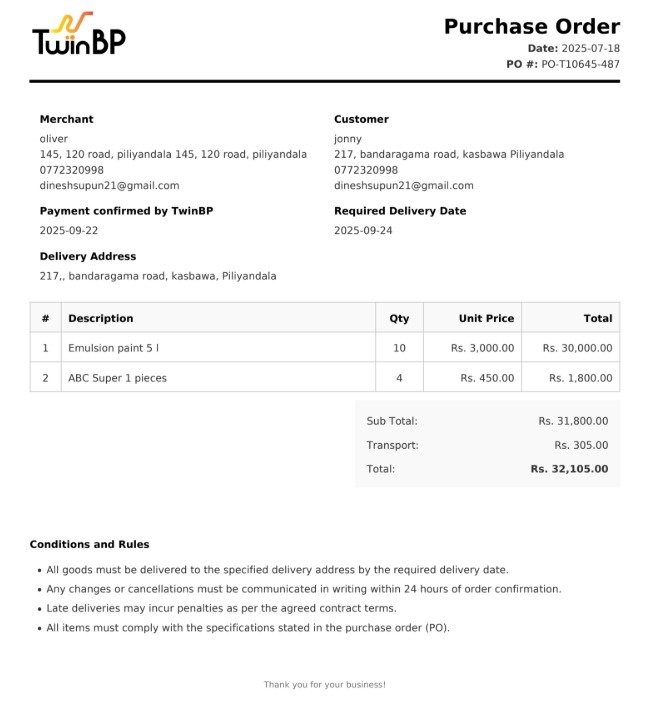
- A ‘Purchase Order’ sheet will be attached to the email, and within the email, (1) you can dispatch your order by clicking ‘Open Merchant Portal.
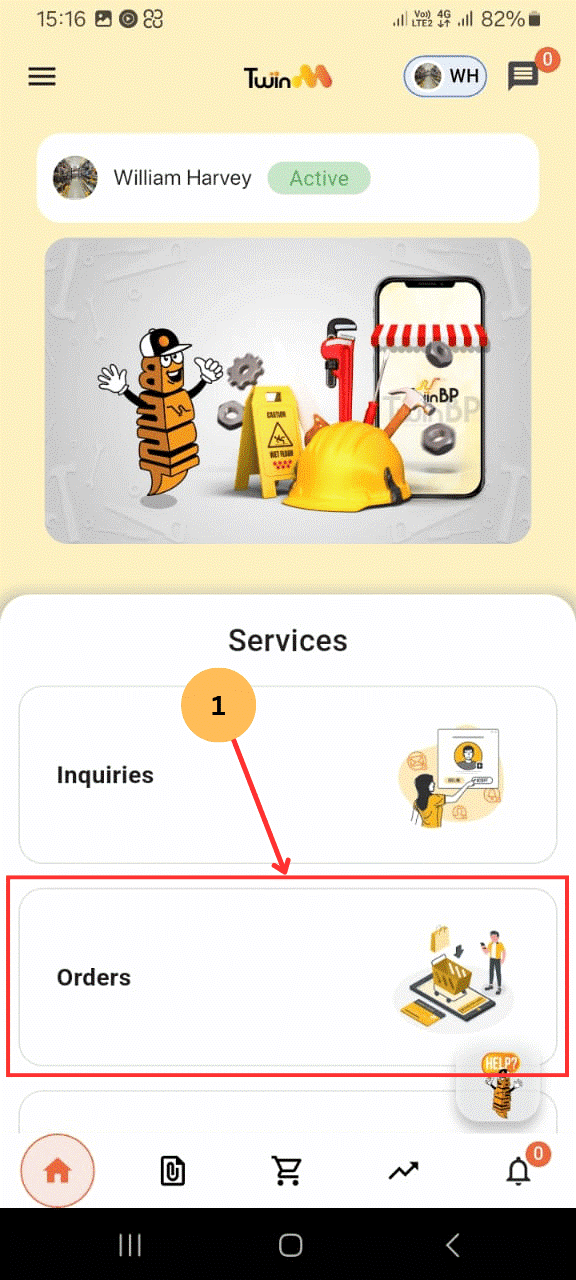
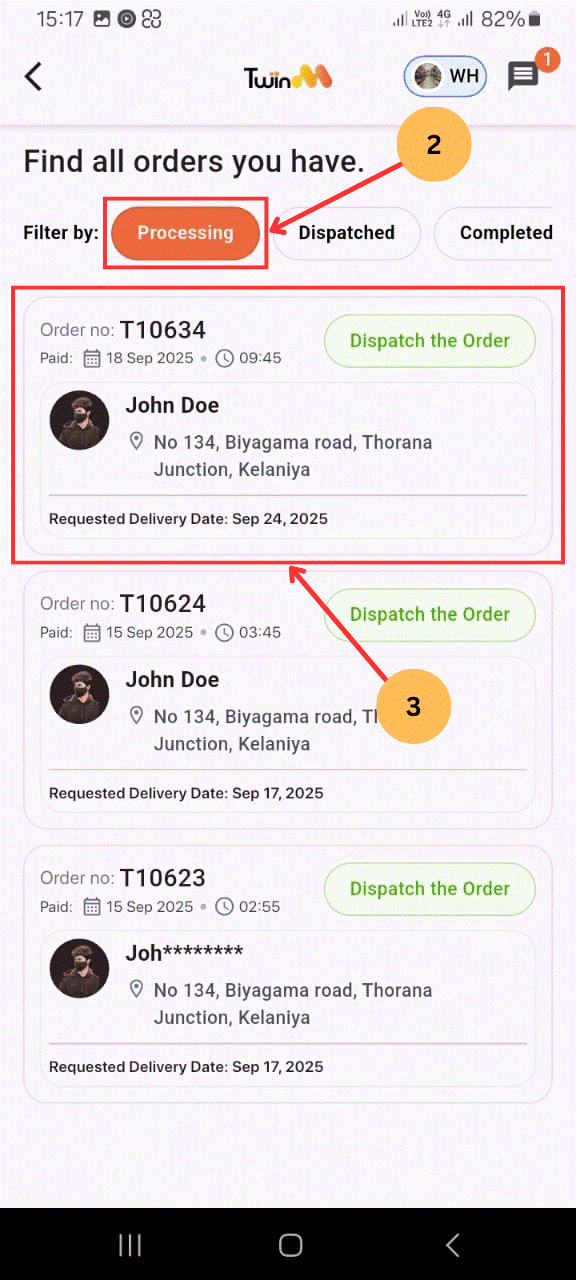
To proceed with the order:
- Tap the mobile notification (this opens the Notifications tab).
- Click on the "Order Created" notification. OR
- (1) Go to the "Orders" tab.
- (2) Select "Processing" under Filter By.
- (3) Tap on the order you want to dispatch.
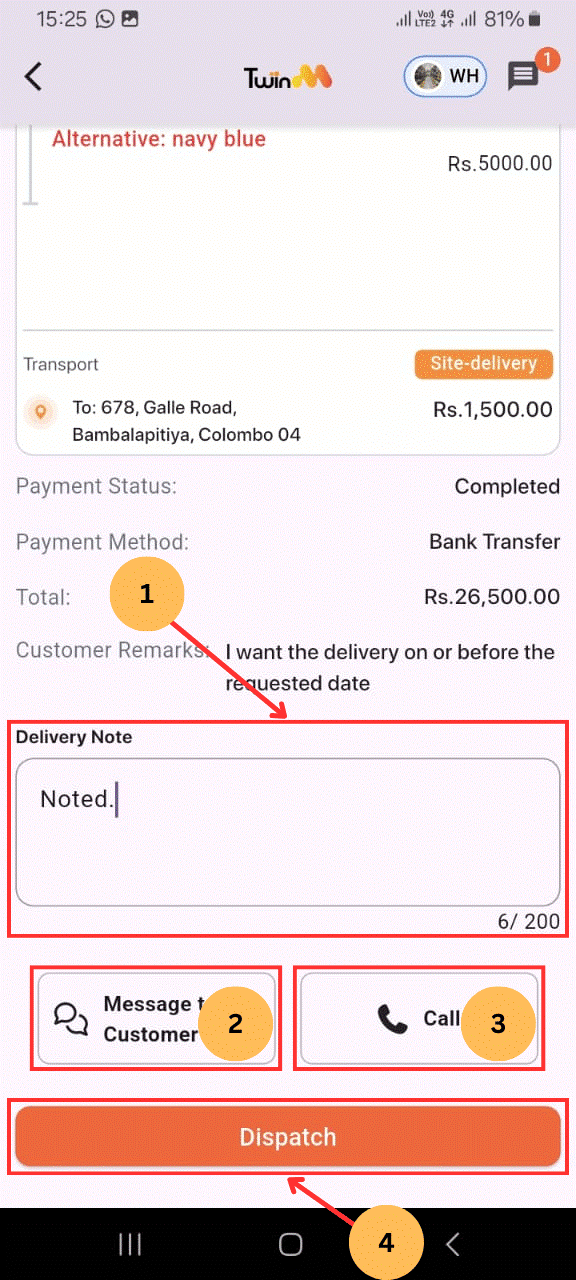
On the order page:
- (1) Add hardware remarks if needed.
- To contact the customer:
- (2) Tap "Message to Customer" to chat.
- (3) Or tap "Call" to phone them.
- (4) Click "Dispatch", then confirm "Yes".
Delivery methods:
- Site Delivery → Deliver to the transport section address on or before the due date.
- Self-Pickup → Wait for the customer to collect the goods.
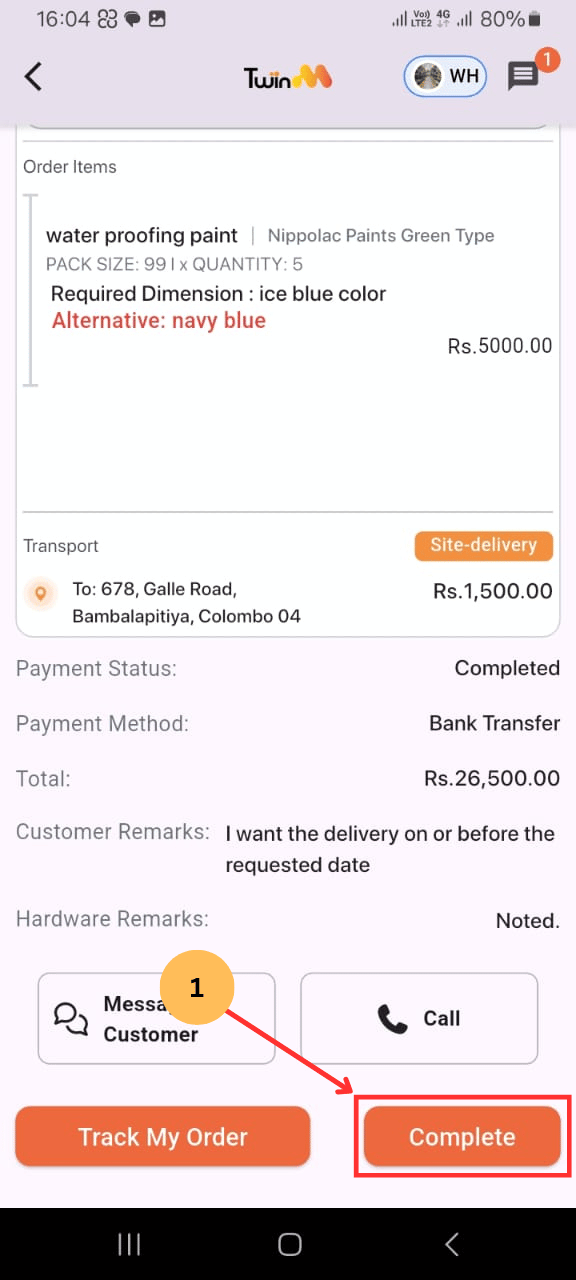
Orders can be completed by either the customer or the merchant.
- Go to the "Orders" tab.
- Select "Dispatched" under Filter By
- Tap the order you want to complete.
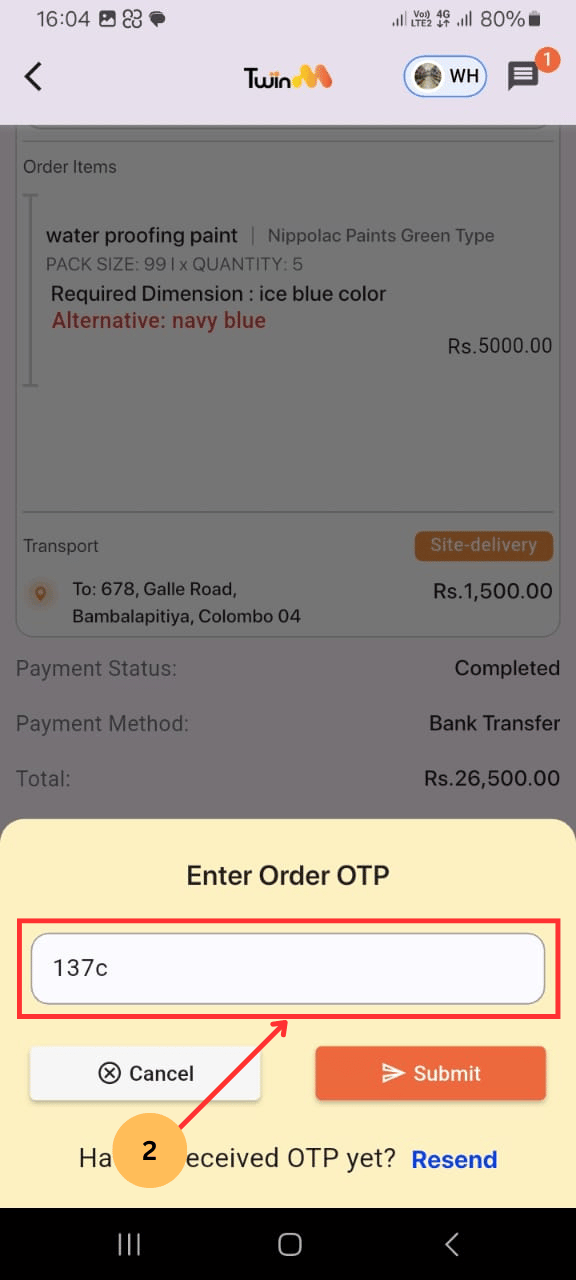
- (1) Click "Complete."
- Get the order completion password from the customer (it is sent to the customer’s registered mobile).
- (2) Enter the password and click "Submit."
- Alternatively, the customer can complete the order from their side.
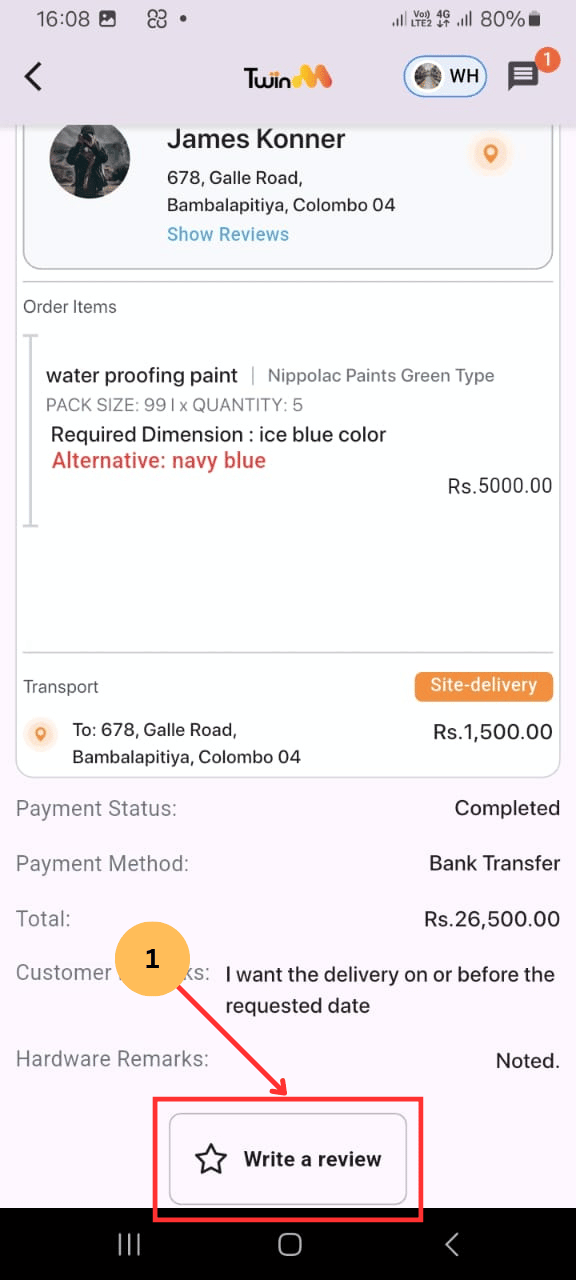
- Go to the "Orders" tab.
- Select "Completed" under Filter By.
- Tap the order you want to review.
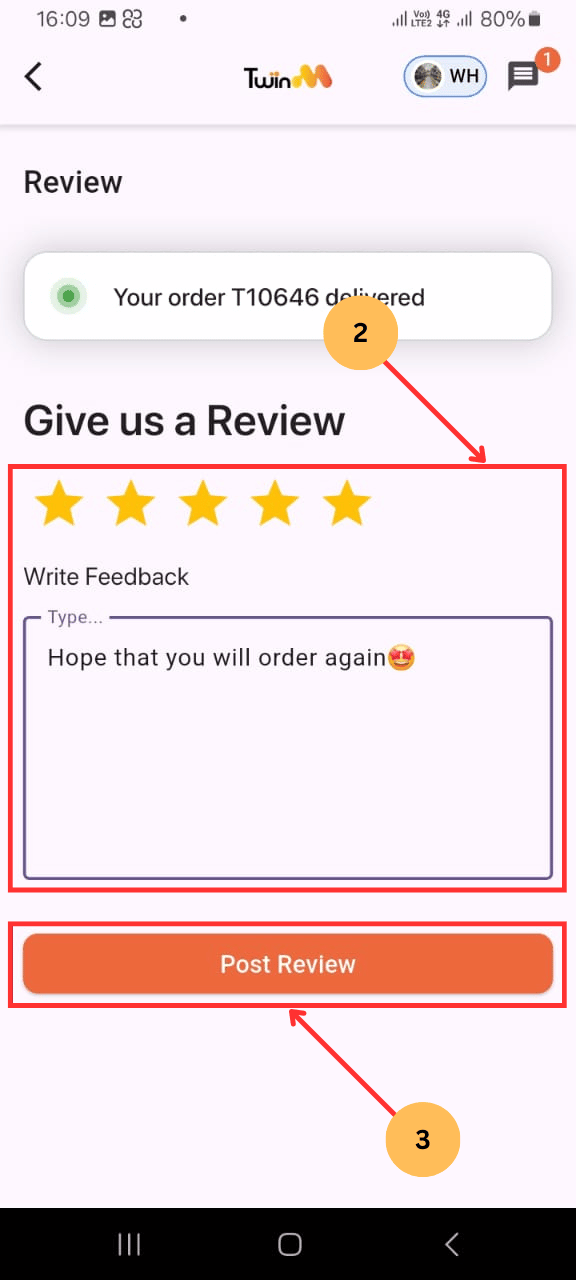
- (1) Click "Write a Review" and enter your feedback.
- (2) Write a review and (3) Tap "Post a Review."